This article may contain affiliate links. If you buy some products using those links, I may receive monetary benefits. See affiliate disclosure here
Earlier, I had published a list comparing the best caching plugins for WordPress. In that post, I had also included a performance test result. If you check it, you can see that W3 Total Cache (a.k.a W3TC) is the plugin that topped the table.
See also: Top Caching Plugins for WordPress
Not just in speed, W3TC is ahead of others in terms of features too. With that amount of functionalities available for free, W3TC almost nullifies the need for a premium caching plugin.
But, do you feel overwhelmed by the sheer number of settings available in W3TC? Then you are not alone.
In this post, we will take a look at each of the settings one by one, and I will explain when and how to use them. After that, you'll feel confident setting up the plugin on your site.
If you currently use WP Super Cache or WP Fastest Cache for their ease-of-use, you can move to W3TC and harness its full powers.
Run a Compatibility Check
After installing W3 Total Cache, you can run a compatibility check to see what all features your host supports.
For example, your server should support the Apache mod_rewrite module for Disk caching to work. Otherwise, the plugin won't be able to edit the Htaccess file.
But the results are not always accurate. It showed that my server didn't support mod_rewrite when actually it did. On further investigation, I found that W3TC may not be able to detect certain features if php_mod is not available (disabled for security reasons).
So, the compatibility test is only to give you an idea; don't give much attention to its results.
General Settings (for Shared Hosting)
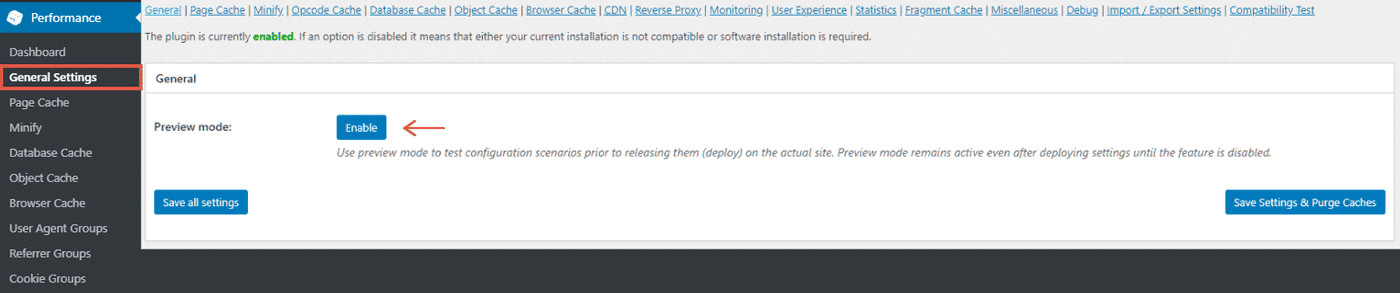
Preview Mode
The preview mode comes handy when you want to test changes before deploying it.
It allows you to make sure nothing breaks on your live site.
Once you've deployed the changes, the preview mode will be turned off automatically.
Enabling Page Cache
As with any other caching plugins, the main thing to do is to enable caching. So, check the box against Page Cache.

Next, you have to select a caching method. W3TC supports nine different types of caching. If you are on shared hosting, you need to think about only two:
- Disk: Basic
- Disk: Enhanced
Out of these, Disk: Enhanced gives better performance. It works by adding rewrite rules to the Htaccess file and serving static Html files from the Disk. So, it prevents all PHP execution, making the site extremely fast.
So, for most web hosts, Disk: Enhanced is the recommended option, and it gives the best results. Disk: Basic, on the other hand, still involves calling a PHP script, and hence slower.
The other methods are advanced, and most shared hosts don't support them. But if you are on a VPS, cloud, or dedicated server, you can try any of the following PHP Opcode caching mechanisms:
- Alternative PHP Caching (APC)
- eAccelerator
- XCache
- WinCache
In addition to these, if you have load-balanced servers or a server cluster, Memcached or Redis can be the best. It helps to share the cache between multiple servers. For more information, here is an article from KeyCDN explaining how Memcached works.
In short, advanced caching mechanisms like Memcached stores compiled PHP in the memory, thereby reducing the load on the server and increasing speed.
Overall, Disk: Enhanced is the recommended method, which should work well on all servers.
HTML, CSS, & JS Minification
Minification helps to compress the size of your HTML, CSS, & JS files. It can also combine multiple files, which can reduce the number of HTTP requests.
Set the mode to Auto, to minify all CSS and JS files.
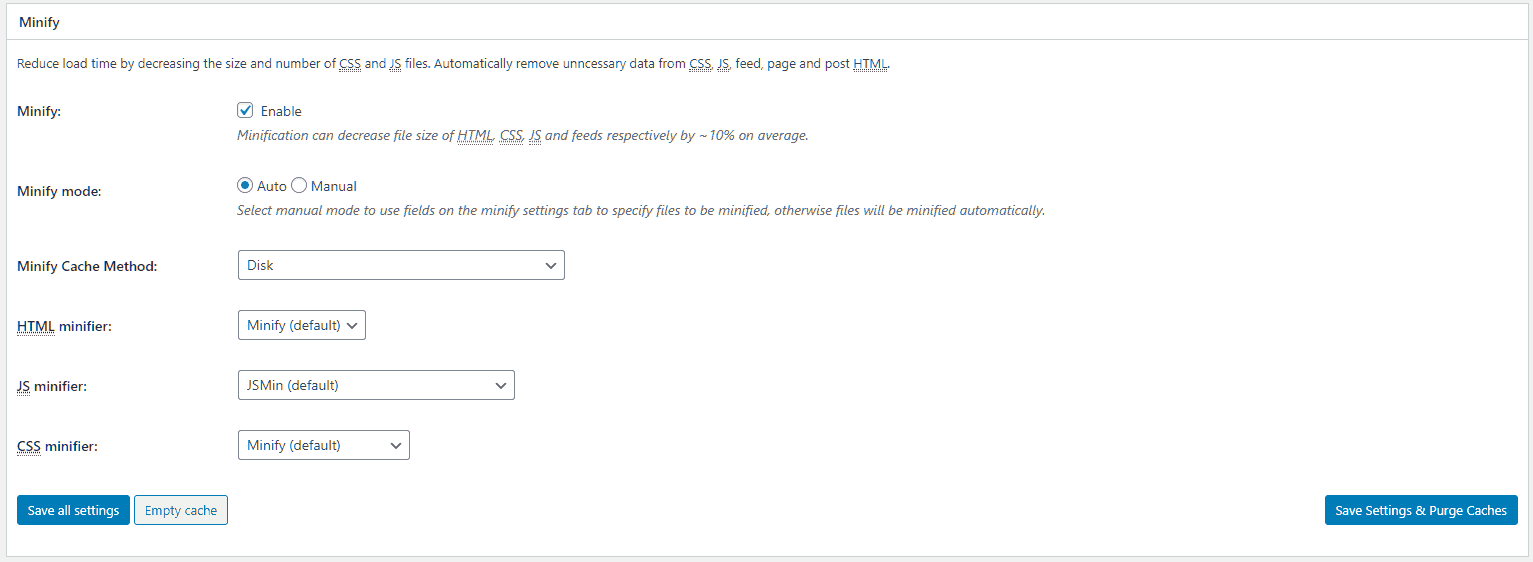
Set the method to Disk so that the minified files will be stored to the Disk. Next is selecting the Minifier engine. You can go with the default options here - Minify (default) for HTML, JSMin for Javascript, and Minify (default) for CSS.
Although there are other options available, like Google Closure Compiler for JS, a simpler solution like JSMin works better with most hosts.
Opcode Cache
Opcode cache stores compiled PHP bytecode in the memory to speed up execution.
From PHP 5.5 onwards, Zend Opcode Cache is enabled by default. So you don't need to do anything with this setting.
W3TC may not recognize Opcode cache sometimes, even if it is available. Most likely, it will be an error, and you can ignore it.

Database Cache
You know that WordPress runs several database queries for each page request. W3TC's database cache stores the results of common queries, which helps to reduce the load on the database for subsequent visits.
DB cache works best when used with advanced caching systems like Memcached or Redis. Most shared hosts don't offer these features. So, the only option left is caching to Disk.
However, in a support reply, the plugin author recommends not to enable DB caching to Disk.
So, if you are on shared hosting, do not enable database cache. It can consume more resources, which can slow down your site instead of making it faster.

On the other hand, if you are on a VPS or dedicated server with Memcached or Redis, try them and decide if it works for you.
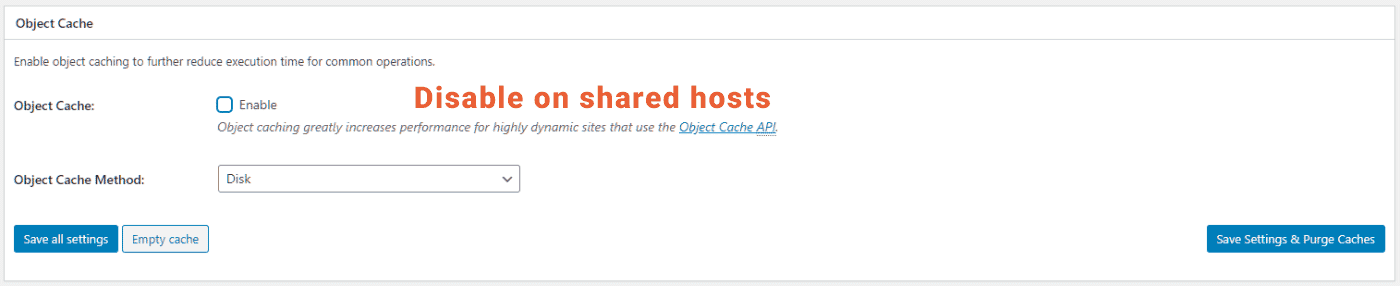
Object Cache
Object Cache is almost similar to Database Cache. But there is a small difference. Instead of storing the results of common database queries, Object cache stores the results of complex queries.
WordPress already offers an Object Cache API, which stores complex queries in the memory. But it is not persistent. That means it saves the results only for the lifetime of a page request. It helps to prevent repeated DB calls within a request, but not beyond that.
W3TC solves this problem by making the Object Cache persistent. The cached results live for as long as you set, allowing subsequent requests to use it.
As with DB cache, Object cache also works well only if you have a powerful server that supports Memcached or Redis.
So, do not enable it on shared hosts.
Browser Cache
Browser cache helps to improve page speed by caching resources in the user's browser. It can reduce the load on your server too. So, enable it.
- See also: How to Leverage Browser Caching

Enabling CDN
W3 Total Cache gives multiple ways to integrate a CDN on your site. Out of these, the easiest way is:
-
Set up a pull-zone (optionally with a CNAME subdomain) on your CDN provider (like KeyCDN, BunnyCDN, etc.)
-
Select the Generic: mirror option in W3TC and enter the CDN URL you've created above.
-
See also: Top CDNs for WordPress
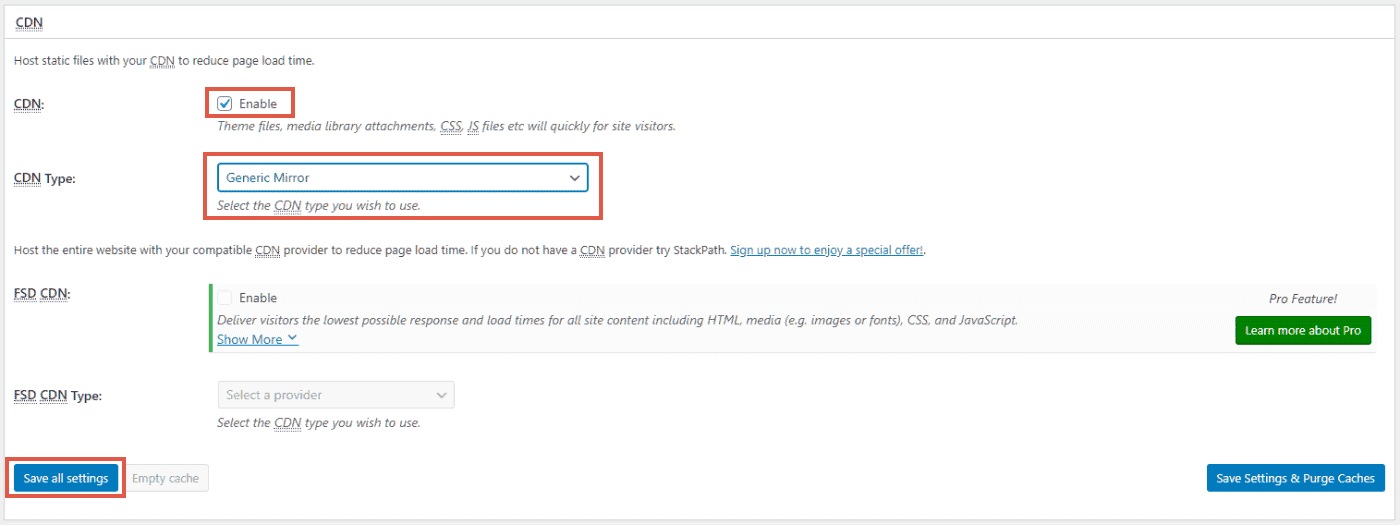
But this method has a limitation. You won't be able to purge CDN cache using W3TC's Empty Cache button.
That's why W3TC offers direct integration with some of the top CDN providers like StackPath and Amazon Cloudfront, which enables purging from within the WP dashboard.
To enable it, select one of the supported providers and click Save all Settings. Then go to the CDN page of the W3TC plugin to enter your credentials. For example, check out this guide to learn how to integrate Stackpath using W3TC.
We will discuss more of it below, under Advanced Settings for CDN.
Setting up a Reverse Proxy
Reverse proxy caching mechanisms like Varnish can make your site extremely fast. Since it stands at the front of the stack and serves requests, your typical Apache server doesn't have to break a sweat.
But most shared hosts don't support Varnish. So, you can leave this section.
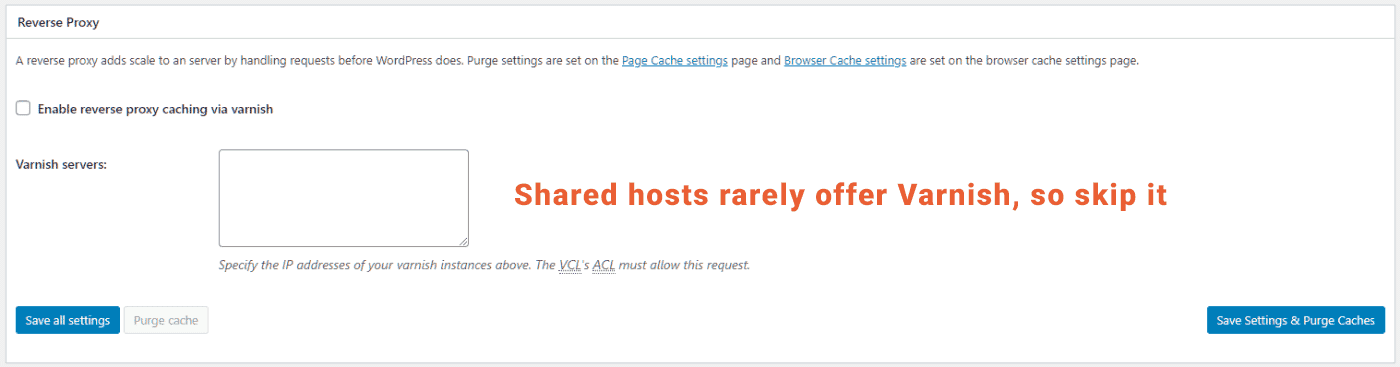
Otherwise, if your server supports Varnish, you should enter its IP address (usually it's 127.0.01 - the IP of the localhost), and save settings.
After that, W3TC can automatically purge Varnish cache as per the schedule you've set under Page Cache settings. If you don't set it, Varnish might still work if it is enabled, but purging and garbage collection won't work.
Lazy loading
Do you use a lazy loading plugin on your site?
If you have W3TC, you may not need that anymore.
Lazy loading has nothing to do with caching. But still, W3TC offers that feature. Under the User Experience section in the General Settings page, check the box against Lazy Loading.

It does not offer all the fancy features that dedicated lazy loading plugins offer. However, it is enough to prevent the defer offscreen images warning you get in Google Pagespeed Insights.
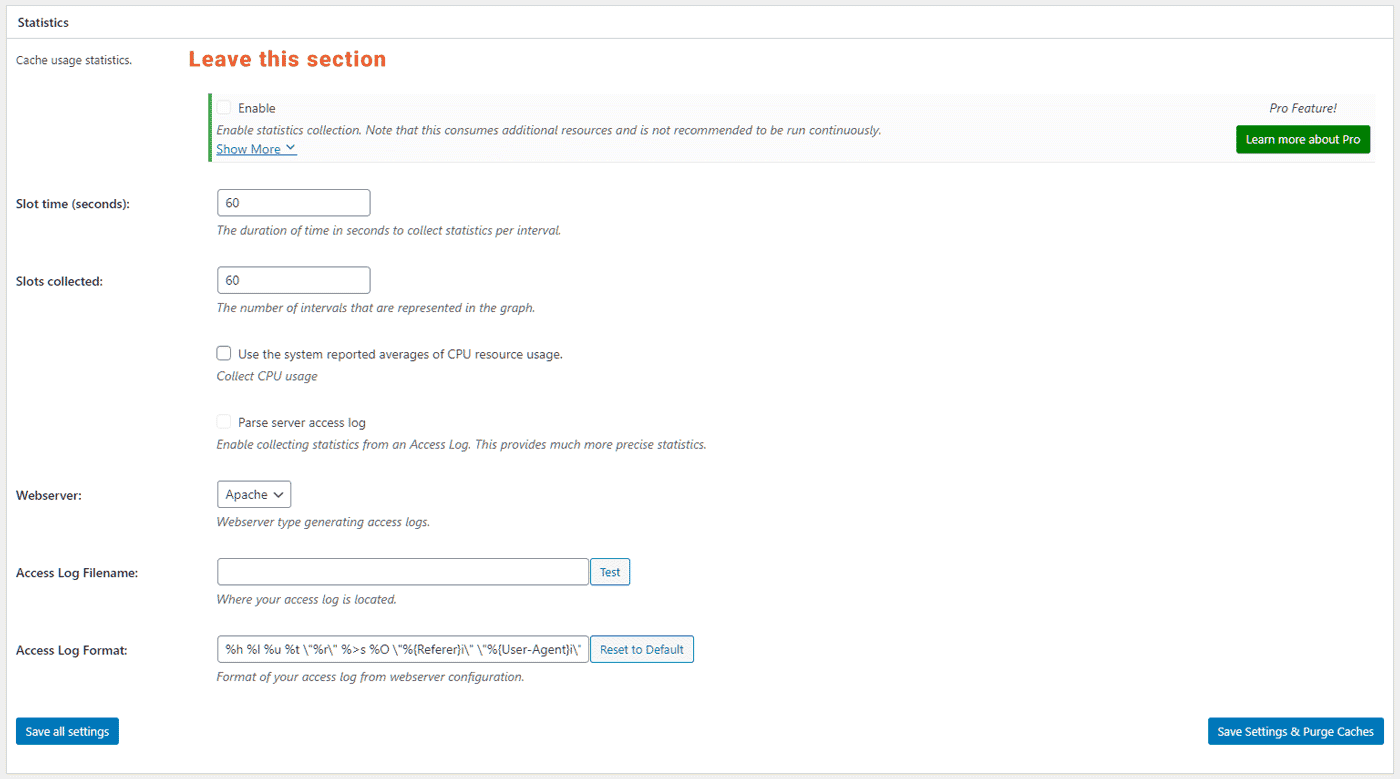
Cache Statistics
Cache statistics are not available in the free version of W3 Total Cache. So, you can skip this section.
Fragment Cache
Sometimes, we don't want to cache certain parts of a page. It can be a social feed, or some personalized content, or anything dynamic in nature. In such a case, you can use Fragment cache instead of the regular full page caching.
However, it is a Pro feature. Since we are discussing configuring the free version here, you can skip it.

If you are a Pro subscriber, refer this guide to learn how to enable Fragment Caching. It uses comments starting with the word mfunc to exclude blocks of code from caching. As stated in another article, don't forget to include mfunc to Ignored Comment Stems list under Minify settings.
Licensing
If you plan to get the pro version of W3TC, don't forget to enter and validate your license key here.

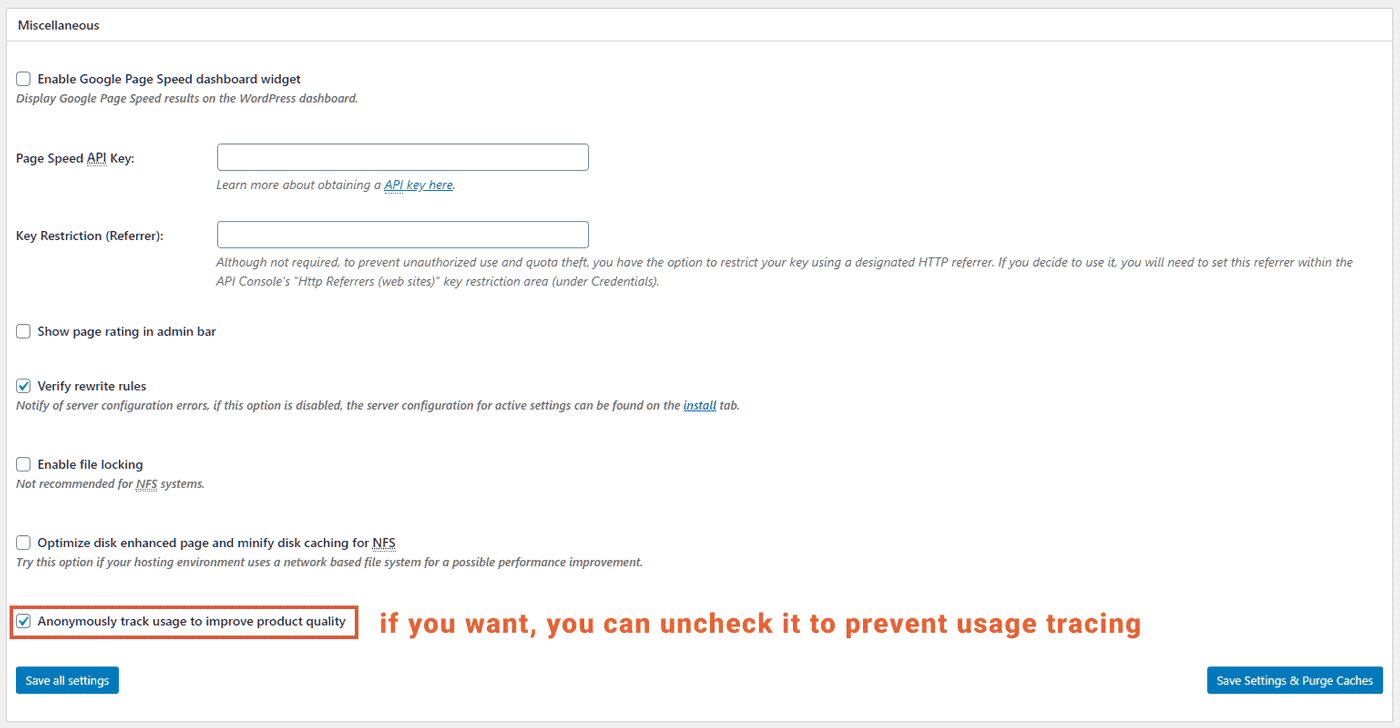
Miscellaneous Settings
The miscellaneous section does not contain any crucial settings. However, if you want to prevent usage tracking, uncheck the box at the bottom. Otherwise, you can keep the defaults and ignore this section altogether.
Debug Mode
Debug mode helps to verify if all the features are working as expected. To enable it, check the boxes against all features you want to debug.
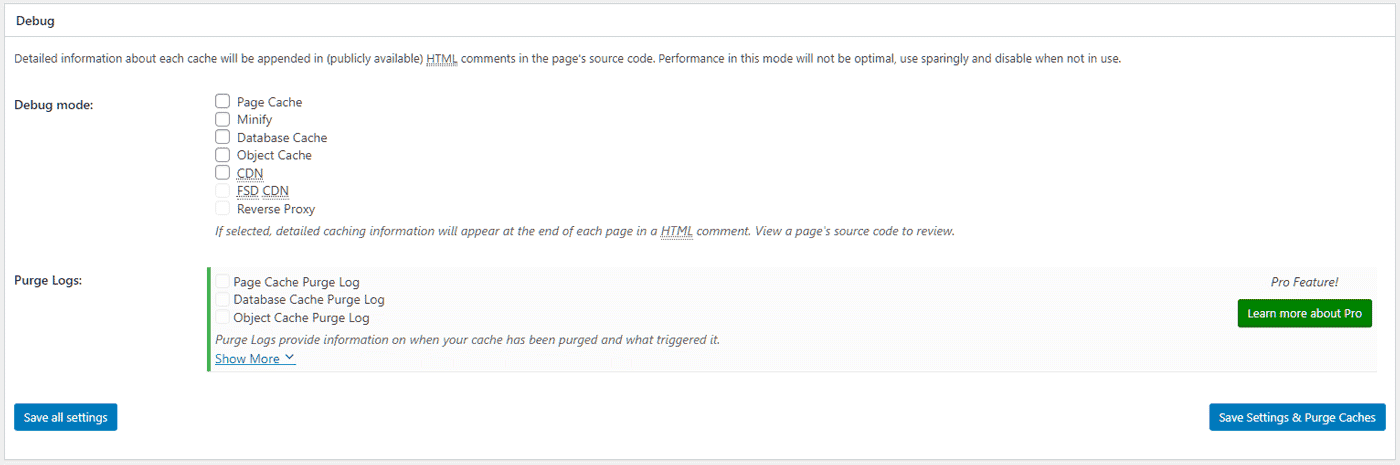
check all the modes you want to debug
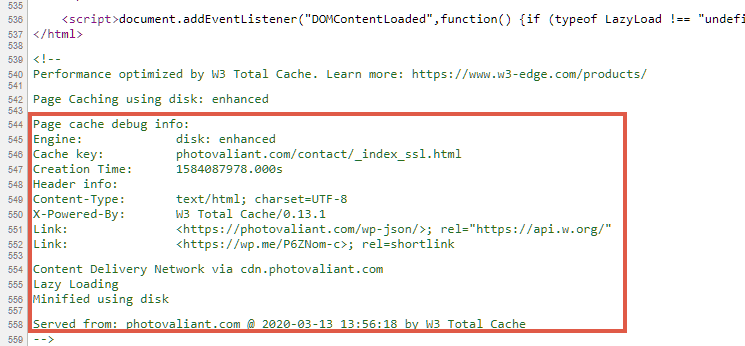
After enabling, W3TC adds these debug information as comments to the HTML source code of each page. To see it in Google Chrome, right-click on a cached page, then click View Page Source, and scroll to the bottom where you can see the comments.
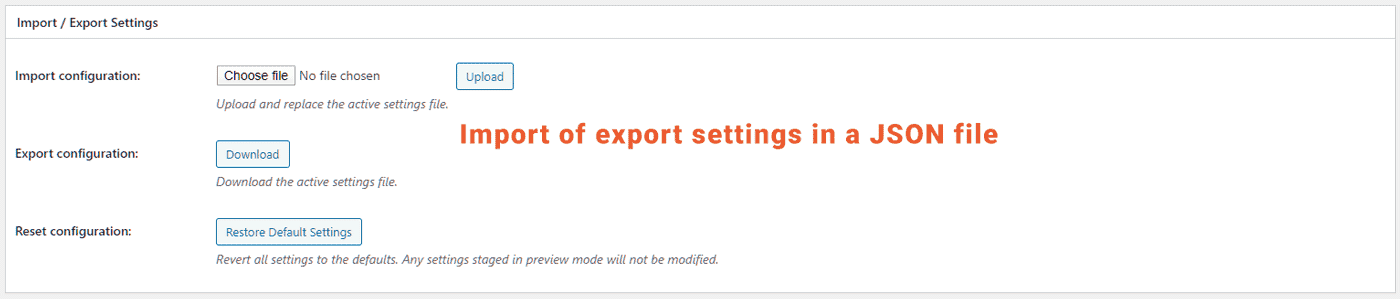
Import and Export Settings
With the import and export ability, you can easily move settings between sites.
It can also help if you are setting up a fresh WordPress site with W3TC. You can download settings file from another site and import it to the new site.
Advances Settings
Page Cache
The Page Cache settings page is again divided into multiple sections. The first one is General.
Keep all the settings to their default values. Read the description beneath each setting that are self-explanatory.
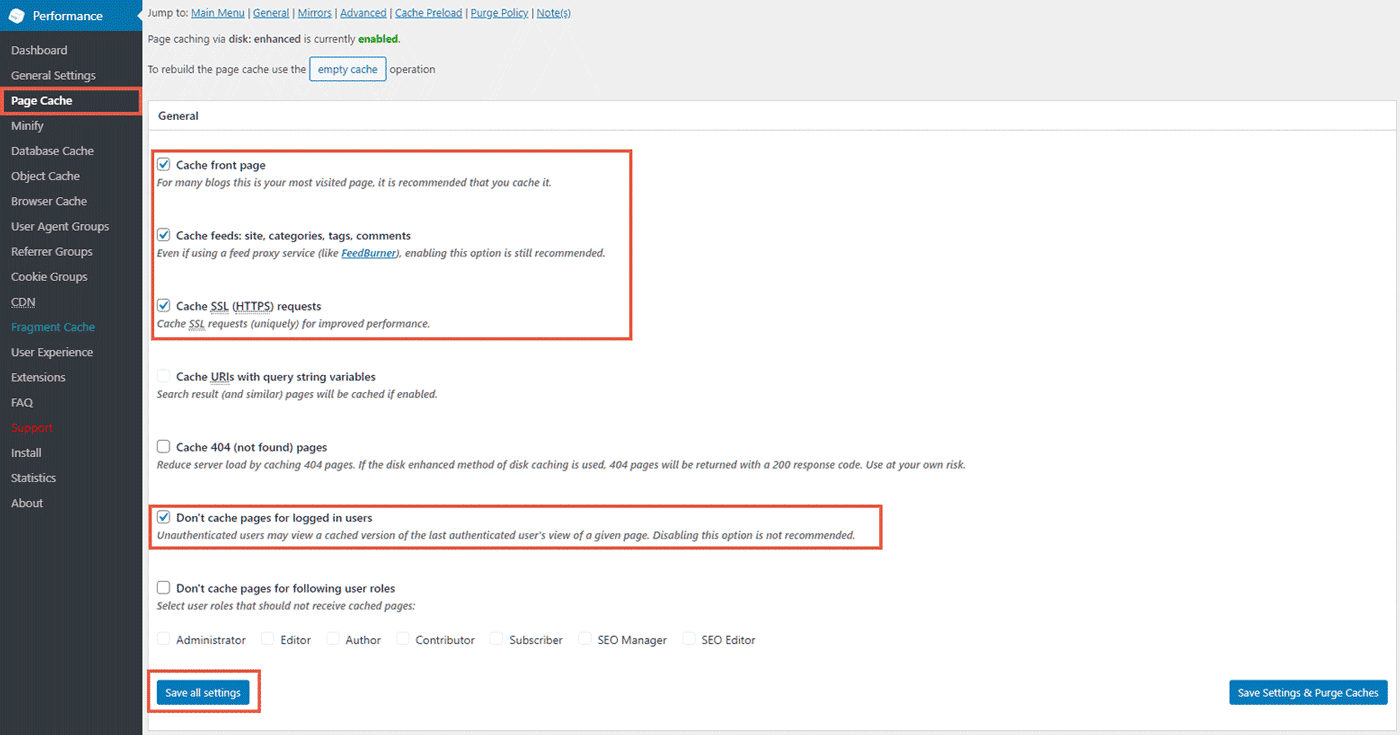
An important thing to note is: DO NOT enable the Cache 404 Pages option. If you do, 404 pages start sending 200 (OK) response code, which is terrible for SEO.
Next is Aliases, where you can specify the multiple domains from which you serve your site. For example, http://yoursite.com, http://www.yoursite.com, or http://yoursite.net can be the various domains that point to the same WordPress site.
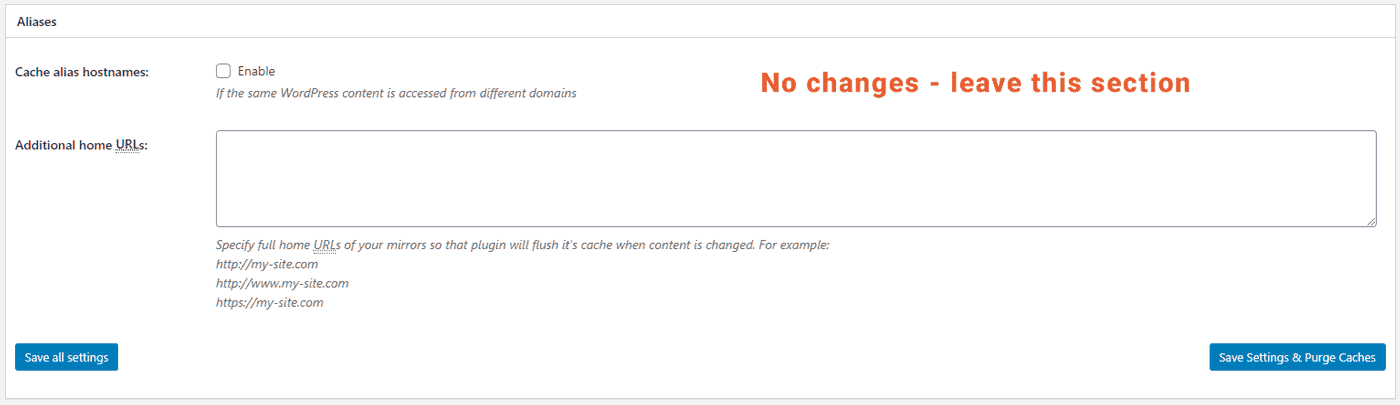
However, from an SEO perspective, serving the same content from multiple domains is not a good idea. Ideally, you should redirect all the other domains to your preferred domain.
So, if you have appropriately set redirects, you can skip this section.
For the Cache Preload, the default options are 900 seconds for the Update Interval and 10 for the Pages per Interval. That means, W3TC preloads ten pages to the cache every one hour.
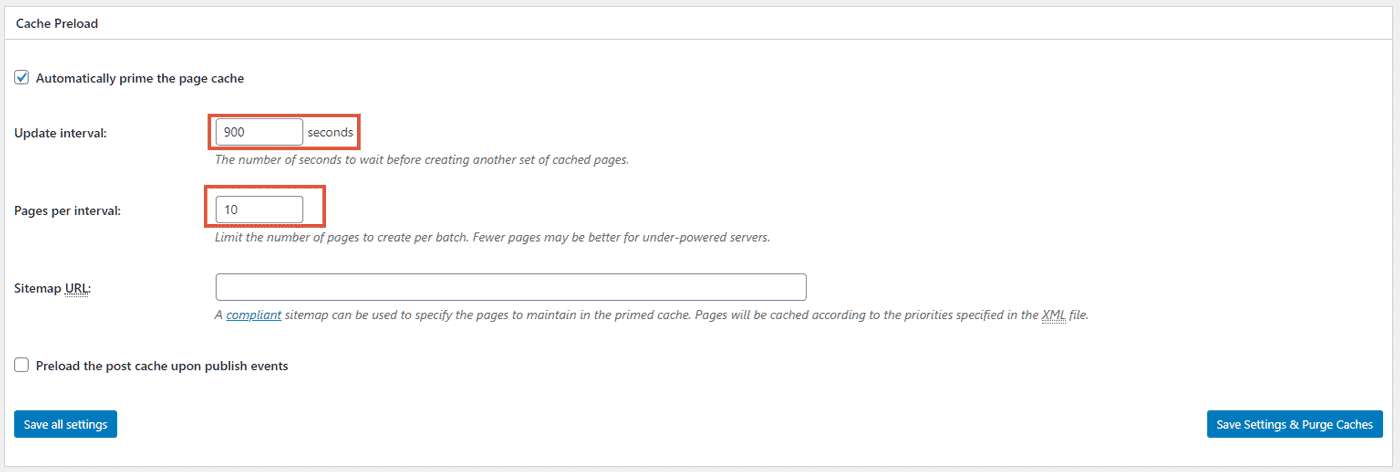
But in my experience, preloading ten pages at a time can seriously overload underpowered servers. So, setting the Page per Interval value to 3 or 4 will be a better choice.
For more powerful servers, you can decrease the Interval and increase the number of pages, so that preloading completes sooner.
When you publish a new post, some cached pages become stale, like your homepage. Similarly, a post page's cache becomes stale when someone publishes a comment. So, the Purge Policy section defines the pages you want to purge from the cache when such an event occurs.
The default settings are recommended for most cases. It purges the front page, post page, blog feed page, and the rss feed page whenever you create or update a post, or when someone publishes a new comment.
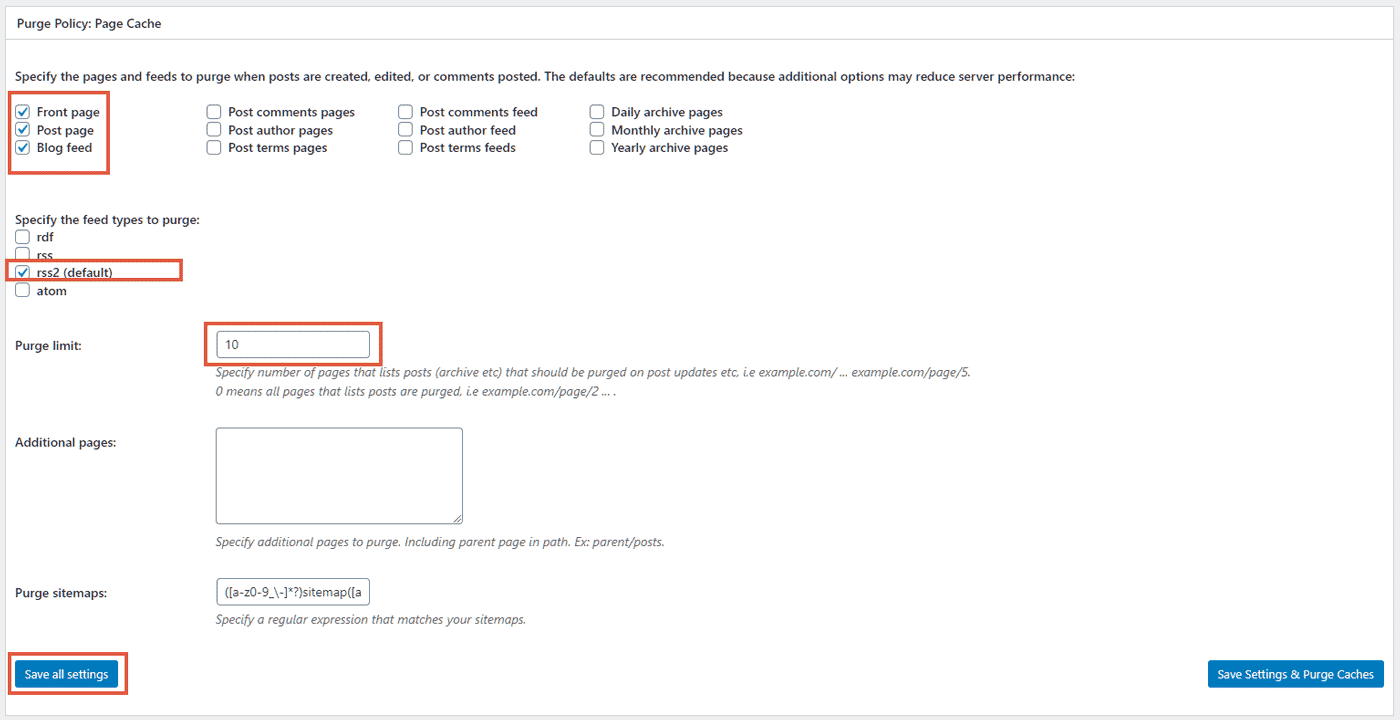
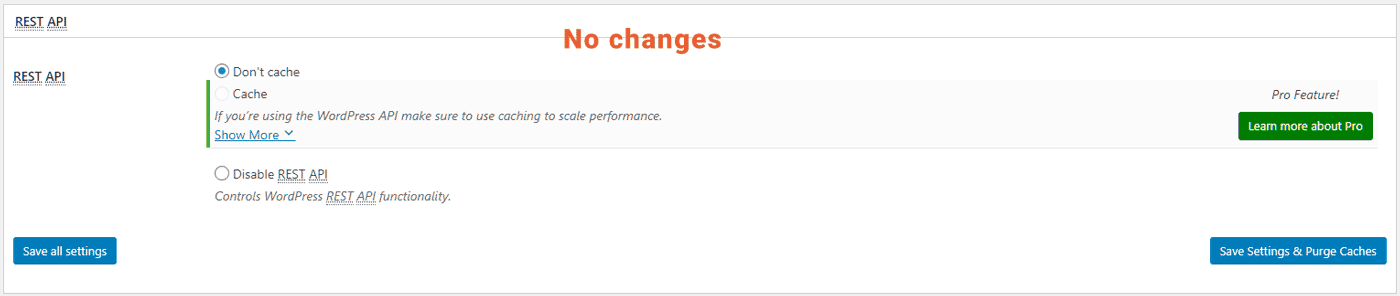
For the REST API Cache, keep the Don't Cache option. Even if you want to enable it, you will need to buy a Pro license.
The Advanced section gives a few more additional options to fine-tune page caching. Out of these, we are only interested in the Garbage Collection Interval. The default value is 3600s (1hr), which is appropriate for most sites.
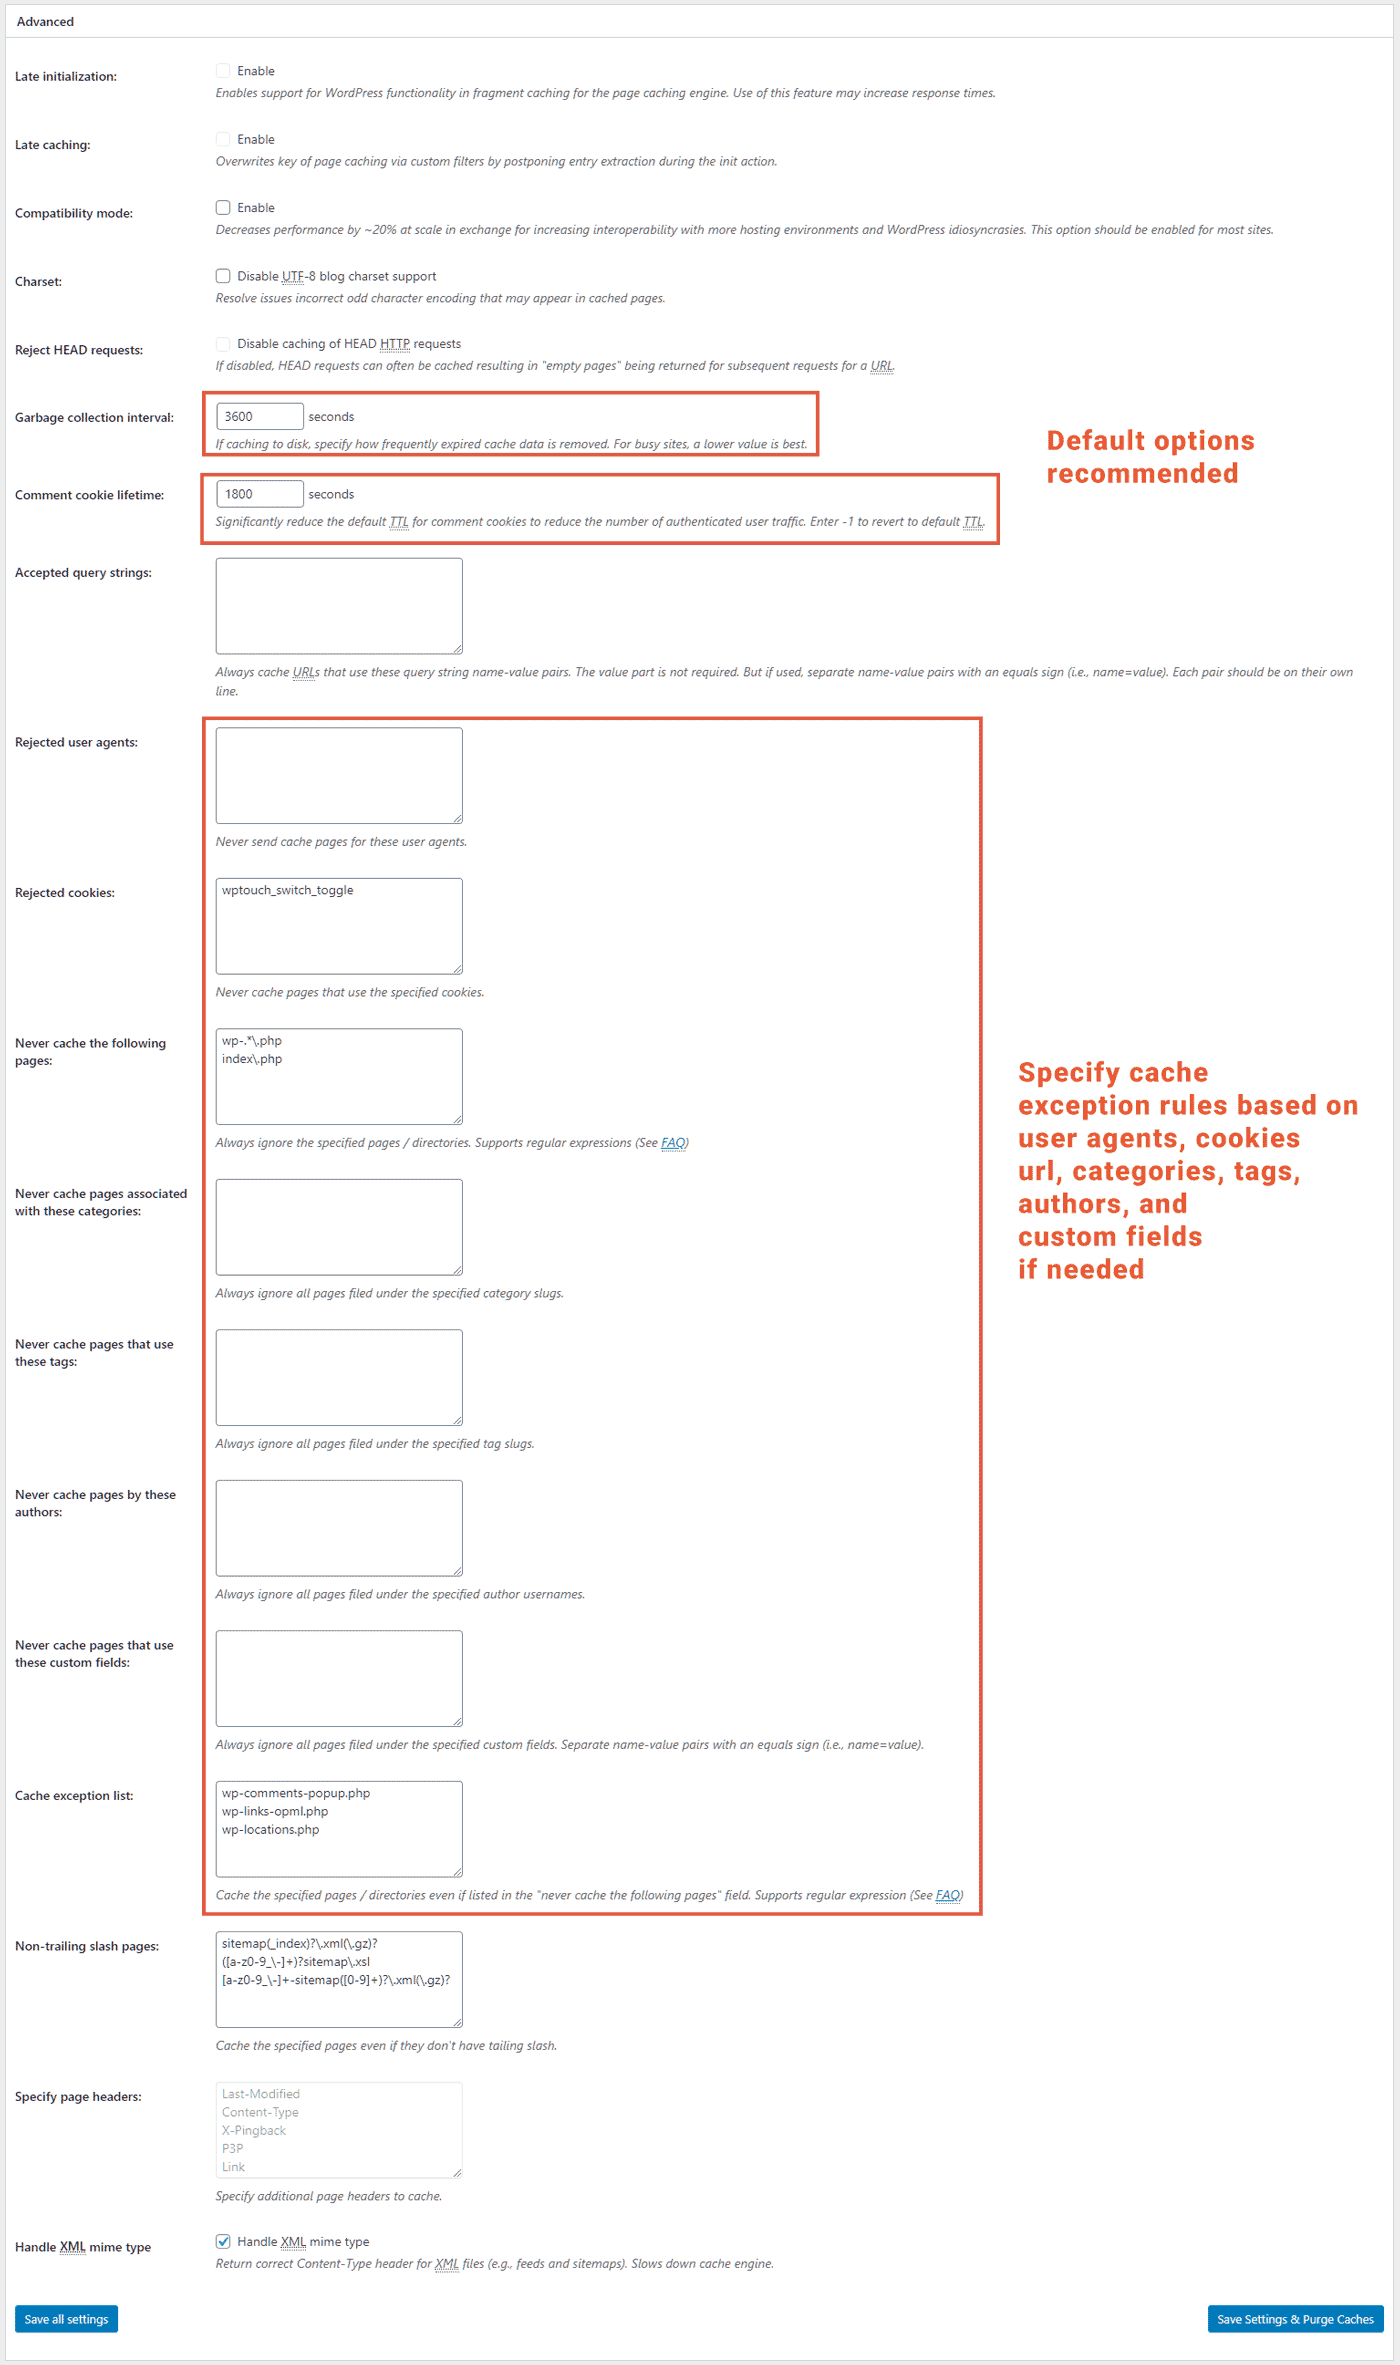
However, if your site is highly busy with lots of pages and traffic, you can set a lower value to avoid stale content accumulating in the cache.
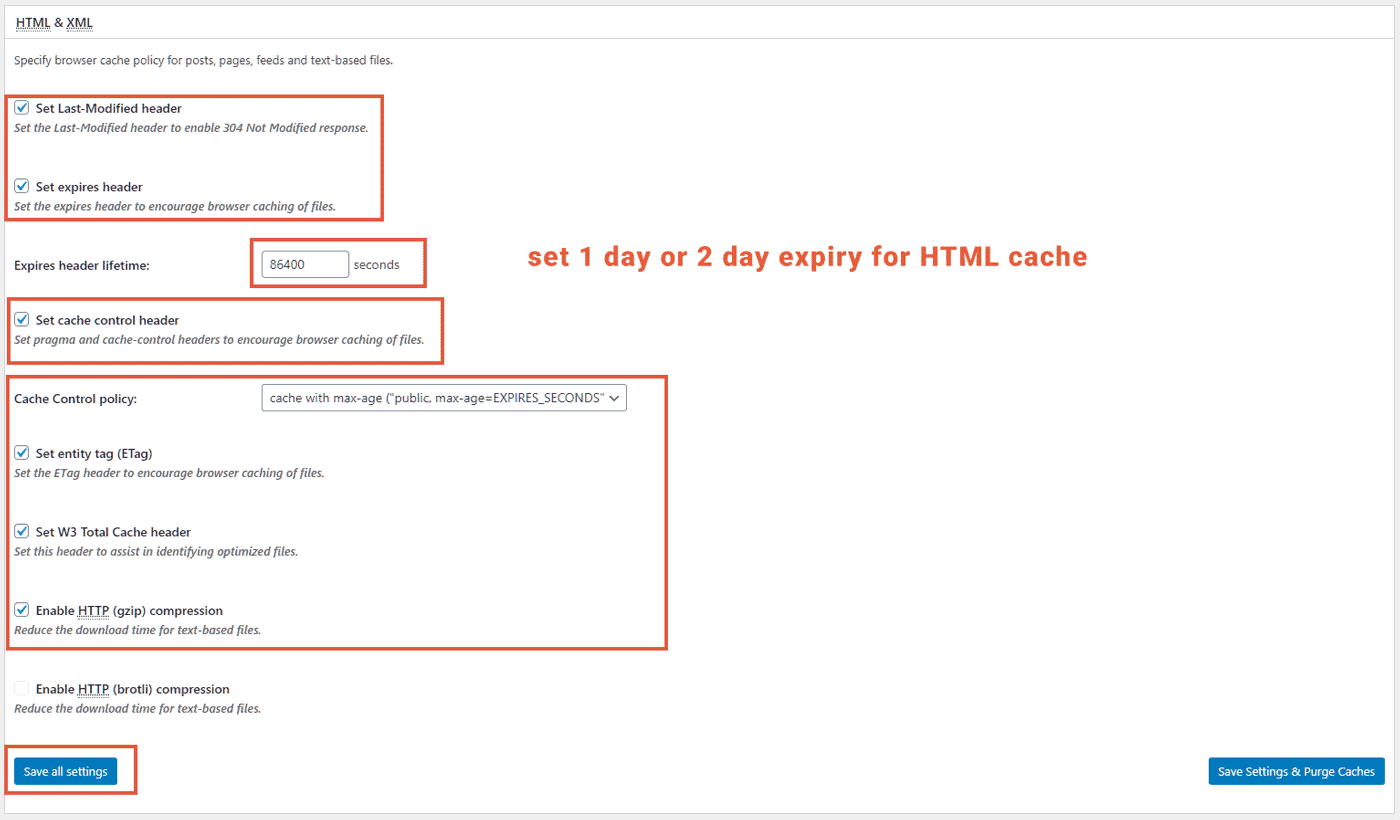
But where to set the cache lifetime (TTL)? That is, how long will it take for cached content to become stale?
Here, note that W3TC does not allow setting page cache TTL directly. Instead, it uses the value you set for Expires header lifetime under HTML & XML in the Browser Cache settings page.

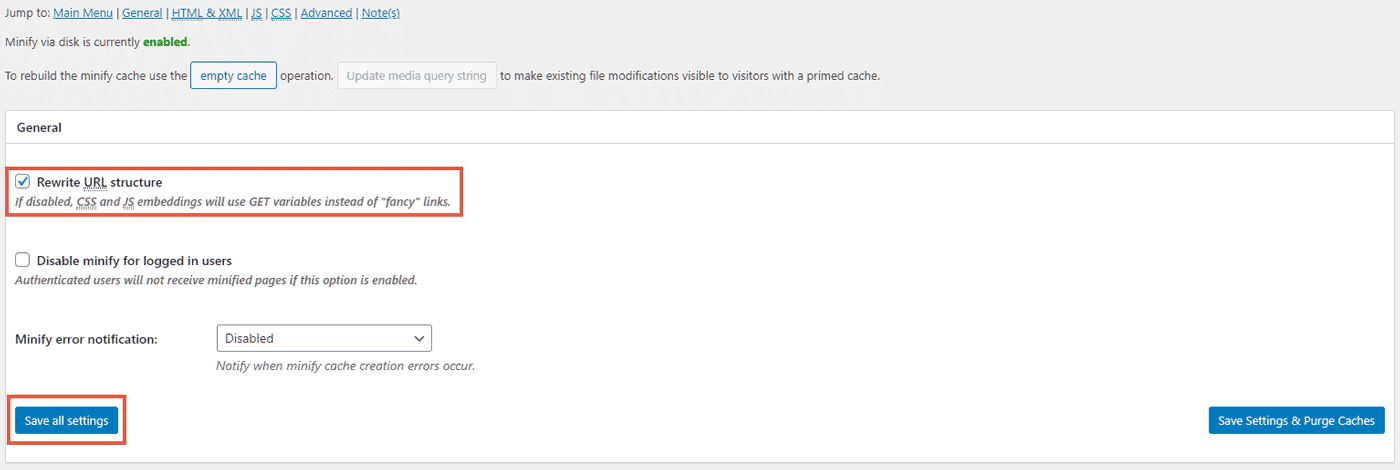
Minify
After globally enabling minification under General Settings, you can fine-tune it in the Minify tab.
First of all, enable the Rewrite URL structure option, so that W3TC uses real links instead of query strings to embed the minified files. I don't know why anyone would want to use query strings URLs, and what is the need for that option.
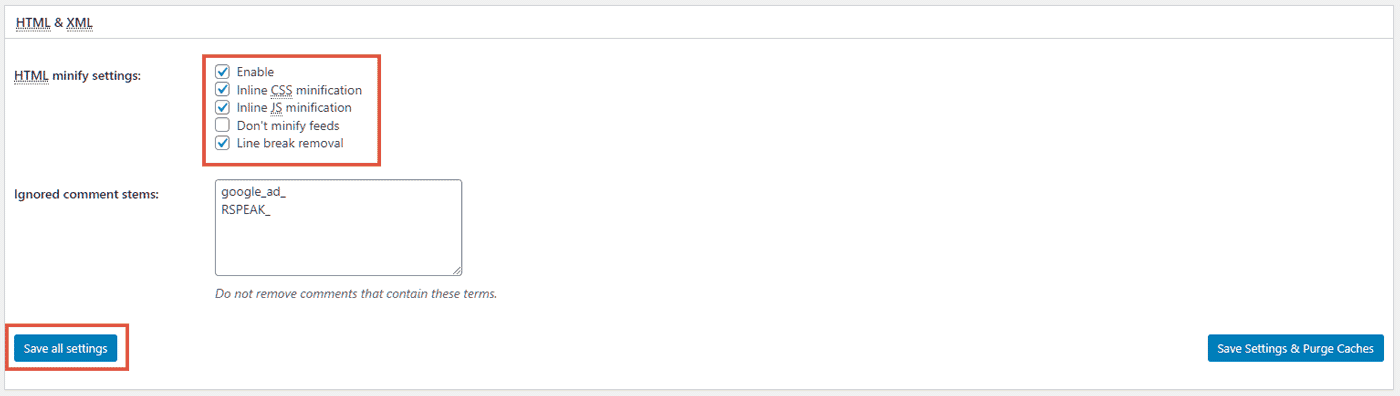
Under the HTML & XML section, check all the boxes except Don't Minify Feeds.
Minifying the JS is usually a problematic thing. So, select the Combine Only option. It will only combine the files, and won't minify the code inside.
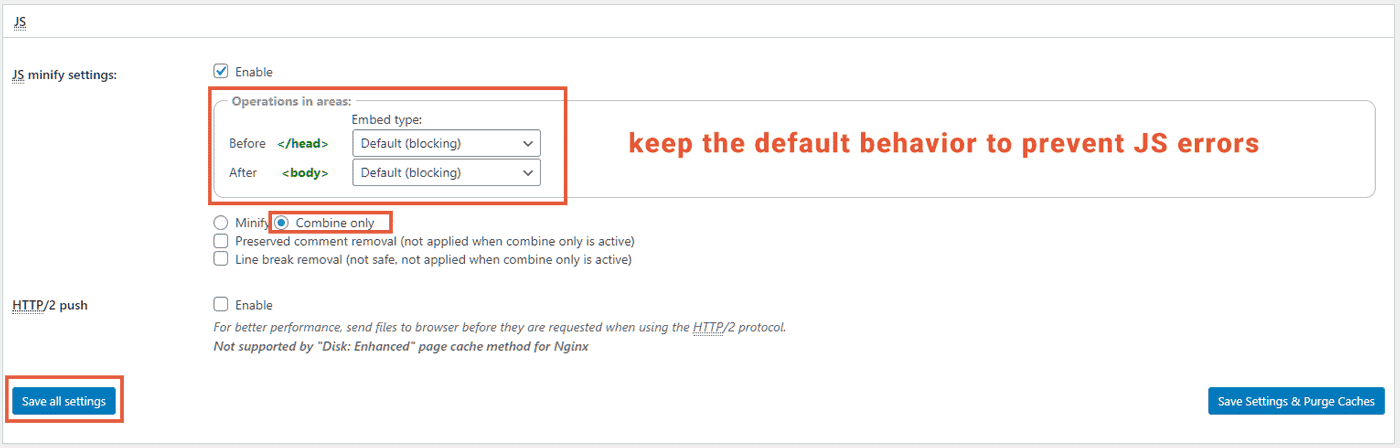
For the embed type, there are four options:
- Blocking: the default option, which embeds the JS files as usual within script tags.
- Non-blocking using JS: loads the JS files using dynamic script tags. It won't block page rendering.
- Non-blocking using async: loads the files using script tag and async attribute.
- Non-blocking using defer: loads the files using script tag and defer attribute.
In most cases, non-blocking methods result in some errors. When I selected the second option for the head, jQuery got broken, and I switched back to the first option.
So, always check if there are any javascript errors by going to the Console tab in Chrome Developer Tools.
If there are no errors, use either of the three options, including async or defer. Here is an article about the differences between async and defer attributes. Play with the settings to find out what works best for the and areas.
Unlike JS minification, minifying CSS files rarely causes troubles. So, no need for selecting the Combine Only option. Keep all the other options to their defaults.

Below the minification settings, you can set the file update and garbage collection intervals. The default is 86400s, i.e., one day.
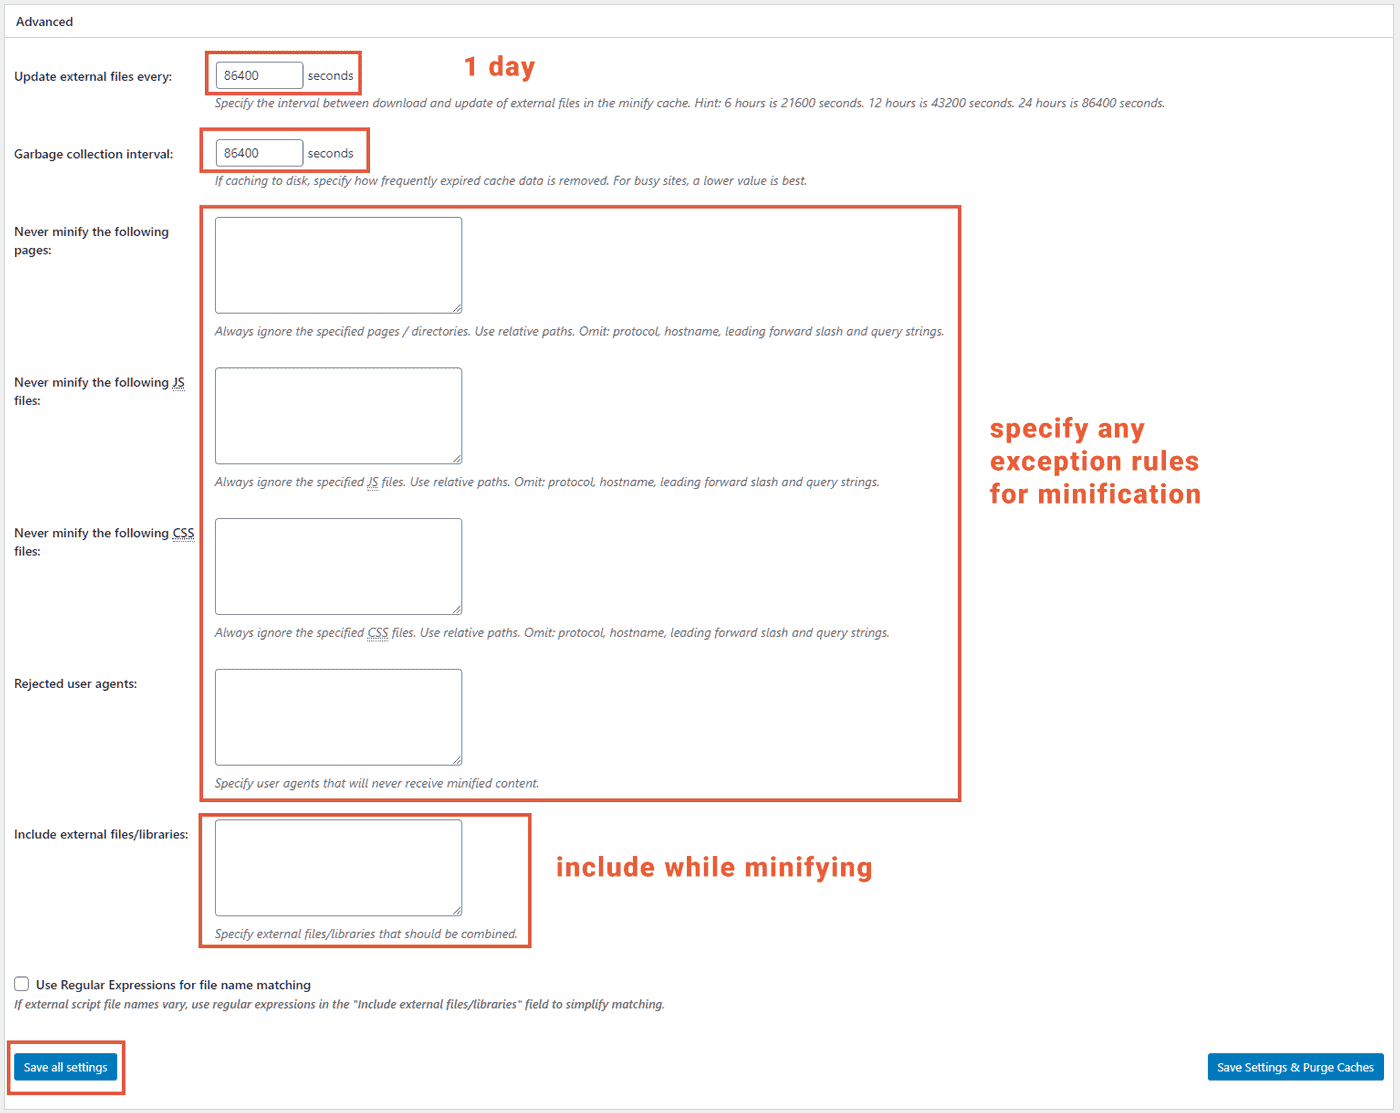
However, the free version of W3TC does not allow deferring CSS. Even after enabling minification, you will still get a warning in Google Pagespeed Insights to eliminate render-blocking resources.
To solve this problem, I use the Autoptimize plugin along with W3TC on my sites. Autoptimize takes care of minification and deferring, while W3TC takes care of the caching part.
For more information about how to set up Autoptimize, check out my article on how to eliminate render-blocking resources.
Database Cache
As mentioned above under General Settings, you should not enable Database Cache on shared hosting. So, you can skip this section as well.
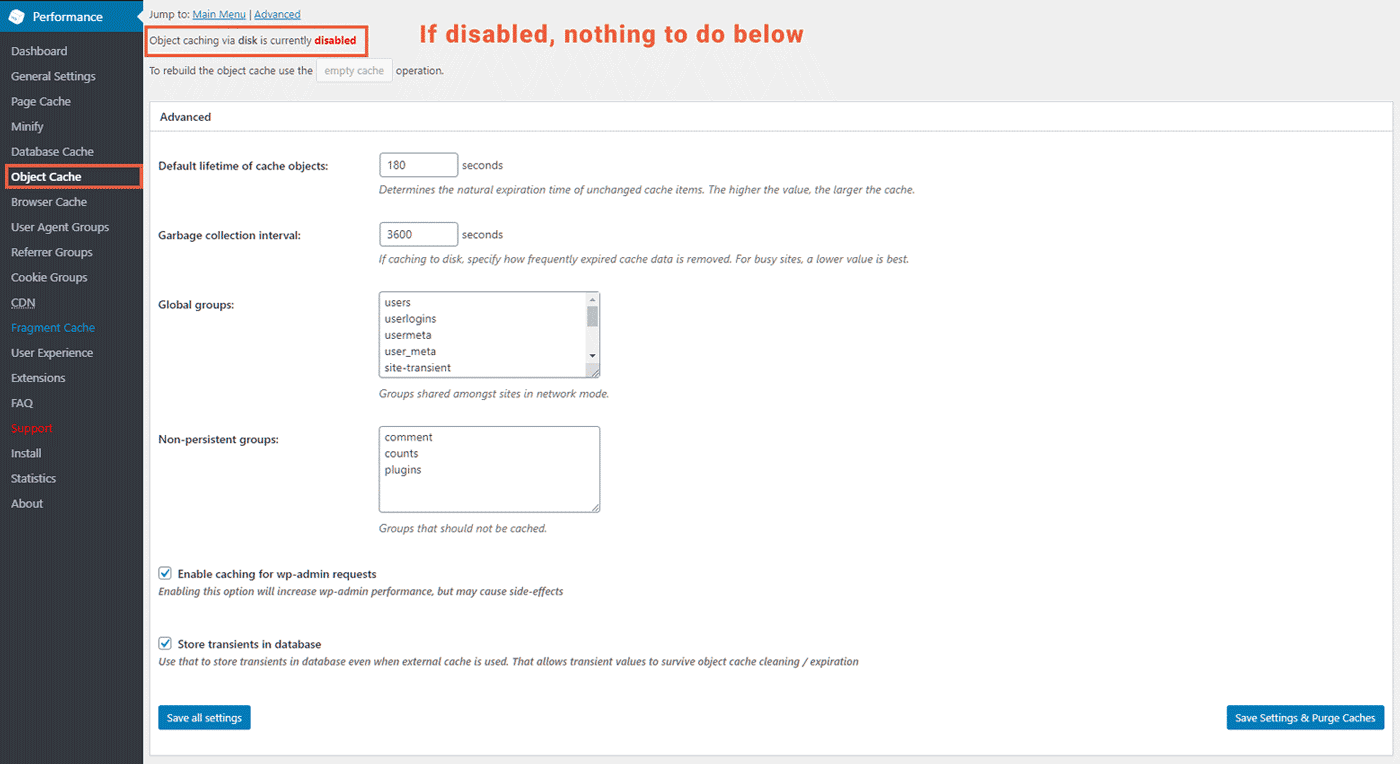
Object Cache
If you have disabled Object cache under General Settings, then you can skip this section.
- Otherwise, what if you have a VPS or Dedicated server? See how I enabled Object cache on this site (same applies to database cache also).
Based on the caching method you've selected, the options available on this page can vary slightly.
Here, I will show you how I configured Object cache with Memcached on a Cloudways server.
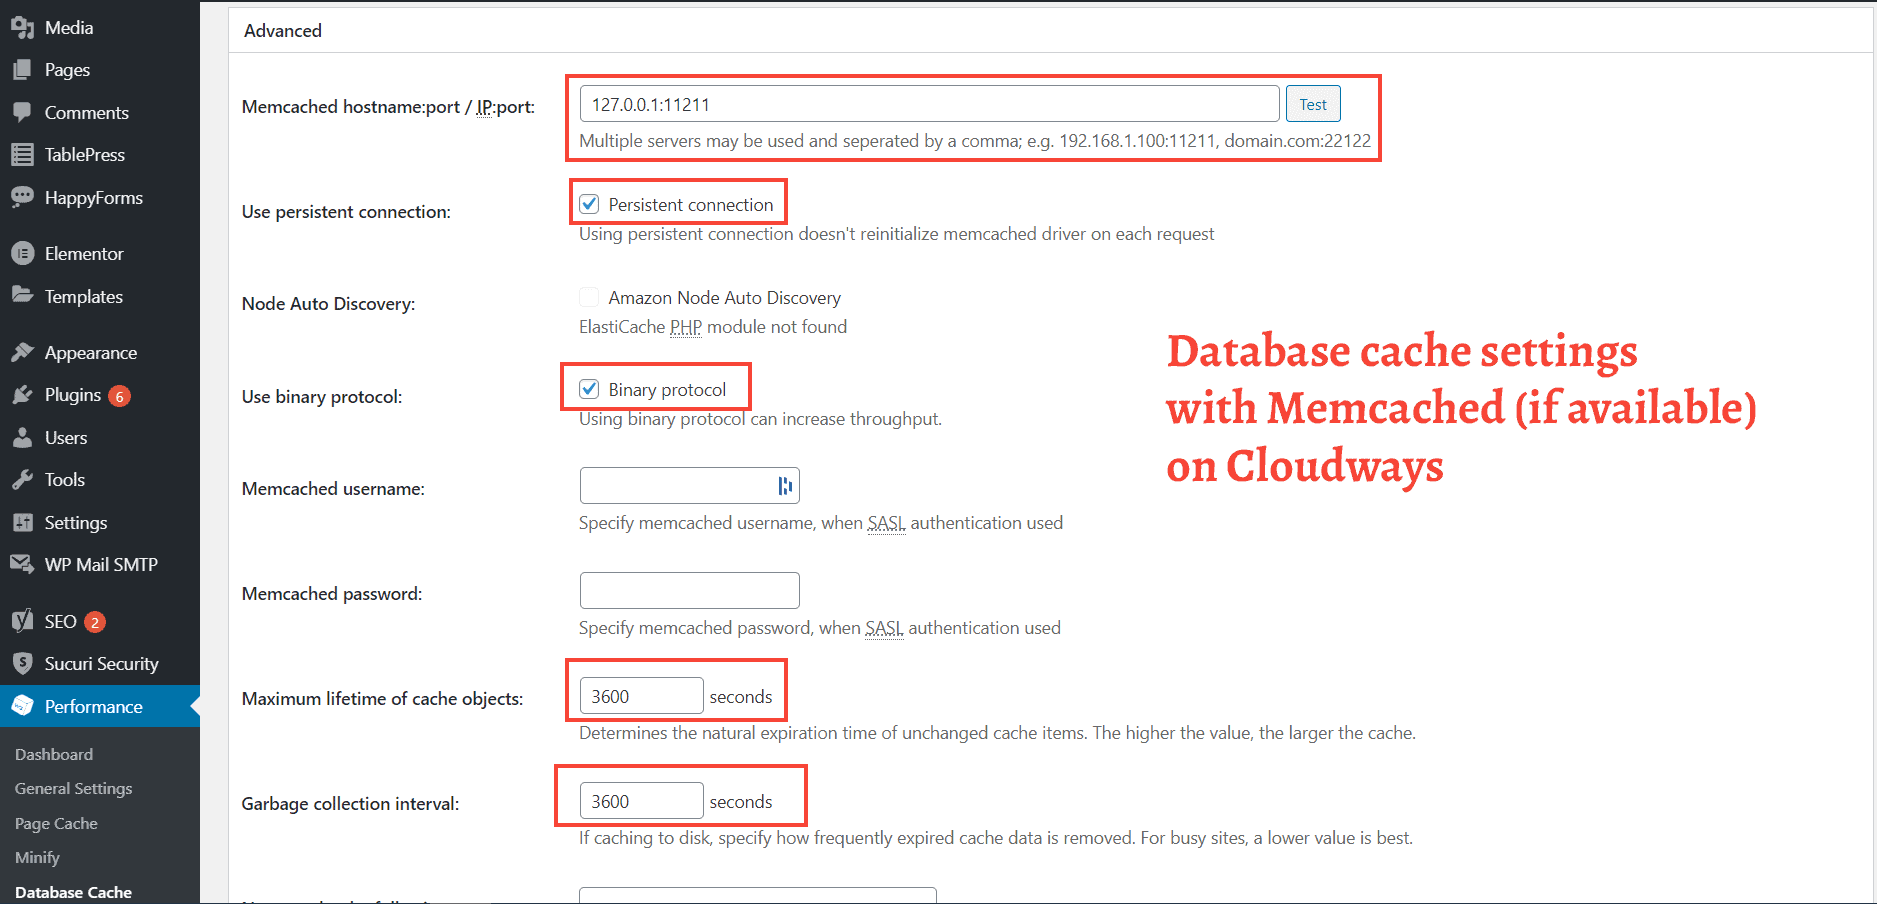
In the first field, give the port number and IP of the Memcached installation. The default option was 127.0.0.1:11211, which worked fine for me. Ask your hosting provider if you don't know the correct input.
Towards the field's right side, there is a button to test the value you've entered. Click it. If it shows Test Passed, Memcached is working fine.
Below that, enable both Persistent connection and Binary protocol options.
Next, you have to specify the username and password if your Memcached server requires SASL authentication. However, my setup worked without providing any credentials.
For the Cache lifetime and Garbage collection interval, keeping the default values is the recommended way:
- Default lifetime of cache objects: 180s
- Garbage collection interval: 3600s
These default values will be fine if you have a large website with busy traffic. However, in my experience, the default lifetime of 180s is too short. Most sites with low to medium traffic may not benefit from it.
Increasing the cache lifetime and Interval can make the cache size huge, though. It is also the main reason why they recommend lower values.
But Memcached stores data in the RAM, and it has a maximum allowed size too (usually from 64MB to 512MB). So, unlike caching to Disk, Memcached won't grow beyond that limit. Once it reaches the full size, the least used data will be removed automatically, making space for new data.
To see how it works, I increased the cache lifetime from 180s to 7200s and the Interval from the 3600s to 43200s. Then I reloaded a couple of pages to populate the cache (in addition to any regular traffic).
Still, the total memory usage by Memcached was only ~3MB, which is a mere 1.1% of the total allocated memory (256MB). The server was a 1GB DigitalOcean instance from Cloudways - the smallest you can buy from DigitalOcean.
In short, if you are running on a VPS with Memcached, you can safely increase the values.
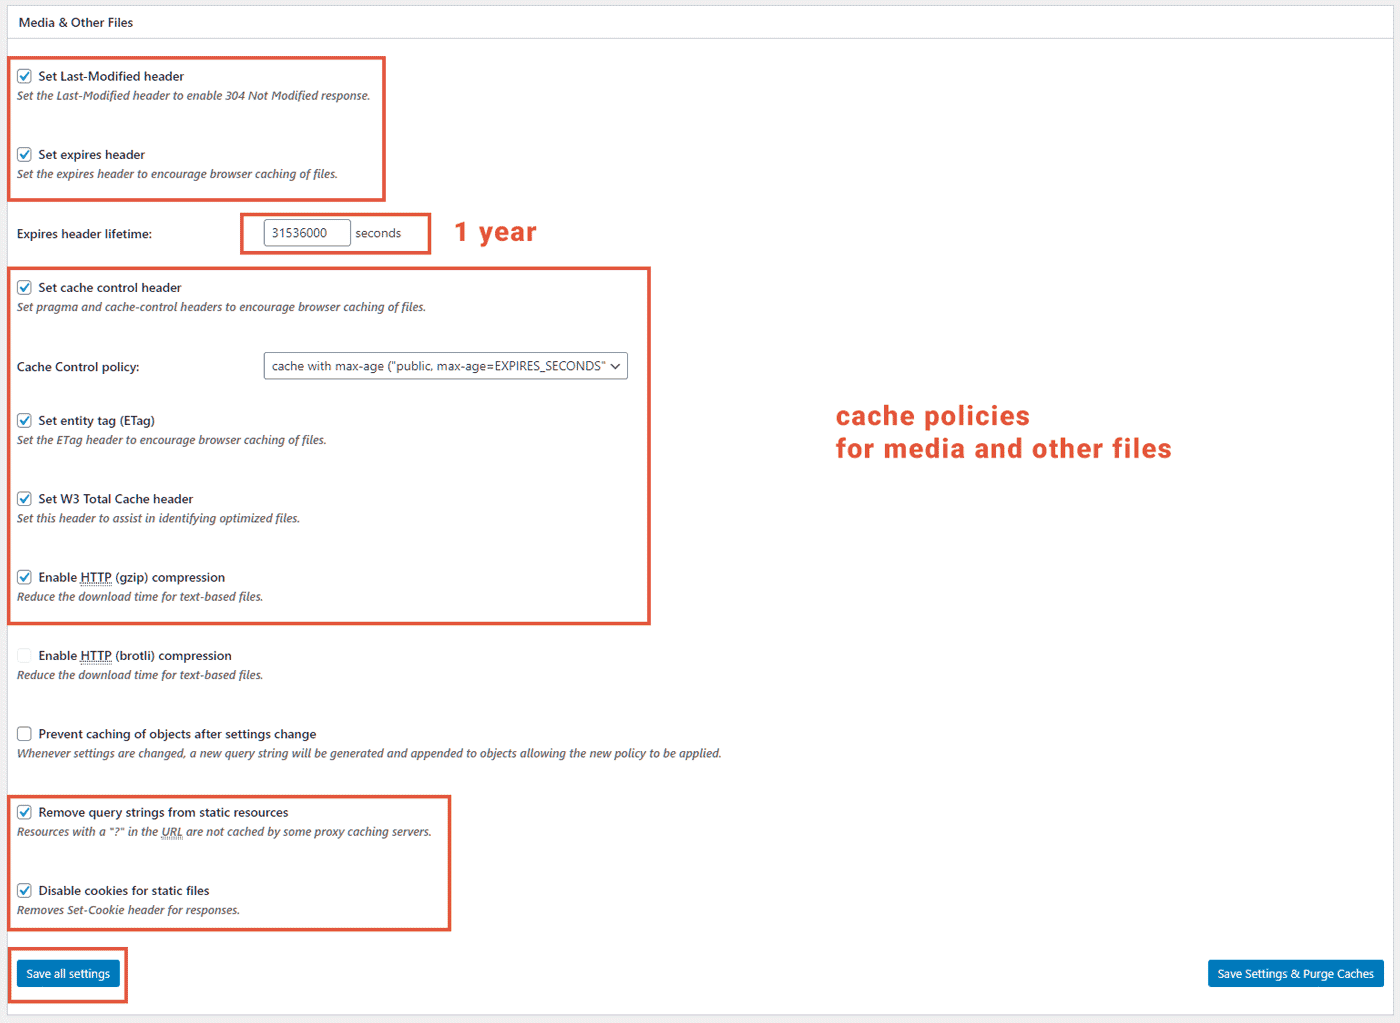
Browser Cache
In another post about how to leverage browser caching, I have mentioned the importance of setting proper cache policies. I have also shown how to manually set up four necessary HTTP headers by modifying the Htaccess file:
- Cache-control
- Expires
- Last-modified
- ETag or Entity Tag
But if you are using W3TC, you don't need to do it manually. Instead, you can set all these headers from the Browser Cache tab.
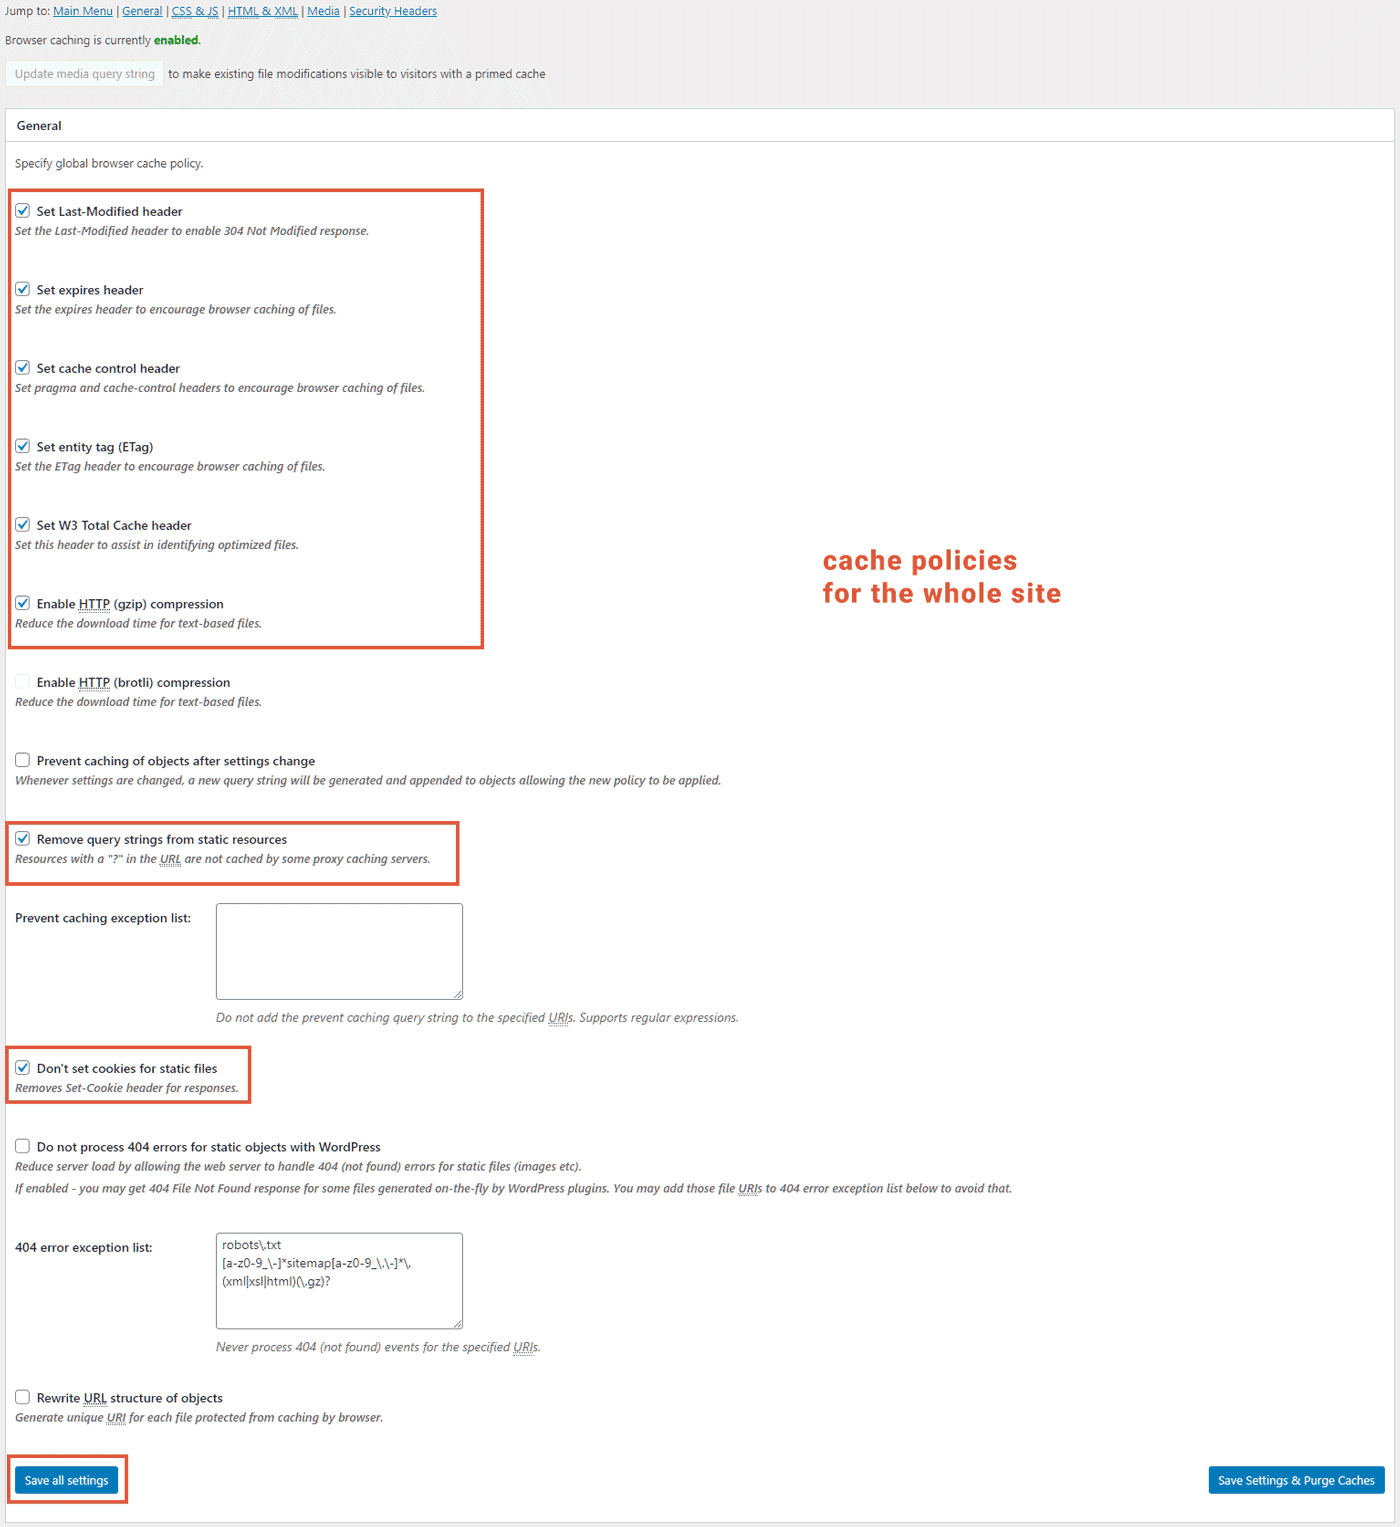
W3TC also allows you to set different cache policies for various resources, like HTML, CSS, JS, media files, and others.

In addition to it, you can also set HTTP security headers.

Under the Security Headers section, you can find the options to set seven of them:
- HSTS
- X-Content-Type-Options
- X-Frame-Options
- Content Security Policy
- X-XSS-Protection
- Referrer-Policy
- Feature-Policy
To learn more about what are HTTP Security Headers and how to add them to a WordPress website, check this post. It is recommended enable these headers as it enhance the security of your site against various attacks including XSS and clickjacking.
User Agent Groups
Since most WordPress themes are responsive out of the box, your site should look great on all devices without any additional work. You rarely need to set up separate versions for desktop and mobile devices.
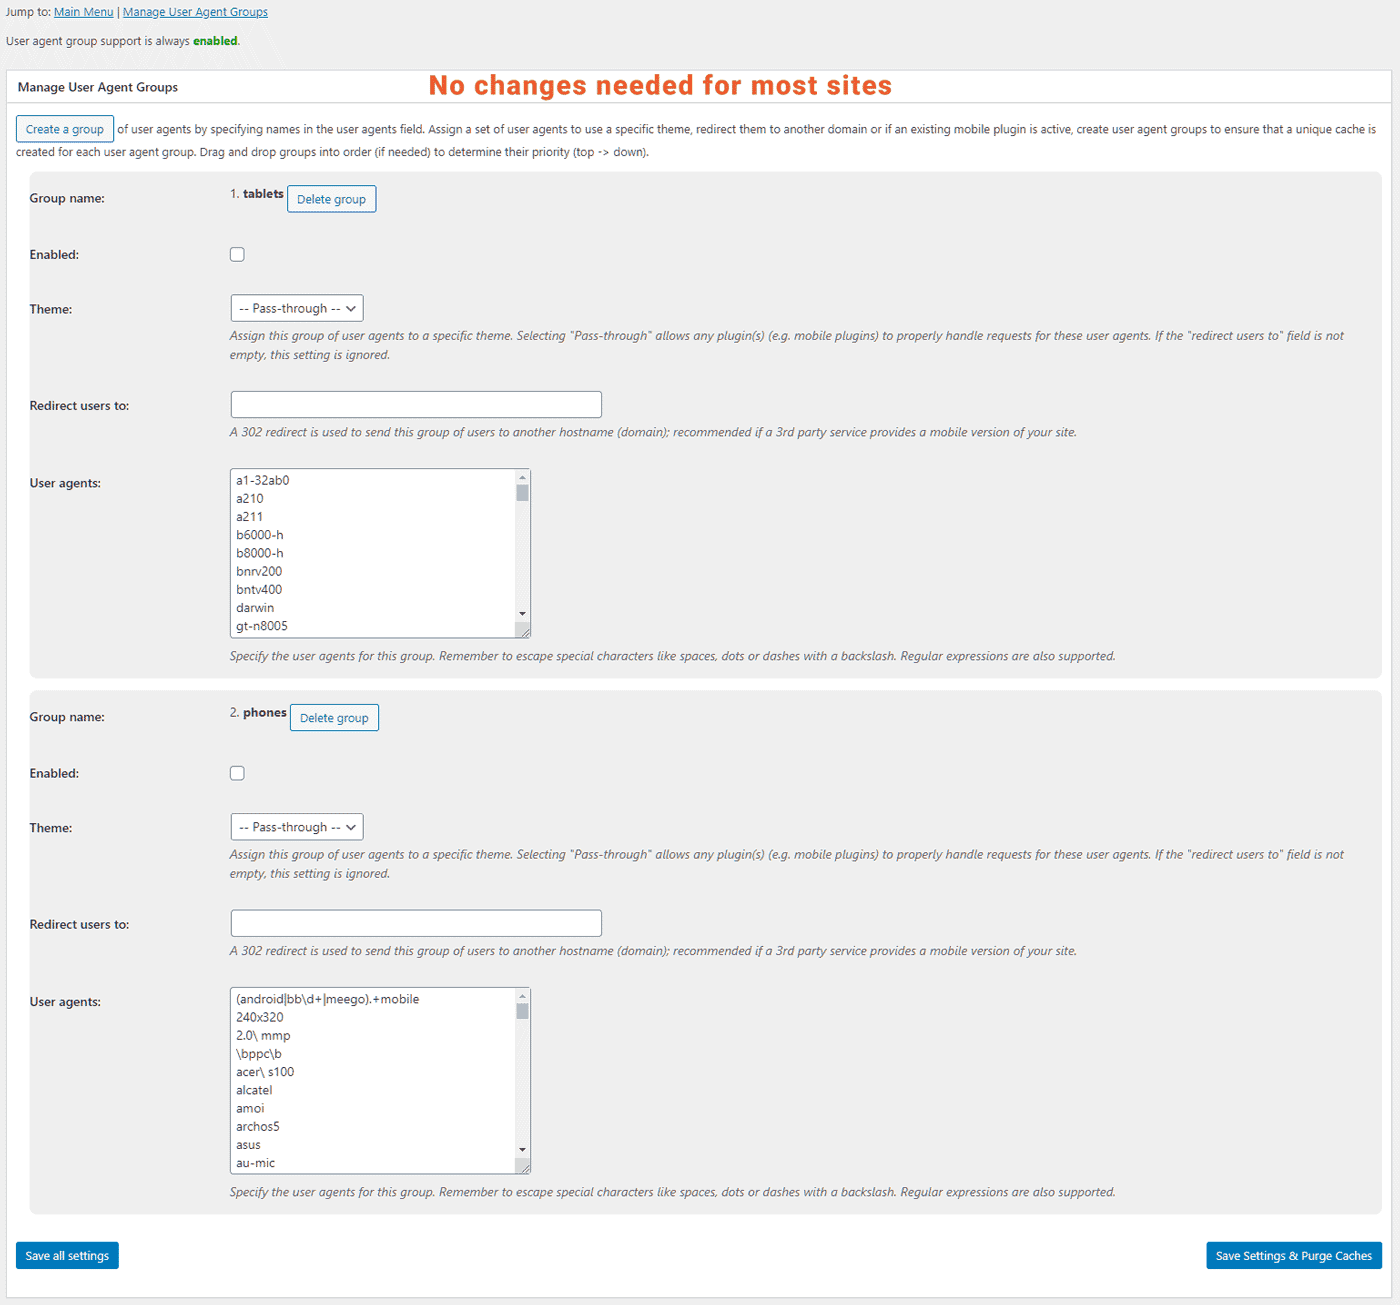
But if you still want to offer separate layouts based on devices, you can do it with W3TC's User Agent Group settings. It allows serving different cache to different devices.
There are two built-in groups of devices - tablets and mobile. Each includes a list of the common user agent strings used by popular devices available today.
You can also create new groups by clicking the Create A Group button.
To activate a group, check the Enable box and select a theme from the dropdown list. The default value is Pass Through, which uses the currently active theme.
You can even send specific devices to an entirely different domain with a 302 redirect. For example, you can use the redirect if the mobile version is served from a different domain.
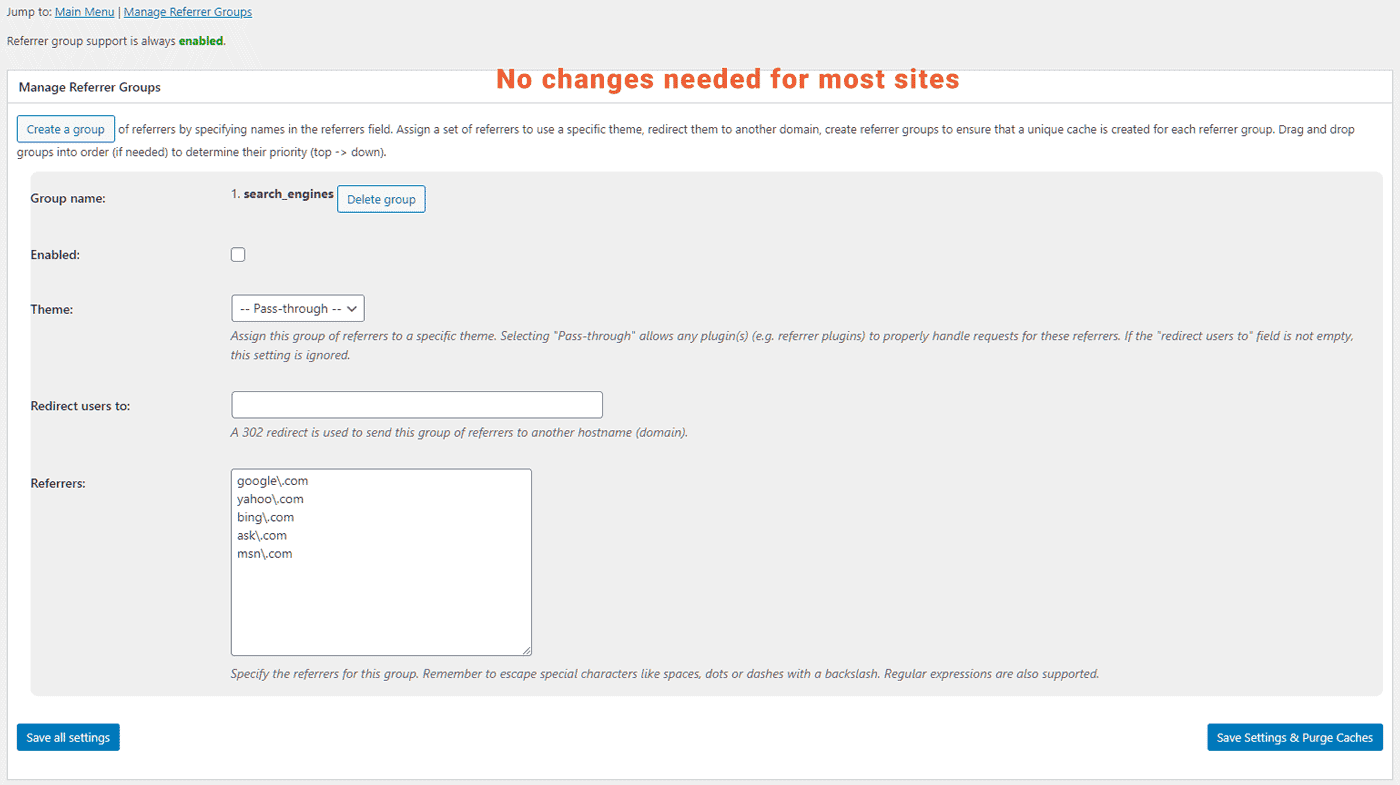
Referrer Groups
Referrer groups work in the same way as User-agent groups. But here you can group them based on their referrers - that is, from where a visitor landed on your site.
For example, if someone visits your site from Google, his referrer is google.com.
So, you can enable referrer groups to serve different content based on their traffic source. However, it is not required for most sites.
Cookie Groups
Again, Cookie groups work in the same way as user agent groups and referrer groups. The only difference is, here you can group users based on a specific cookie set on their browser.

CDN
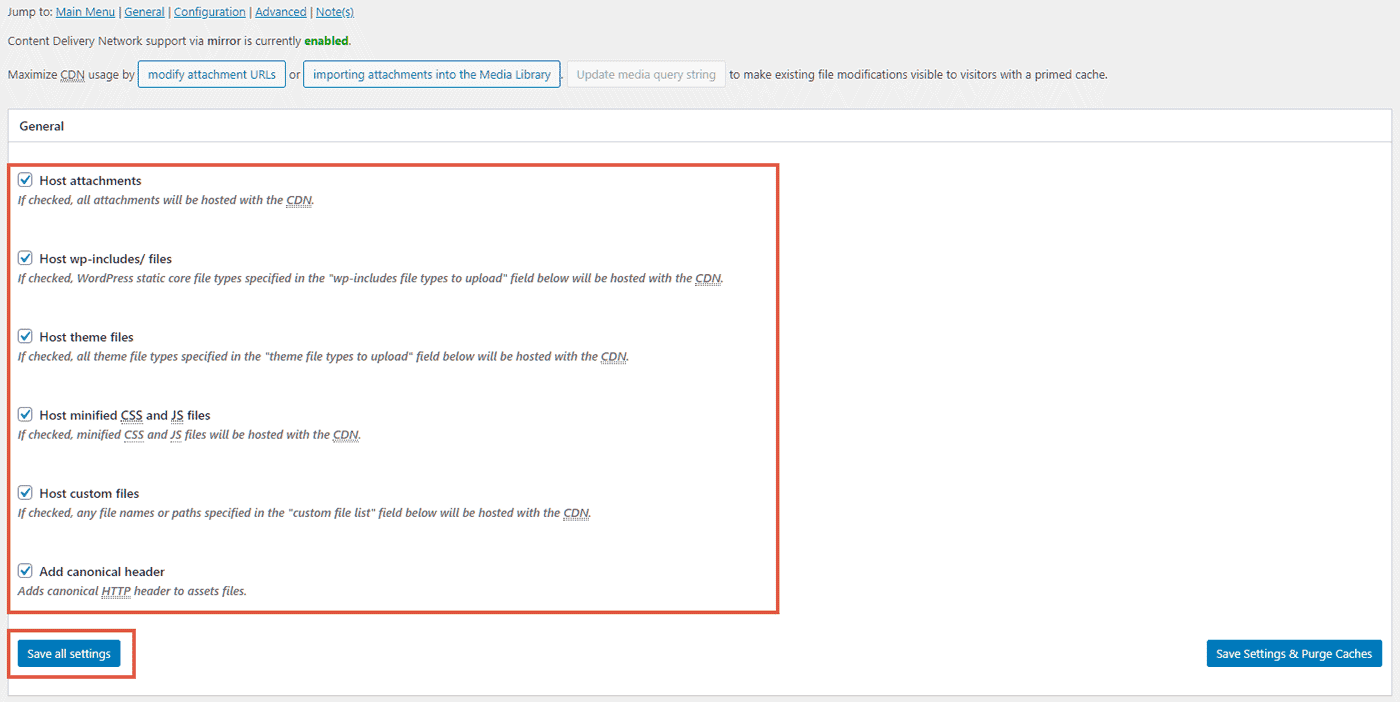
Under the General section, check all the boxes.
Next, configure it according to the CDN type you've selected earlier. If it is Generic: mirror, set two fields:
- SSL support: Auto
- Hostname: enter the hostname of your CDN pull-zone, like cdn.yoursite.com
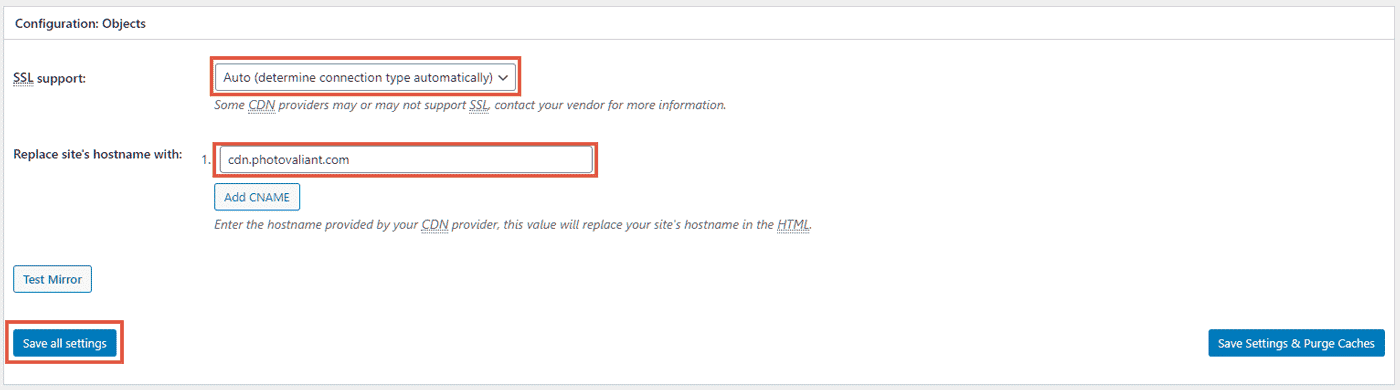
For other integrations other than Generic, provide appropriate credentials so that W3TC can successfully connect to it.
Fragment Cache
Since we haven't enabled it above, you can skip this section as well.

User Experience
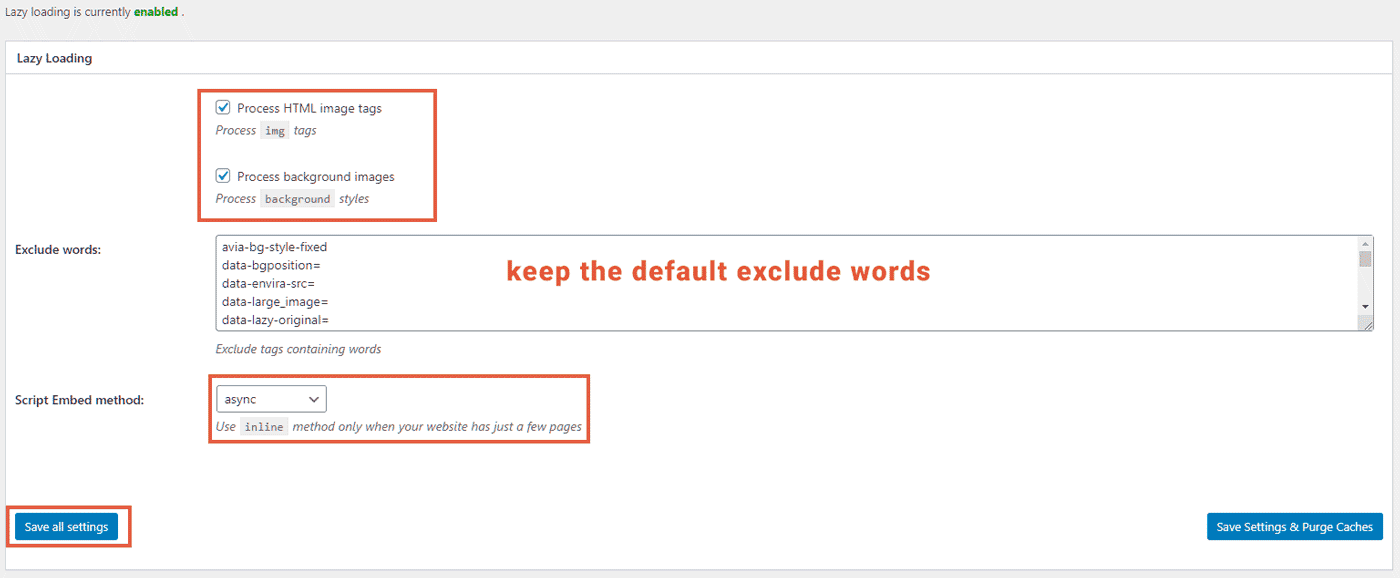
This section is where you can configure lazy-loading, which includes four main settings:
- Process HTML image tags: default - checked
- Process background images: default - checked
- Exclude words - prevent lazy loading image tags containing a list of words.
- Script embed method: default - async.
Keep all the defaults for optimal performance.
Going Further
Pro Versions of W3TC
You've already recognized how powerful the free W3 Total Cache is. With a Pro license, you can get even more. It offers mainly the following additional features:
- Fragment Caching
- Full-site Delivery
- Rest API Caching
- Support for more extensions
- Cache Statistics
- Eliminate render-blocking CSS
The price is $99 for one year.
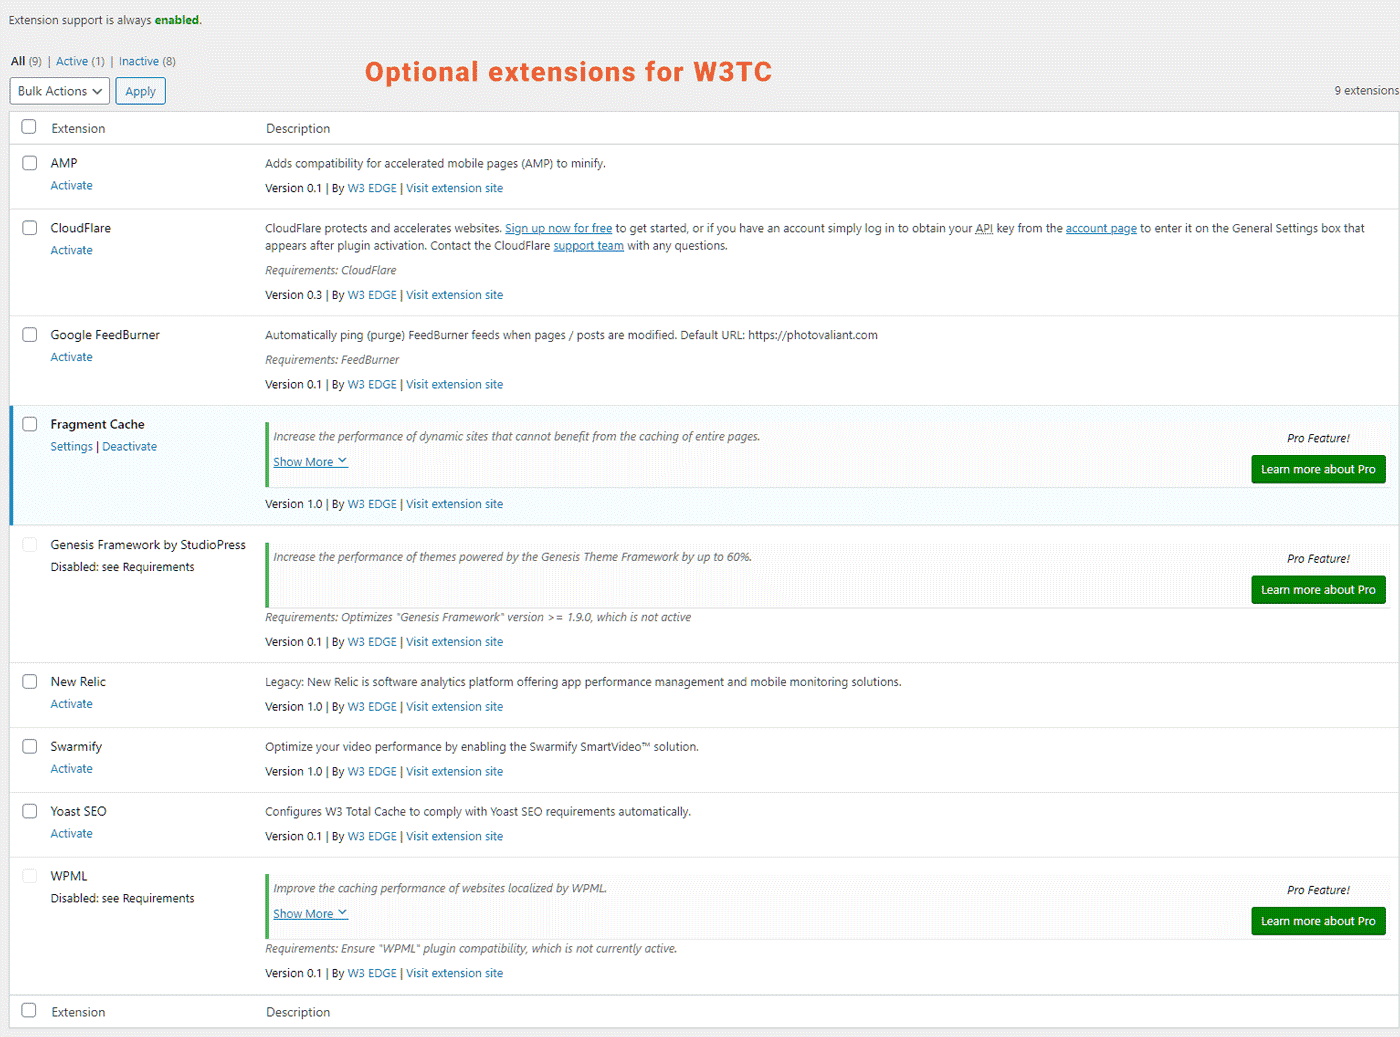
Extensions
The extension page contains a couple of free and premium add-ons. They work like plugins on top of W3TC.
Conclusion
W3 Total Cache has the potential to be a silver bullet to fix all the performance issues of a WordPress site. But for that, you have to set it up correctly, which is a daunting task for many.
In this post, I have tried my best to explain each of the settings to the best of my knowledge. I hope it will help you in configuring your site. If you have any questions, or if I was not clear somewhere, please ask in the comments.