This article may contain affiliate links. If you buy some products using those links, I may receive monetary benefits. See affiliate disclosure here
Adding proper security headers is one of the things that many small website owners often overlook. The reason is, it's not as obvious as enabling HTTPS or using a strong password. But, it's not unimportant either.
I first learned about the security headers from the WebPageTest site. When you test your site performance, the tool gives a grade score for security also, in addition to loading speed and other speed-related metrics. It mainly checks whether the relevant headers are present or not. When I first tested my site, the grade was F, the lowest possible score.
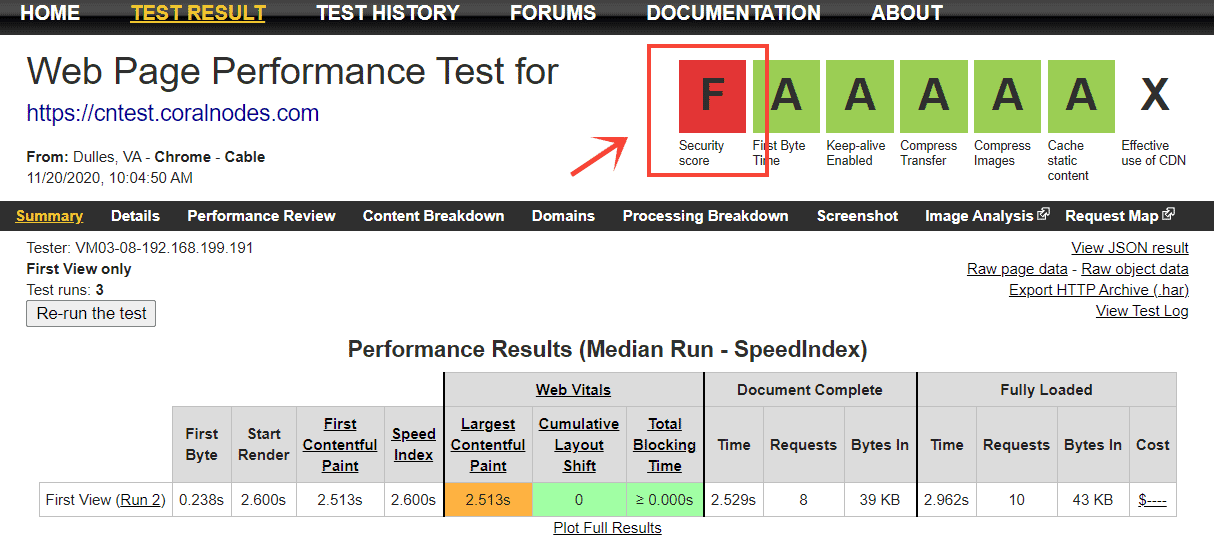
If you want to know your score, test your site at WebPageTest. Or, you can also use SecurityHeaders(dot)com to get a more detailed analysis.
So, in this post, we will discuss what are HTTP security headers, the list of important ones, and how to implement them on a WordPress website, manually as well as using a plugin.
First let us the list of headers.
List of Important HTTP Security Headers
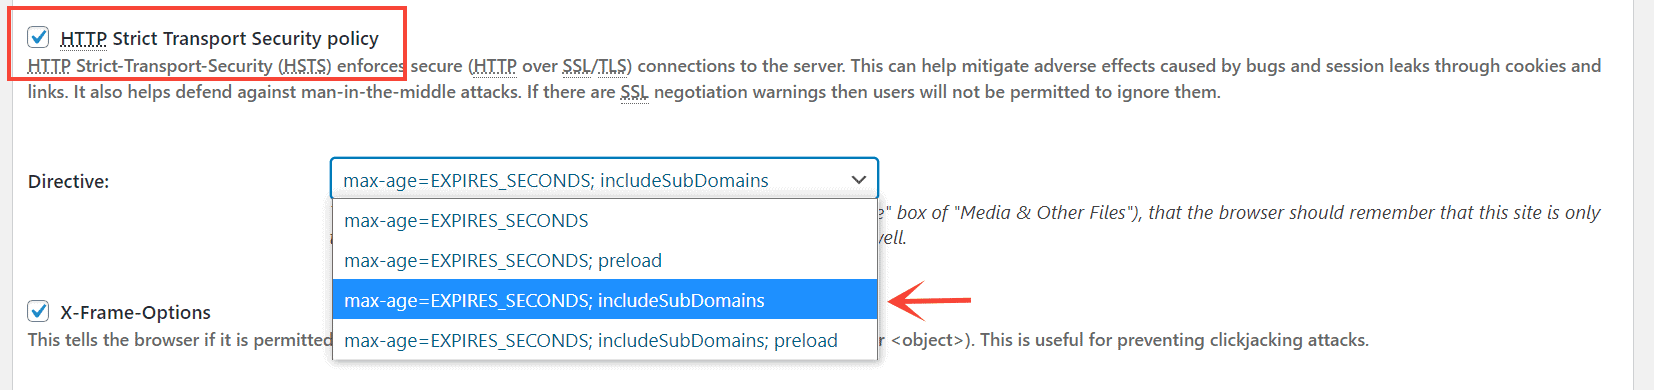
1. HTTP Strict Transport Security Policy (HSTS)
If you have implemented HTTP to HTTPS redirection on your site, users will automatically get redirected to the secure version of the site, even if they typed just http://yoursite.com. But still, the browser will momentarily connect with the insecure version before getting redirected. It leaves a small window for exploitation, like man-in-the-middle attacks.
That's where HTTP Strict Transport Security Policy, a.k.a HSTS comes useful. When enabled, it forces the browser to automatically use the secure https:// version.
But, for that to work, the user must have visited the site at least once. Only then the HSTS directive gets stored on the browser's memory.
There is a solution for that too - HSTS preloading. There is a website called hstspreload(dot)org where you can find the details. If you want, you can also add your domain to the list of preloaded sites. All major browsers check this list before loading a site. So, even if it's the first visit, the user will be redirected to the HTTPS:// version by the browser. Popular sites like Facebook and Google are already using this feature.
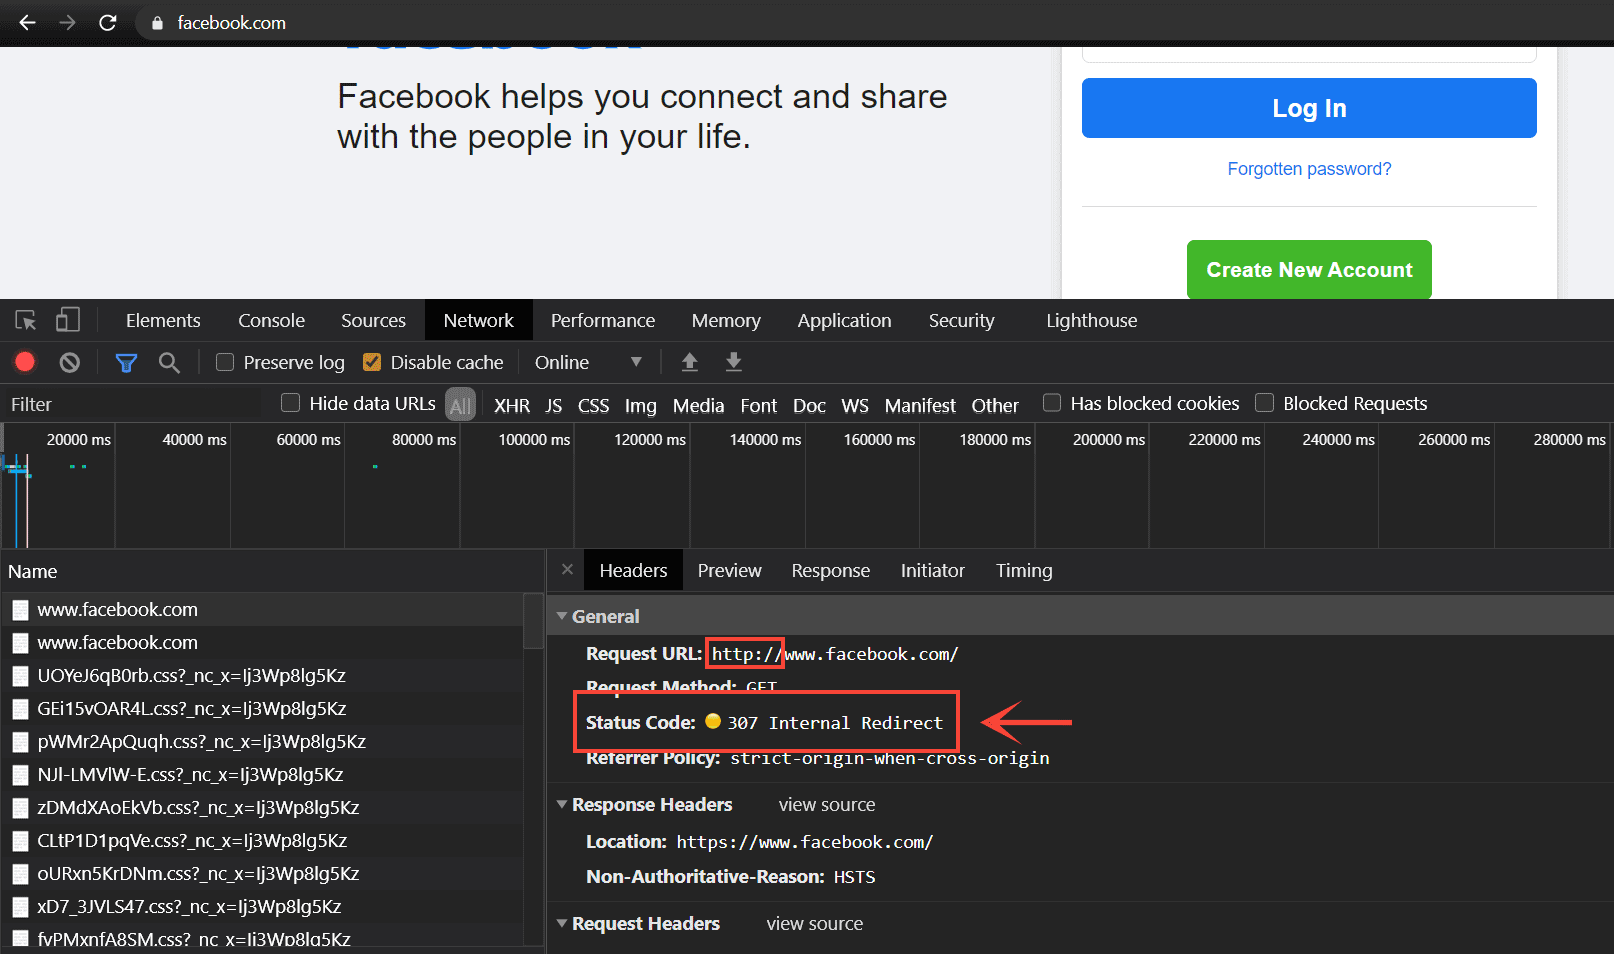
Facebook using HSTS and the browser sending a 307 Internal Redirect when I typed http:// in the address bar
You can check the preload status in Chrome by going to chrome://net-internals/#hsts. There, you can also add or delete a domain from the preload list.
The HSTS header supports three headers:
- expire-time
- includesubdomains
- preload
Out of these, expire-time specifies how long the HTTPS enforcement for a domain stays valid in the browser. After that time, the browser will recheck the header sent by the server.
In short, HSTS is essential for all websites dealing with sensitive user data. Because that's where man-in-the-middle attacks pose a serious threat.
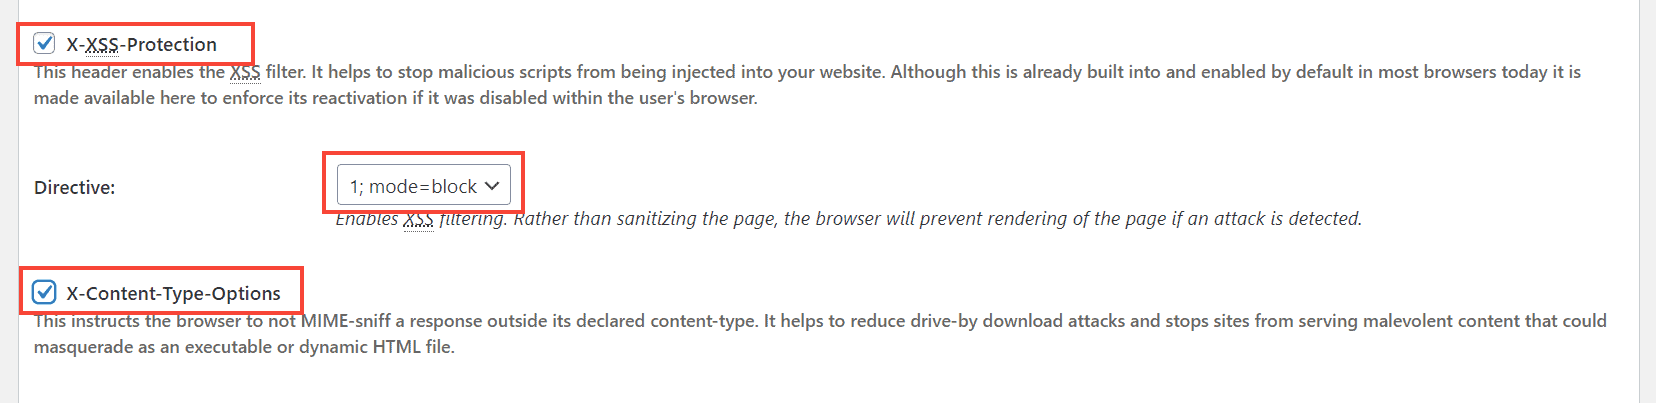
2. X-Content-Type-Options
Before discussing what X-Content-Type-Options is, I have to mention another thing called mime type sniffing. It's a feature available in browsers that enables them to guess the mime type of the resources in a document, like JS, CSS, JSON, XML, etc. It is supposed to be helpful when the server has not defined the Content-type header.
But, even if the Content-type header is defined, browsers can still guess the type to be something else. It can open doors for cross-site scripting attacks.
For example, your website allows users to upload text files to the server. When the file gets loaded on the front-end, you set the mime type as Content-type: text/plain. So far, so good. But, if the user uploads a text file that contains some javascript, then the browser can wrongly identify the mime type as application/javascript, thereby executing the code in the visitor's browser. And if that javascript code contains some malicious javascript, then it's a Cross-Site Scripting (XSS) attack.
Check out this article came on Medium that helps to get a better understanding on how this security exploit works.
The X-Content-Type-Options header helps to prevent this exploit. It completely disables mime-type sniffing, so that browsers will respect the value set in the Content-type header.
The headers supports only one value: nosniff.
3. X-Frame-Options
The X-Frame-Options header helps to prevent another type of attack called clickjacking. By default, we can embed one website inside another using an HTML iframe tag.
Suppose you have a website where users can sign-up. On the account page, there is also a Delete Account button, which deletes the account in one click. Now, imagine an exploiter sitting somewhere else with another webpage about some other topic. On that webpage, there is a seemingly unharmful button, say a View More button, that looks like it is for loading more content.
But, the exploiter has embedded your site's account page on top of his webpage. He has done it in such a way that the Delete Account button is directly above the View More button. The whole embed is also invisible. He can use CSS properties like opacity, z-index, and position to create this effect.
Now, if a user logged in on your site visits the exploiter's webpage, and clicks the View More button, in reality, he will be clicking the Delete Account button, which deletes his account on your site. The person won't even know what happened, since he thought he clicked the View More button.
In short, using clickjacking, an attacker can trick an innocent visitor to take some action on a vulnerable site. Here is another post that came on Netsparker about how it worked on Facebook to gather likes.
So, using the X-Frame-Options header, you can prevent embedding your site on other domains.
It supports three directives:
- deny: prevents embedding altogether
- sameorigin: allow only on your domain
- allow-url: allows only on specific domains
4. Content Security Policy
Like X-Content-Type-Options, Content Security Policy (CSP) is another measure that helps prevent XSS attacks. By setting a CSP header, you can specify the sources from where your site can load the resources. So, if an attacker tries to load a malicious code from another domain that is unspecified, it won't be executed.
CSP supports a multitude of directives. Some of them are:
- default-src
- img-src
- script-src
- style-src
As obvious, the default is default-src, which sets the source domains for all types of resources. For example, you can set:
Content-Security-Policy: default-src https://*.mysite.comIt tells the browser to load resources only from mysite.com and its subdomains via a secure HTTPS connection.
However, there are a few inconveniences here. Setting CSP sources also disables inline javascript, as inline JS is often the medium for executing XSS attacks. But, as most sites use inline Javascript, setting CSP can also break the site.
Another problem is, websites often load resources from various third party sources, like Google Fonts CDN, Javascript CDN. If you miss any of these sources in the CSP, then that can also break the site.
Since WordPress sites use a lot of inline JS and third party resources, we won't be setting this header fully, for now. But you can still use it to redirect insecure requests to a secure HTTPS version - use the upgrade-insecure-requests directive only, without mentioning any of the src directives:
Content-Security-Policy: upgrade-insecure-requests5. X-XSS-Protection
Browsers have a built-in mechanism to filter our harmful-looking inline javascript code. With that, the browser checks if the inline code contains a payload set by the URL parameters. Check out this Stackexchange thread to know more about how it works.
The X-XSS-Protection header just asks the browser to leverage this feature and block any malicious code. But, if you have already set the CSP header comprehensively with all the source domains, it is already blocking all inline javascript codes. So, there is not much need to set this header.
However, if you are not using the CSP header, then it will be wise to set the X-XSS-Protection header.
Manually Adding Security Headers using Htaccess
Now, let us see how you can set these headers manually by editing your site's .htaccess file. If you are using WordPress, then you can use the Htaccess editor plugin to add the code at the top of your site's Htaccess file.
<IfModule mod_headers.c>
Header always set Strict-Transport-Security "max-age=31536000; includeSubDomains"
Header set X-Content-Type-Options "nosniff"
Header set X-Frame-Options "SAMEORIGIN"
Header set X-XSS-Protection "1; mode=block"
Header always set Content-Security-Policy "upgrade-insecure-requests;"
</IfModule>
Note: Code referenced from Htaccessbook.
Adding Security Headers to WordPress using the W3 Total Cache Plugin
If you are using the W3 Total Cache plugin, then there is no need to manually add the code to the Htaccess file. The plugin includes a section to set the headers from a graphical user interface.
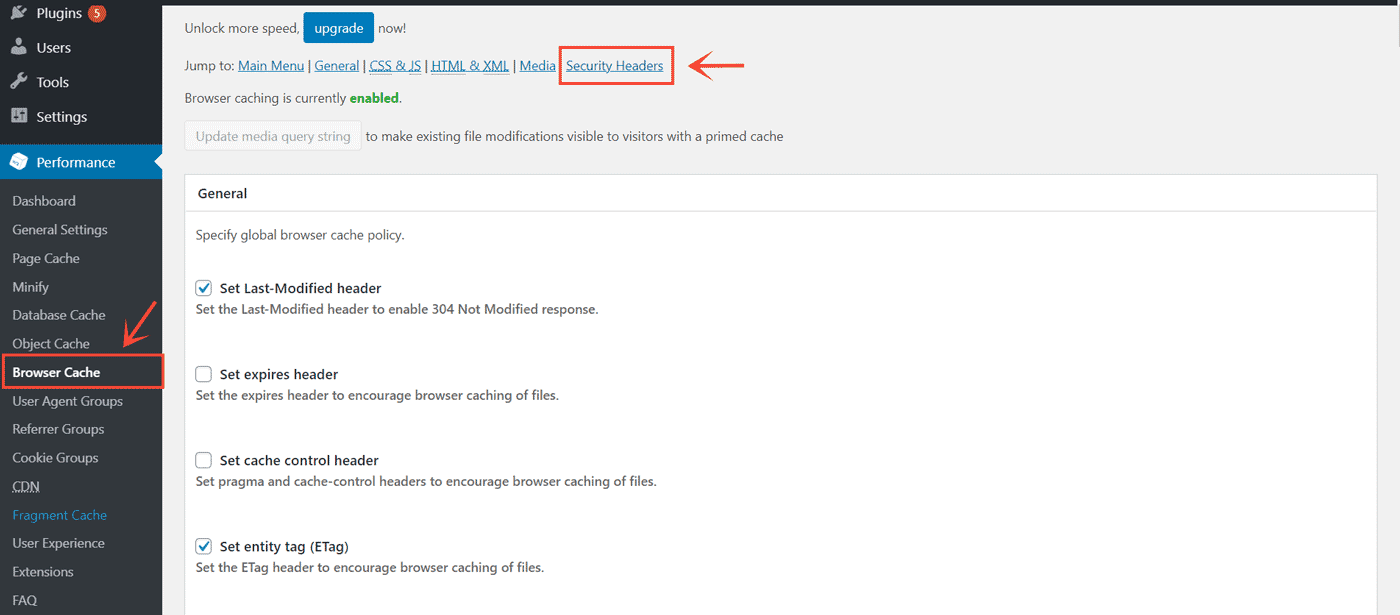


Here, note that W3 Total Cache also allows setting two more headers we haven't discussed above - Referrer-Policy, and Feature-Policy.
Referrer-Policy controls the referrer header sent along with the outbound links. In short, if someone clicks an outbound link on your site, the other site receives the URL of your site as the referring site. In some edge cases, it can result in information leaking, if some sensitive information is included in the URL. So, setting the Referrer Policy helps to avoid that. But, it's not a serious concern for most websites.
Feature Policy, on the other hand, is related more to the features than security.
Summary
Above, we have discussed all the important headers, and how adding them can enhance the security of your websites. I have also included reference links throughout the post, which can help you in learning more about the topic. Finally, we learned how to add the headers manually or using a plugin to a WordPress website.
If you have any queries about the things we have discussed, feel free to ask in the comments below.