This article may contain affiliate links. If you buy some products using those links, I may receive monetary benefits. See affiliate disclosure here
If your WordPress site has a slow response time, then the first thing you should check is caching. Unless you need to serve fully dynamic content to each visitor, page caching is ideal for most websites.
In an earlier post, I had written about the best caching plugins available for WordPress. Out of those plugins, WP Super Cache is one of the easiest to configure. Unlike W3 Total Cache, it won't overwhelm you with a lot of options.
So in this post, we will discuss the different settings available in WP Super Cache. If you don't know how to configure it correctly, by the end of this post, you will be able to do it.
See also:
- WP Super Cache vs W3 Total Cache
- WP Super Cache vs WP Fastest Cache
- W3 Total Cache Recommended Settings
Installing and Activating WP Super Cache
Just like any other plugins, go to Plugins > Add New page on your WordPress dashboard and search for 'wp super cache'. Then click 'Install', followed by 'Activate' to activate the caching plugin.
After activating, you will see a new sub-menu item - WP Super Cache - under the Settings menu. Open it.
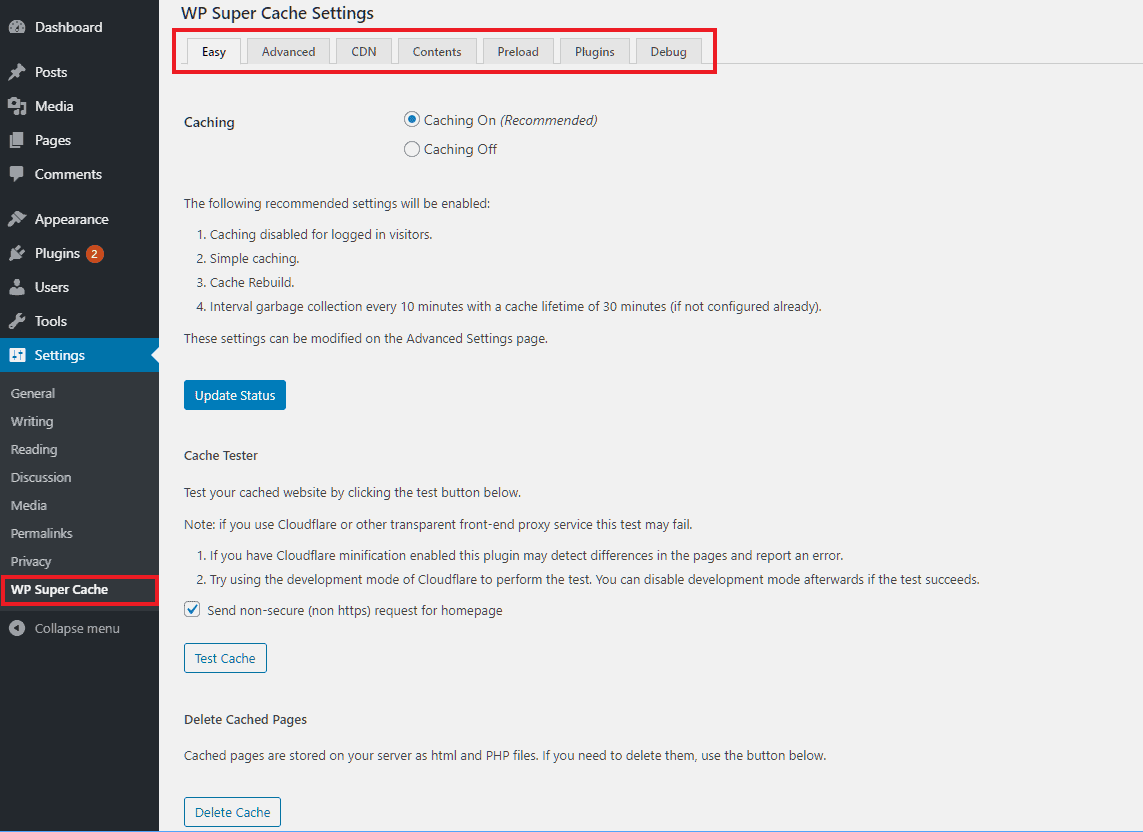
On that page, you can find seven primary tabs:
- Easy: enabling cache & testing cache
- Advanced: select cache method and other advanced settings
- CDN: optionally integrate a CDN
- Contents: view cache statistics, or purge cache
- Preload: select whether to preload the cache in advance
- Plugins: integrate optional addons
- Debug: turn on or off the debug mode
Let us discuss each of the tabs one by one.
Basic Settings - Enabling Page Cache & Testing
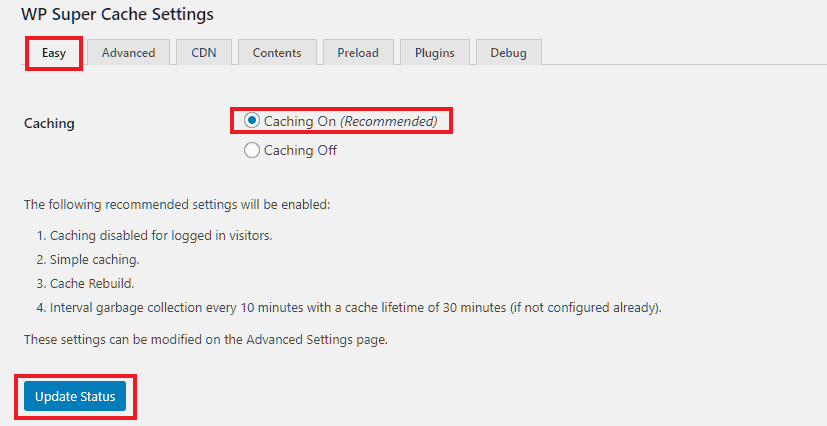
Under the Easy tab, select the radio button against 'Caching On' and click the Update Status button at the bottom.
Now, caching is enabled on your site. WP Super Cache will start generating static HTML files for each page. But that's not all. There are more settings in the Advanced section.
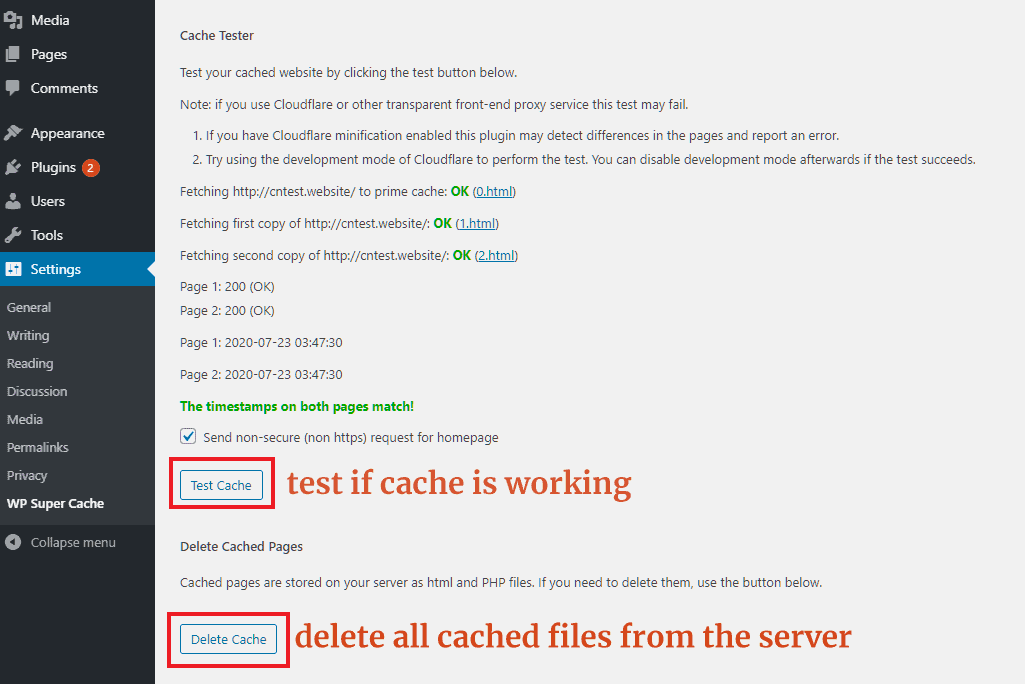
But before going there, you can test if the cache is working. So, below the Cache Tester section, click the Test Cache button. If everything is fine, you will see a success message in green color.
Below that, there is also another button to delete the cached files.
Advanced Settings
At the top of the Advanced tab, there is another checkbox to enable the cache. We have already done it in the Easy tab. So keep it checked here as well.
Other than that, the following are the important things we have to configure under this tab:
- Cache Delivery Method
- Restrictions
- Rebuild
- Location
Selecting Cache Delivery Method
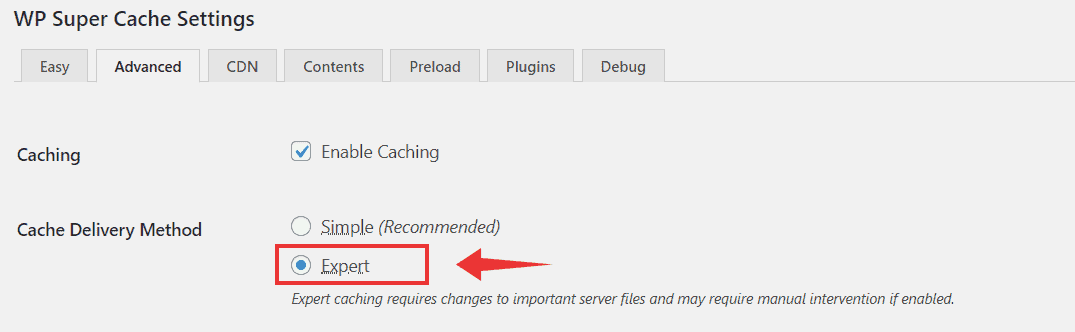
WP Super Cache offers two methods for implementing cache:
- Simple: The recommended method. As it doesn't involve modifying any files on the server, it will work on almost all hosts without any issues. So it is the easiest way to enable cache.
- Expert: this method involves modifying the .htaccess file.
On most hosts (e.g., Dreamhost), the Expert mode works without any manual intervention. But with some hosts (e.g., Cloudways), you might get a permission issue when WP Super Cache tries to edit the file.
But it has an advantage:
- When I tested both the methods, the Expert method gave the maximum speed benefits.
It completely eliminates all the PHP processing, effectively making your site static. Whereas in Simple method, there is still some PHP execution involved. That's why the difference in speed.
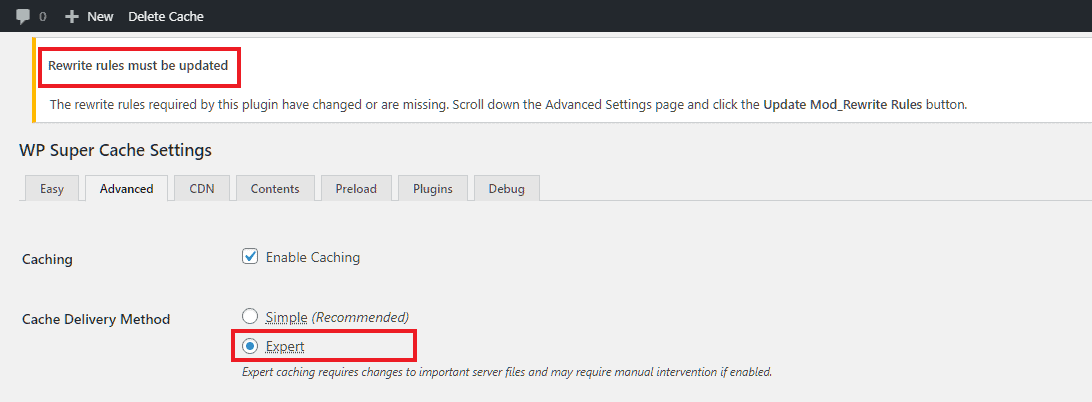
Enabling Expert Caching Method
So I recommend selecting this method even though it requires editing the .htaccess file.
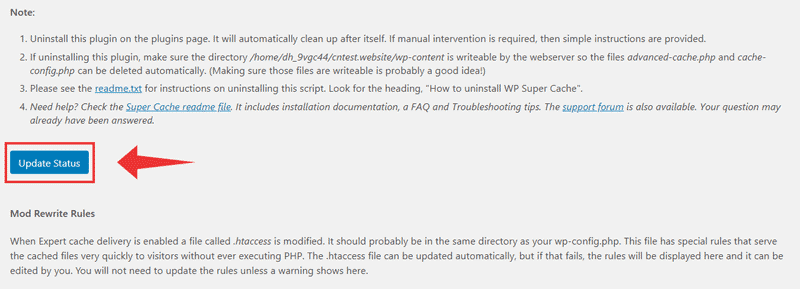
If you see a warning like below, the plugin will display the rules you have to add to the .htaccess file. You can use a plugin like WP Htaccess Editor to add the code to the file. Or if you don't want to install another plugin, you will have to open the file using FTP. Check this video to learn how to access your site files using FileZilla FTP.
Cache Restrictions
Under the Cache Restrictions sections, check this option:
- Disable cache for logged in visitors.
Generally, it is a recommended way to keep things uncached for logged-in visitors. For example, when you are making some changes or debugging, you might want want to see the original uncached output.
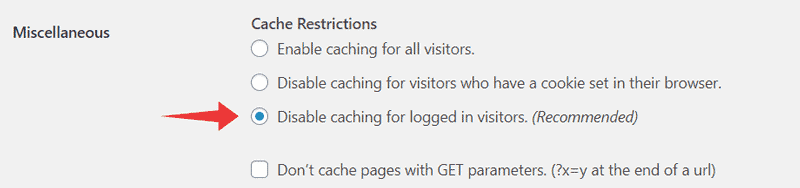
Below that, there is another option to disable cache for visitors with GET parameters. However, it's wise to keep it unchecked. For instance, if you link to or advertise your site on social media platforms like Facebook, they add a GET parameter. So, all such visitors will receive the slow uncached page, which is not a good thing.
Enable Compression & Rebuild

Gzip Compression
Sending uncompressed files over the network is highly inefficient. That's why you should enable compression. With WP Super Cache, you can do it in one click. Remember, changing this option will purge any existing cached files.
However, to use it, your host should support Gzip compression. Most web hosts offer it via the mod_deflate Apache module. So, you can enable it without installing any additional plugins or packages. Some hosts even enable it by default, so your files will be compressed already. Even if so, you can enable it here as well.
To check if compression is working, view the source of any cached page after enabling this feature. If you can see 'compression = gzip' at the bottom, it's working fine.
In addition to that, you can check your site using an online tool to know the compression benfits.

Serve Supercache while Rebuilding
Below that, enable the Cache Rebuild option as well. With this option enabled, WP Super Cache will serve existing supercache files while new ones are being generated. For example, if a cache file is expired, visitors don't have to wait for the new one to be generated. Instead, they will receive the existing file.
Enable Browser Caching
With browser caching, your server asks the visitor's browser to store the files in its cache for a specific time. It's called leveraging browser cache. In a separate post, I have written about it in detail:
Unfortunately, WP Super Cache does not allow you to enable browser cache when you select the Expert cache delivery method.
In the comments section below, you can see a reader asked about the same. When you select the Simple method, WPSC does give an option to enable 304 Browser caching. But, it only checks if a supercached file has changed since the last request (see the description on this Github page). If it is the same, the server sends a 304 response code. The checking is done using PHP code without adding any modifications to the Htaccess file. So, it doesn't help to add any Expires headers for other files like CSS, images, and JS.
For all the other files, you will have to manually add the rules I have mentioned in the above post.
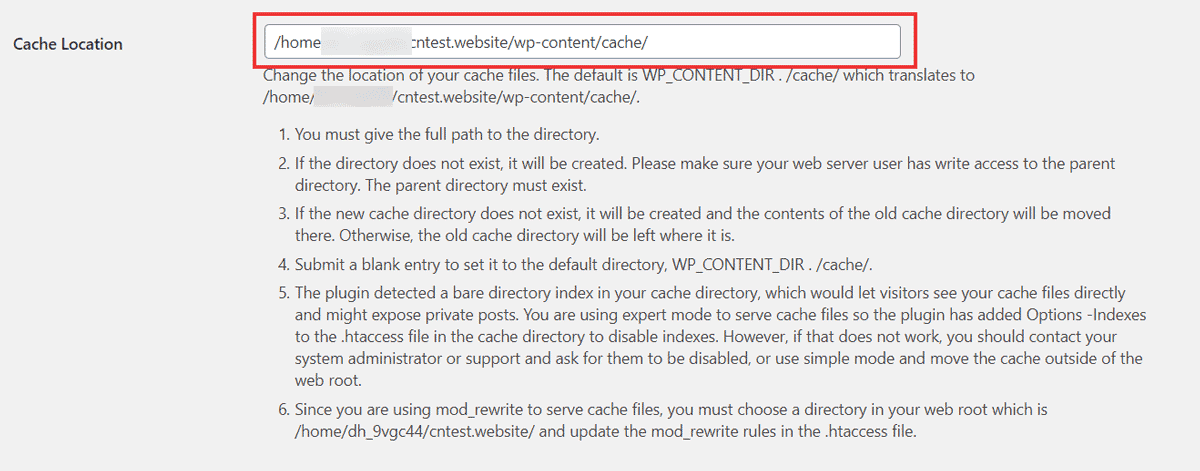
Cache Location
WP Super Cache stores your cached files inside the wp-content/cache/ directory. It's the default location. In most cases, you don't have to change it.
If you do want to change the location, don't forget to update the .htaccess file with the appropriate rules for the new location. If you are not sure about it, leave this section as it is.
Cache Lifetime & Garbage Collection
Another important setting is the Cache timeout (lifetime) and the Garbage collection schedule. The first one sets how long a cached file should stay valid. Whereas the second one sets how often the expired files should be removed from the cache.
Here, note that the expired files won't be removed immediately when it expires. It happens only when the next scheduled garbage collection runs unless you've enabled Preload. More on that later.
However, there is no optimum time setting that works for all sites. It depends on the content and usage of each site. For example, if you publish new content frequently, the cache lifetime should be short, and garbage collection should be more frequent. Otherwise, stale cache files will remain in the disk.
On the other hand, if your publishing frequency is less, you can set a longer duration. For a typical blog, four hours (14400s) for Timeout and once-in-an-hour garbage collection should be sufficient.

Below that, there are a few more settings, which are not that important. So, we will skip it for now.
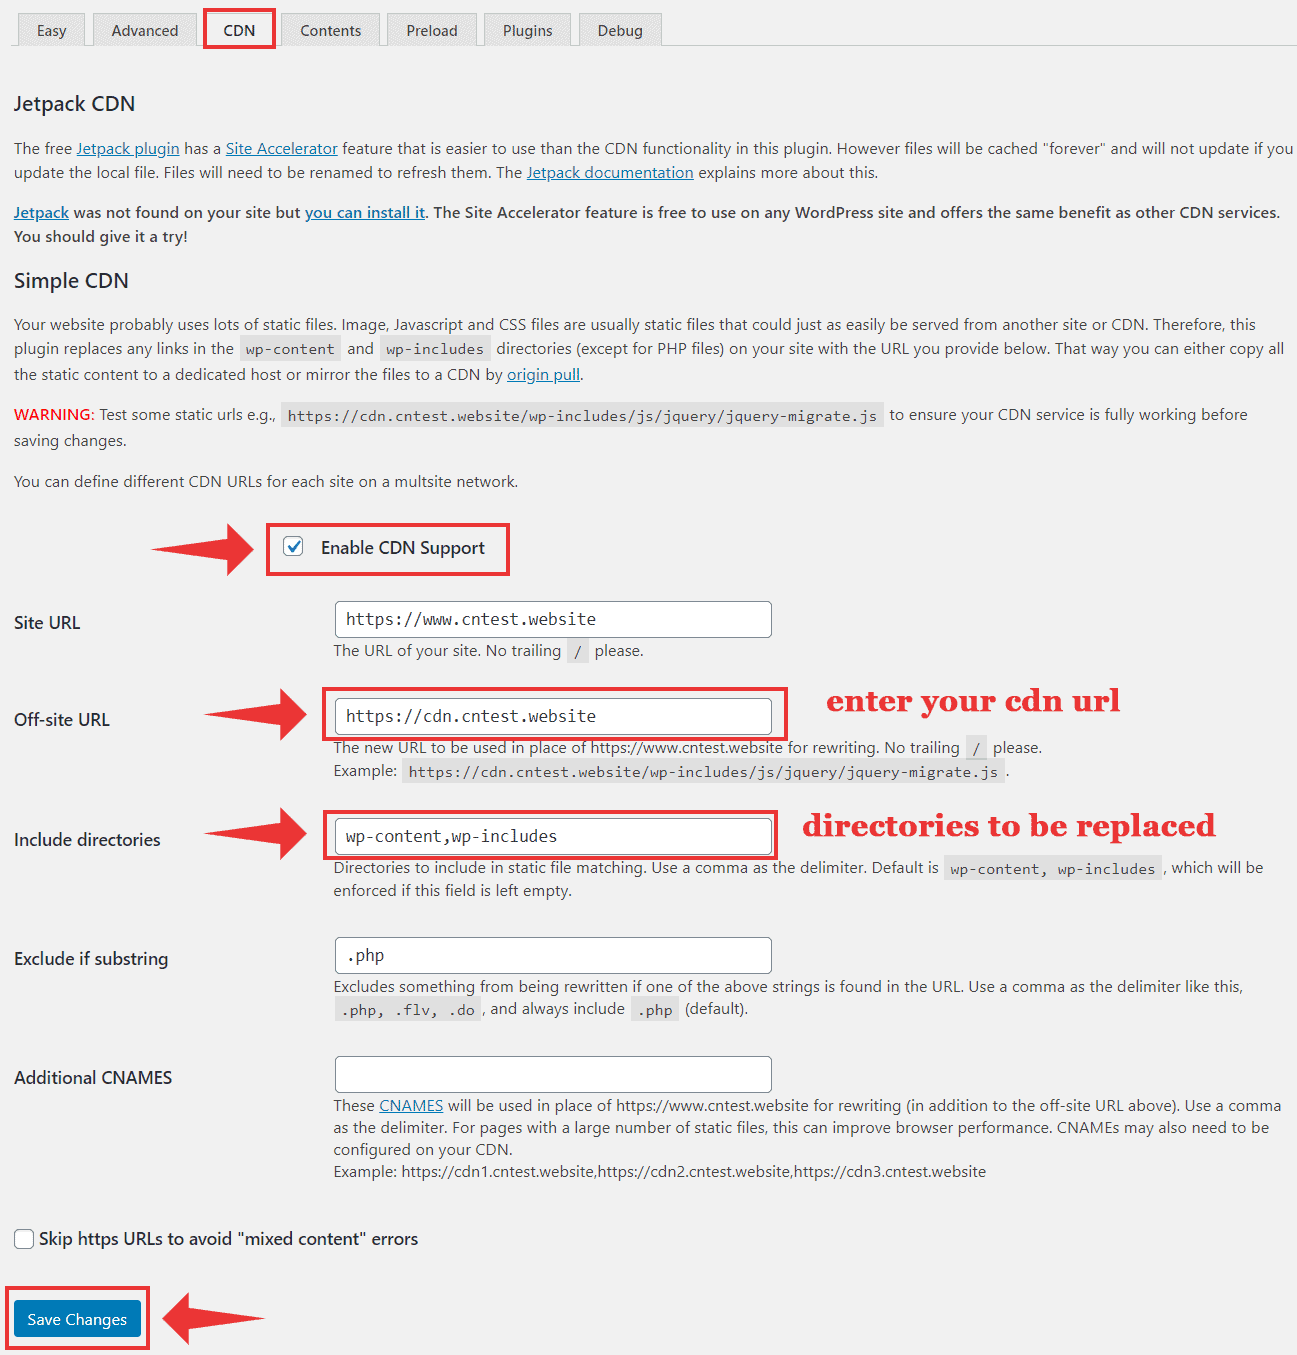
CDN
Next, let us see how you can integrate a content delivery network using WP Super Cache. So, open the CDN tab.
At the top, you can see a suggestion to try JetPack Site Accelerator. It's a free plug-and-play CDN from Automattic, the creators of WP Super Cache, and WordPress. But it lacks a lot of advanced features.
To integrate all other third-party CDNs, you have to replace the existing asset URLs on all pages with the corresponding CDN URL.
When you use WP Super Cache, you don't need any other plugin to do that search and replacement.
Check the box against 'Enable CDN Support', enter your CDN hostname, and click Save Changes at the bottom, and it should replace all the asset URLs.
Contents
In this tab, you can view the cache statistics and manage the contents. There are two categories here - WP-Cache and WP-Super-Cache, along with two buttons at the bottom to delete all/expired files.
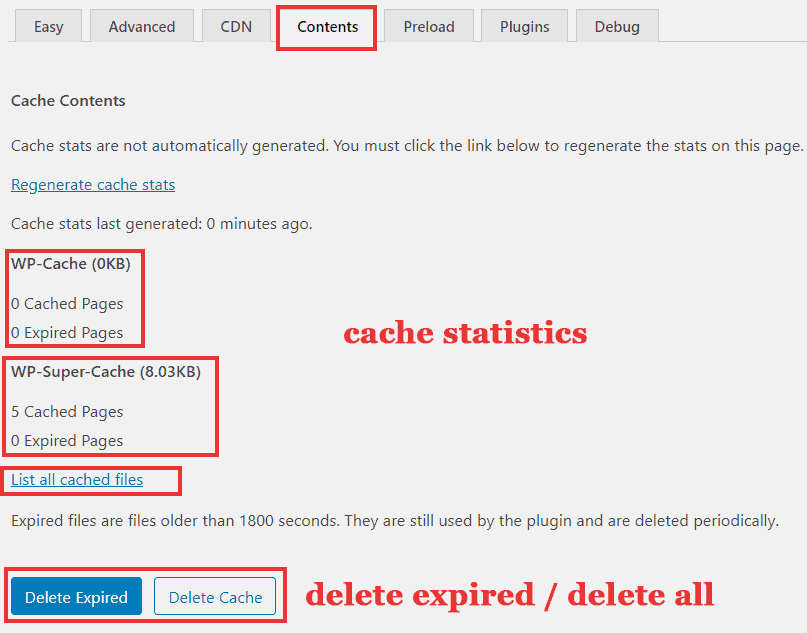
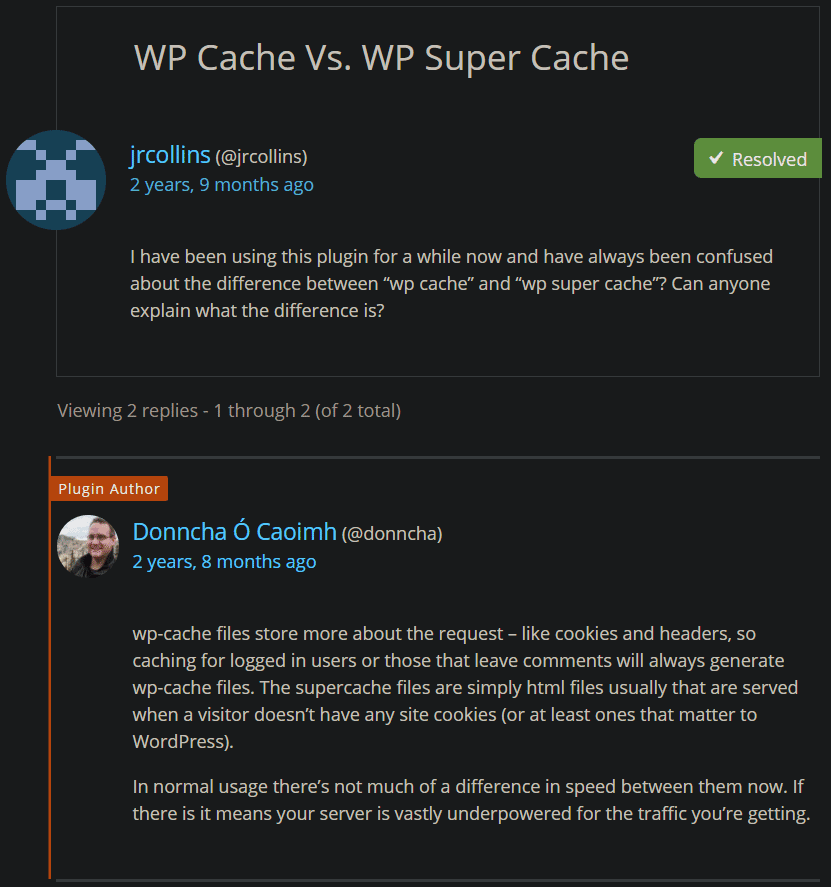
WP-Super-Cache contains the static HTML files generated by the plugin. Whereas, wp-cache contains request-related data, like cookies. There was an explanation in a support thread about the difference between the two:
Below the cache statistics, there is a button to list the cached files. Clicking on it will reveal the list of files in the Supercache.
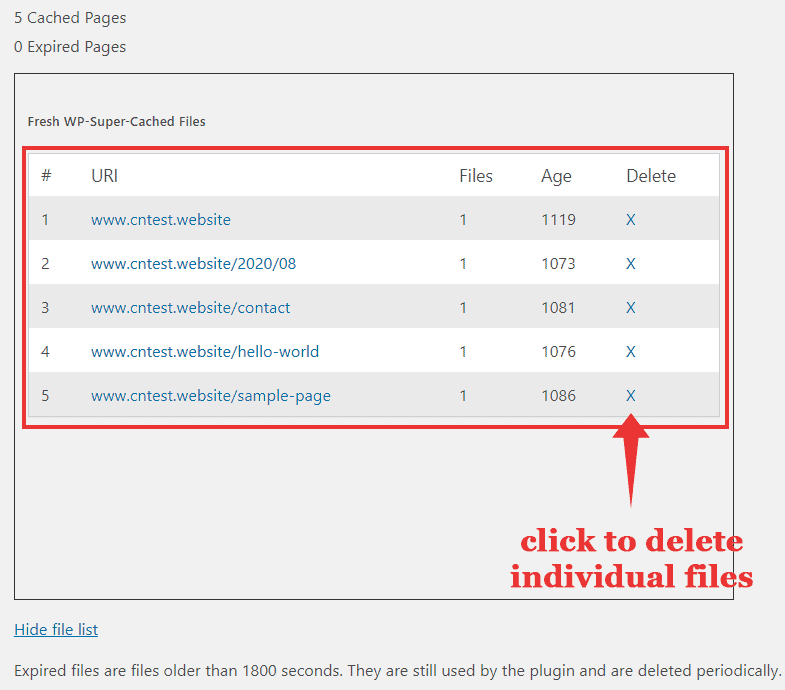
For each page in the cache, you can view the no. of files, age (in seconds), and a button to delete that page from the cache. So, if you want to purge a specific page instead of caching all files, you can use this option.
Preload
By default, WP Super Cache loads the cache for a page when someone visits that page. That means the first visitor gets the slower uncached response while subsequent visitors receive a faster response.
There is a problem with that method. If that first visitor is a search engine spider, it too receives a slower response. For example, if Google bot visits a page on your site right after you publish it, there won't be any cache for the newly published page. So, the bot might assume that your website is slow. It is not good for SEO.
That is where preloading comes useful. When enabled, WP Super Cache fills the cache in advance. So even the first user gets a fast cached response.
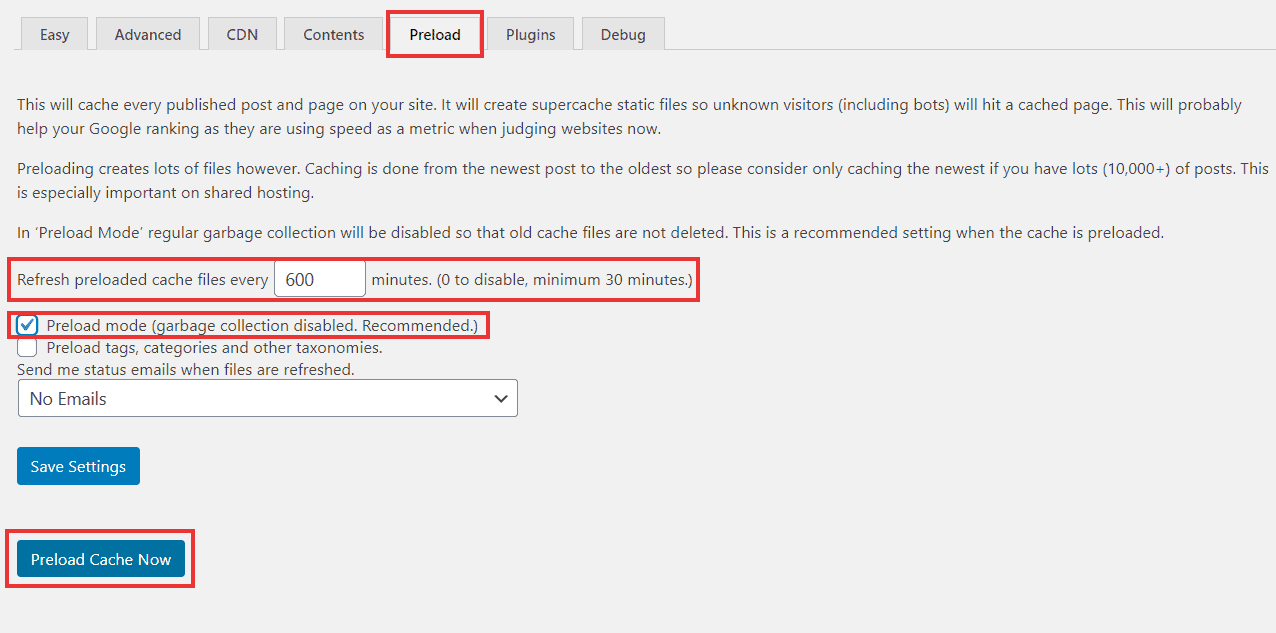
There are two main settings to remember here:
- Preload interval: It sets how often the preloaded cache should be renewed. The default value is 600 minutes (10 hours). Don't keep it too small, else it might overload the server.
- Preload mode: If you check this option, the usual garbage collection (as we set under the Advanced tab) won't occur. Instead, the next preloading renews all the files. Until then, the cache will stay there even after it expires.
Running Preload
After setting both the above options, click the Preload Cache Now button to start filling the cache right away. Refresh that page, and you should see something like the following:
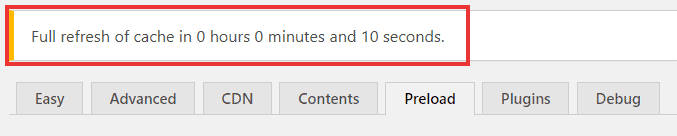
preloading just initiated
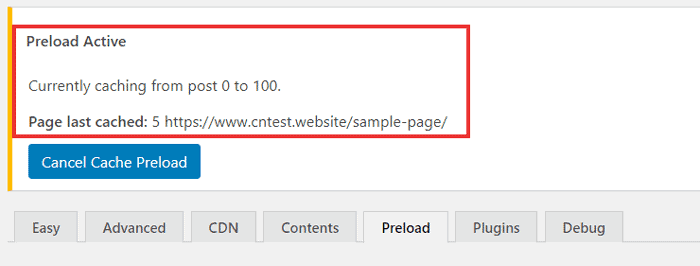
preloading in progress

completed, next in 600 mins
After the first batch of preloading is completed, you can view the details under the Contents tab as well. Note the line at the bottom.
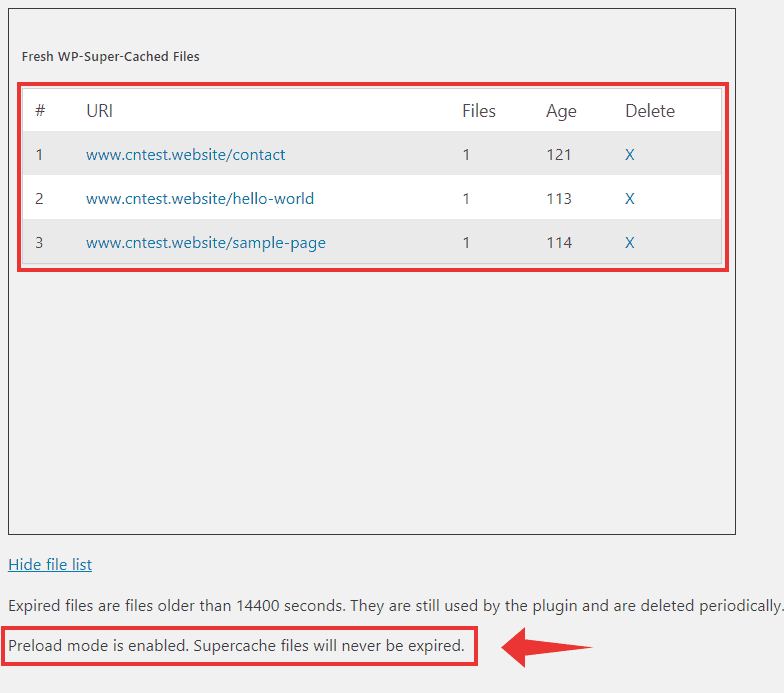
The Preload loads the first hundred pages by default. I had only three sample pages, that's why there is only three files.
If you have hundreds of pages, then it's not wise to preload it using WP Super Cache. In my experience, W3 Total Cache has more advanced settings suited for large sites. On W3TC, you can set the interval as well as the no. of pages to preload per interval. It even allows setting a sitemap link, so as to preload high-priority pages first.
Plugins
Apart from the core caching plugin, WP Super Cache also provides support for a few addons:
- Awaiting Moderation: removes the "comment is awaiting moderation" text.
- Bad Behaviour: helps to prevent spams, but it won't work when you enable compression
- Domain mapping: support for the domain mapping plugin
- Jetpack Mobile Theme: support for the WPTouch plugin
However, these settings are mostly unimportant. So you don't have to enable them in most cases.
Debug
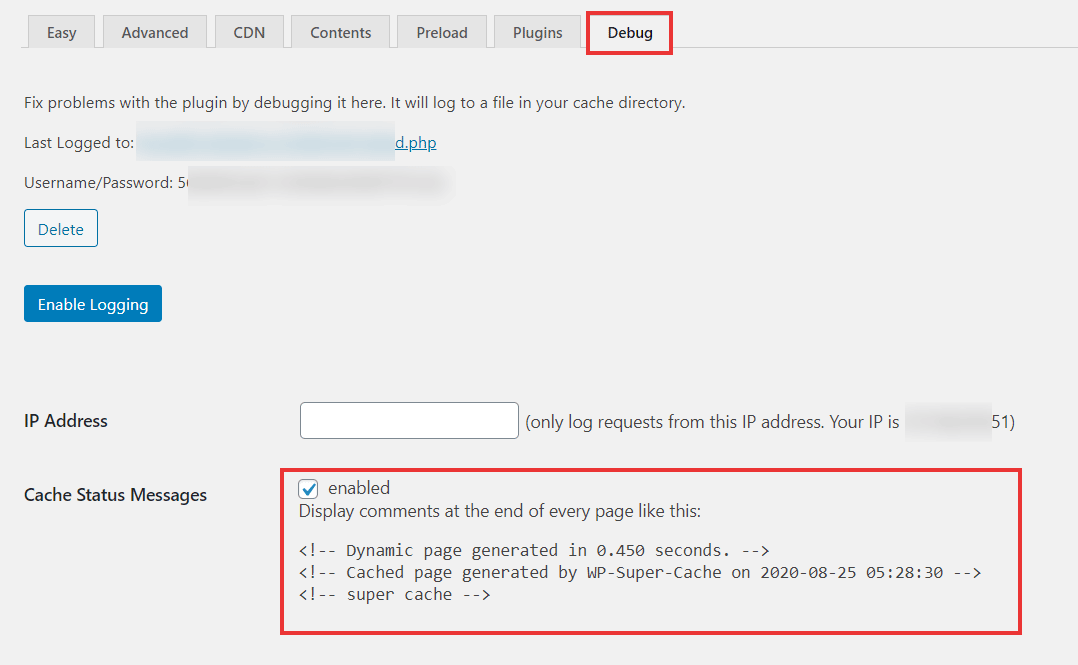
The last section is Debug. Here you can set the following things:
- Logging: once enabled, the plugin will load the details to a file in your cache directory, which can be helpful in finding and fixing issues. But under normal conditions, you don't have to enable it.
- IP Address: enable logging for a specific IP address. Here, you can enter your IP address, so it won't log requests from normal users, keeping the size of the log file smaller.
- Cache Status Message: Switched on by default. It adds an HTML comment at the bottom of the cached files.
Conclusion
Except for a few non-essential things, we have discussed almost all settings available in WP Super Cache. I hope now you are able to configure the plugin yourself.
If I have missed any crucial point, mention it in the comments.