This article may contain affiliate links. If you buy some products using those links, I may receive monetary benefits. See affiliate disclosure here
If you have ever tested your website using Google PageSpeed Insights, you might be familiar with this warning - eliminate render-blocking resources.
If you are struggling with the same issue, this post will help you. In this post, I will show you how I managed to solve this problem on my website, thereby increasing the PageSpeed score from 76 to 94.
What is rendering & How it gets blocked?
You know that a web page is made up of HTML markup. When you visit a website, your browser parses this HTML and renders (displays) it on the screen. However, this HTML usually calls additional resource files like stylesheets (CSS) and scripts (JS), which add design and functionality to the webpage.
Usually, the links to these external resources appear in the head section of the HTML markup, before the body tag that contains the main content of the page. So when a browser encounters any such file, it stops rendering the page and starts downloading and parsing them. And the rendering resumes only after it's finished.
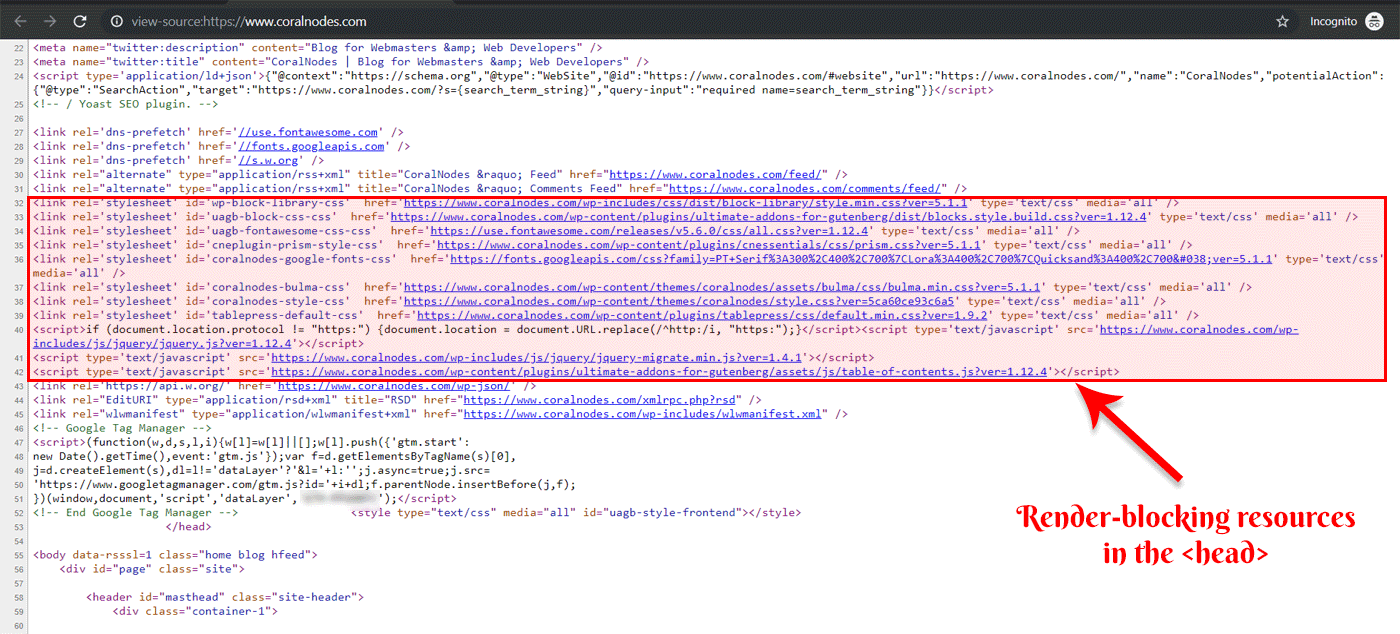
View source using Chrome Dev Tools
Disclaimer: The steps described in this article and in the video below may not be perfect. It solves only one warning in GPSI. Also, many things have changed with GPSI and Lighthouse after I initially published this article. Let me explain it.
A crucial step in eliminating render-blocking resources is inlining critical CSS and deferring (delaying) non-critical CSS. But with the free Autoptimize plugin, there is no way to split the CSS file into critical and non-critical. So, the deferred CSS file loads the rules we've already inlined. So, in effect, it is increasing the overall page size.
Not just that, if the inlined critical CSS is incomplete or imperfect, it can cause layout shifts when the original CSS file loads, which in turn worsens the CLS (Cumulative Layout Shift) score. In short, one fix introduces another issue. So, I am currently exploring better ways to implement it. Until then, I am not using the below techniques on this site. My point is, don't just blindly follow the steps and introduce new problems into your site. Instead, try the methods and use your findings.
Why is it a problem?
From a performance perspective, linking to CSS and JS in the head is not a good idea as it can slow down page speed. If you have more number of such render-blocking resources, the more time your visitors will have to wait to start seeing the actual content. PageSpeed Insights and Lighthouse shows two metrics to denote this initial rendering:
- First Contentful Paint - the time at which rendering starts
- First Meaningful Paint - the time at which something useful has rendered

So, any delay in the rendering process makes your users feel that your website is slow.
However, adhering to all the suggestions given by PageSpeed may not be always practical as it can affect the usability and maintainability of your site. It is not always necessary. So, use these guidelines to identify serious performance issues and address them.
Steps to remove render-blocking CSS & JS
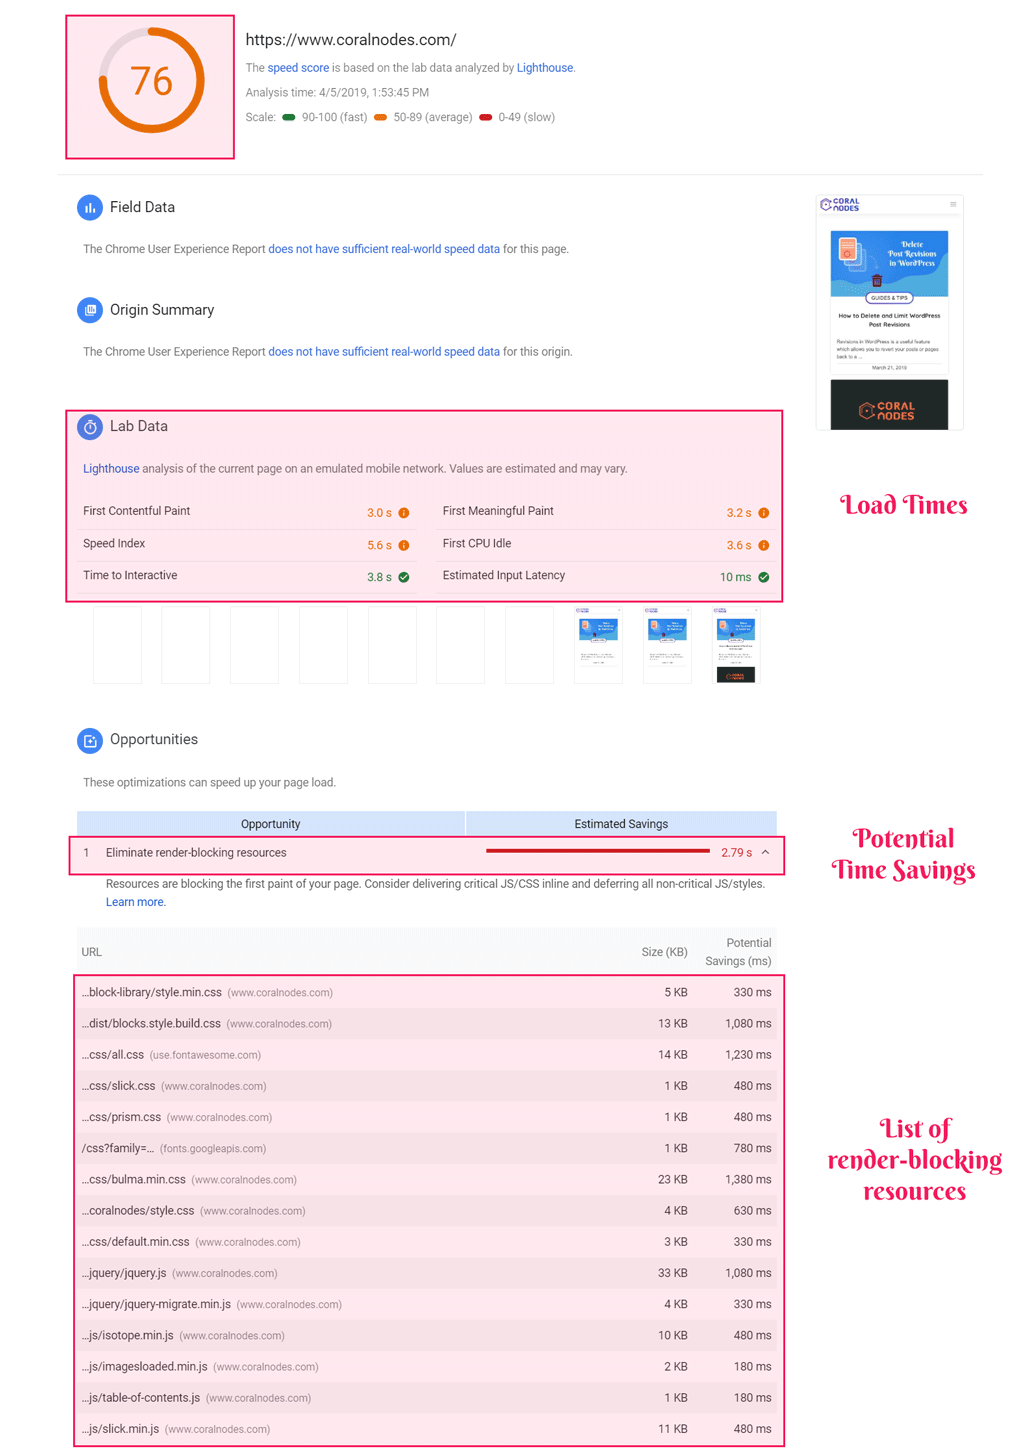
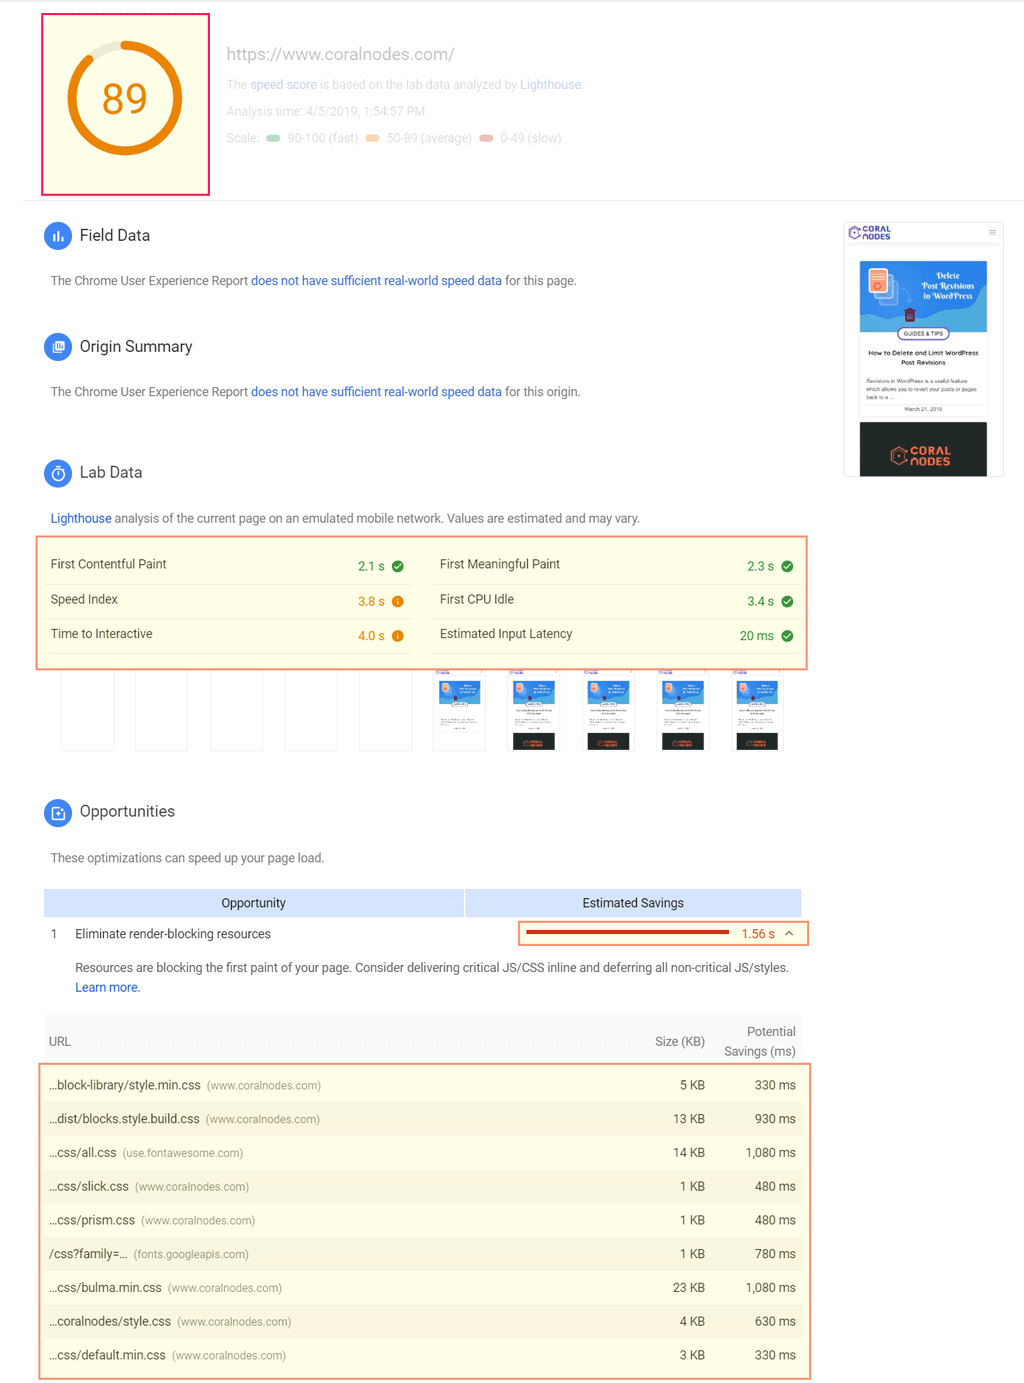
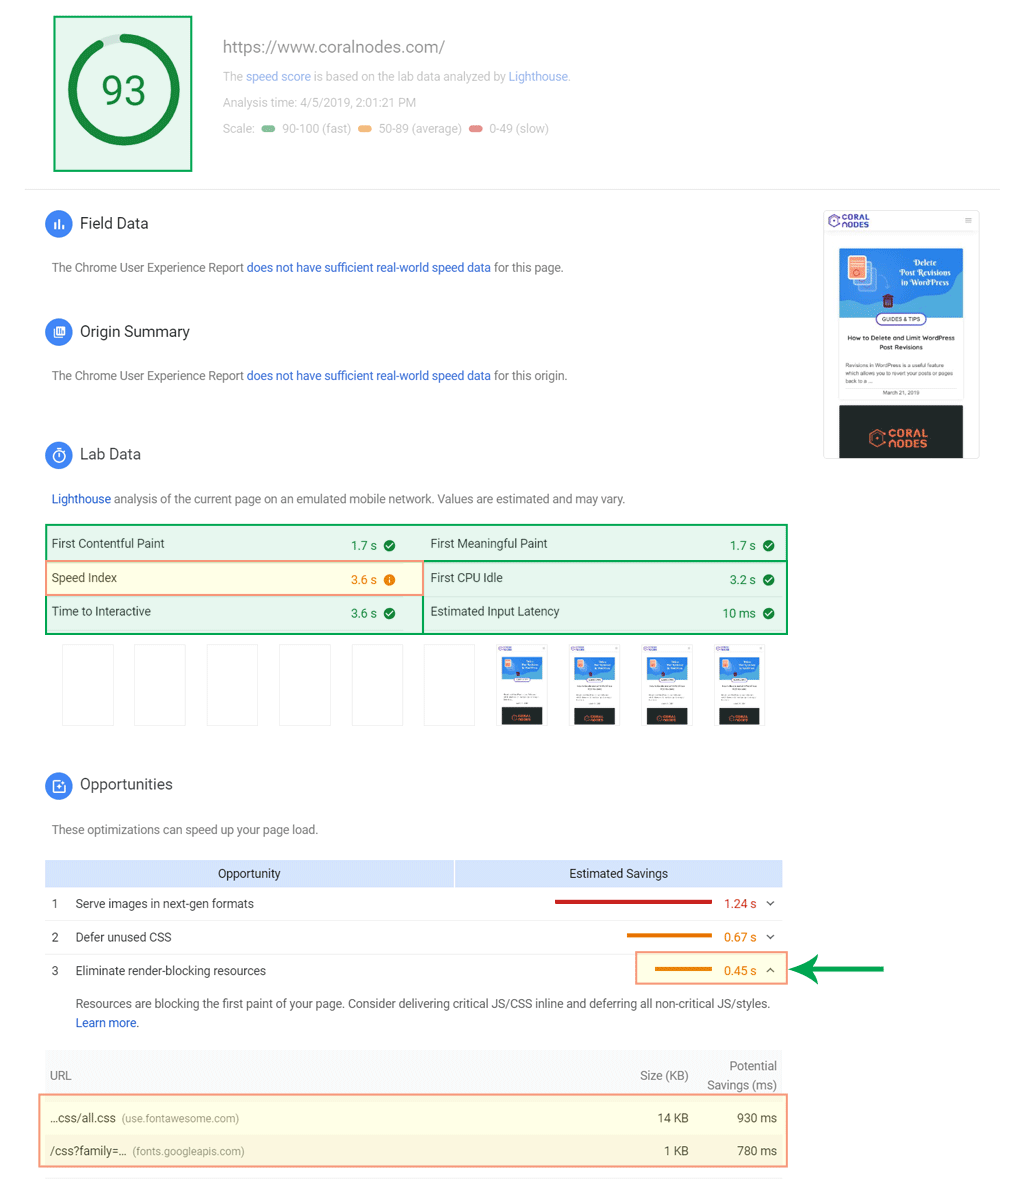
I used this same blog to try these optimizations. As you can see below, removing render-blocking files alone increased the overall score from 76 to 94.
These were the results before doing any optimizations. There were a total of fourteen files in the head, which are clearly making the page slow.
My aim was to get rid of all the external CSS & JS resources from the head. And these are steps I took to get there:
- Install Autoptimize Plugin
- Combine & Move Javascript to Footer
- Combine CSS
- Preload CSS file & implement loadCSS
- Finding & Inlining Critical CSS
Things can become really difficult if you are using a bloated WordPress theme. The same is the case with plugins also. Because, poorly coded themes/plugins often add lots of external CSS and JS files to the front-end, making the site load like a snail.
Here, I was using the Astra theme, which is already optimized for performance. If you are performance-focused, I suggest you try Astra or GeneratePress. They only add minimal amount of requests.
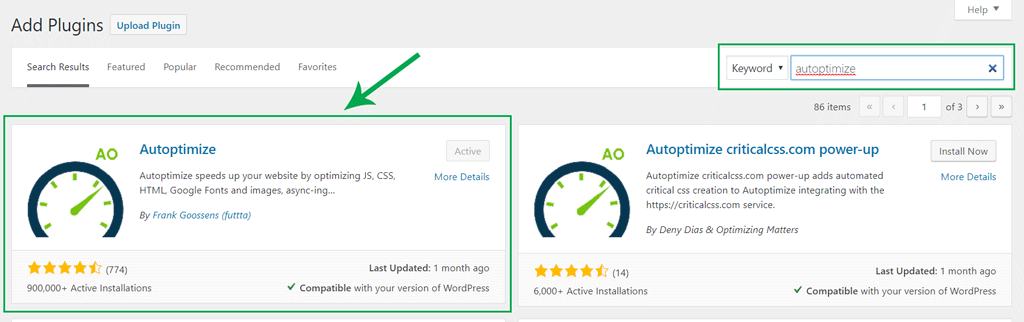
1. Install Autoptimize Plugin
Autoptimize is going to be our main tool here. It helps us in doing all the things mentioned above. So, the first step is to install and activate it.
2. Combine & Move Javascript to Footer
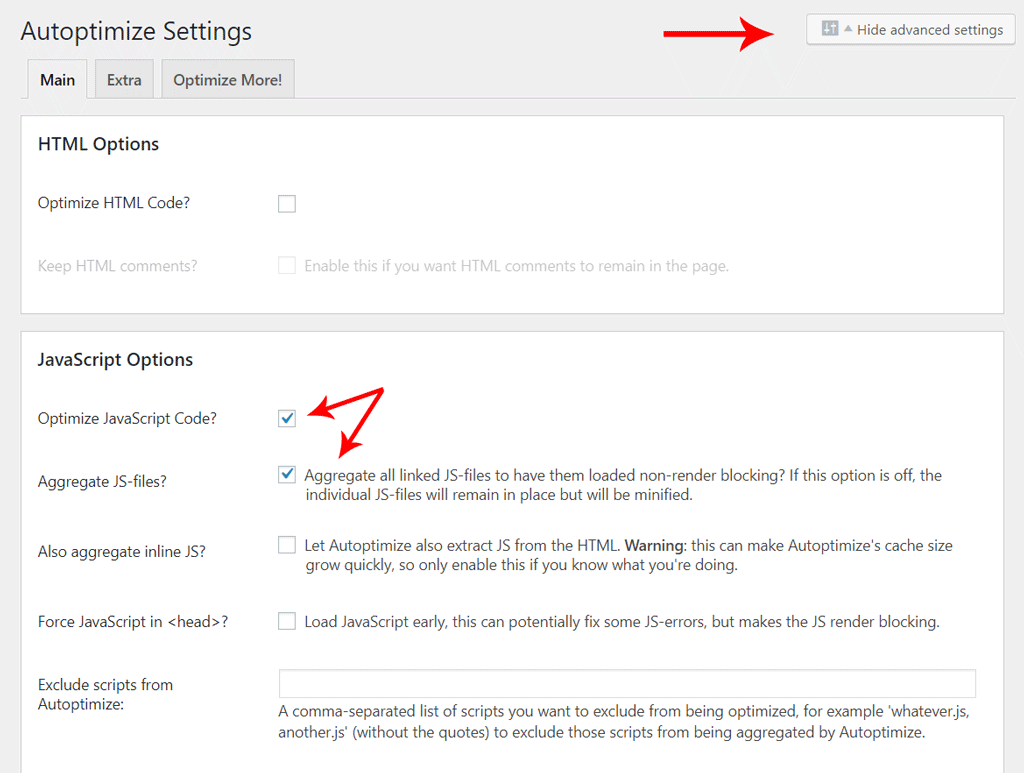
Before dealing with CSS, let us optimize JS. For that, go to Settings > Autoptimize. Make sure that you have enabled the Show advanced settings option.
Under the Javascript Options, check the following two boxes:
- Optimize JavaScript Code - minifies all the JS files
- Aggregate JS-files - combines the files into one and move it to the footer so that it is non-blocking.
After that, hit Save Changes & Empty Cache.
Moving JS to footer alone improved load times and raised our score to 89.
Caution
Minifying and combining JS files can break things. In such a case, you have an option to exclude individual files from being optimized.
Another point your should take care is, combining and moving jQuery to the footer can break inline scripts which depend on it. In such a case, you can extract jQuery-dependent JS and load it later.
3. Combine & Minify CSS
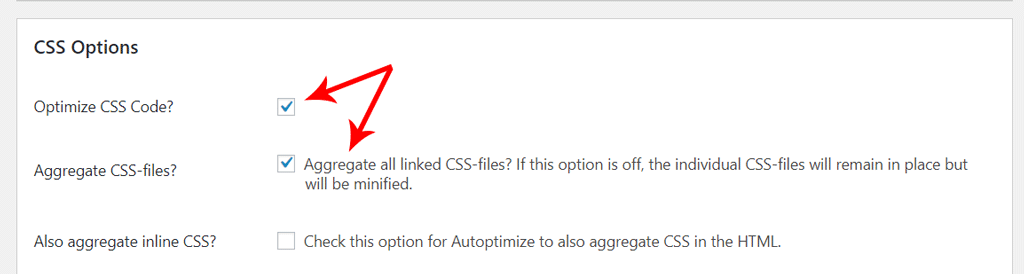
Below the Javascript Options, you can see the settings to optimize CSS as well. Just like JS, tick the first two boxes to optimize and aggregate CSS files.
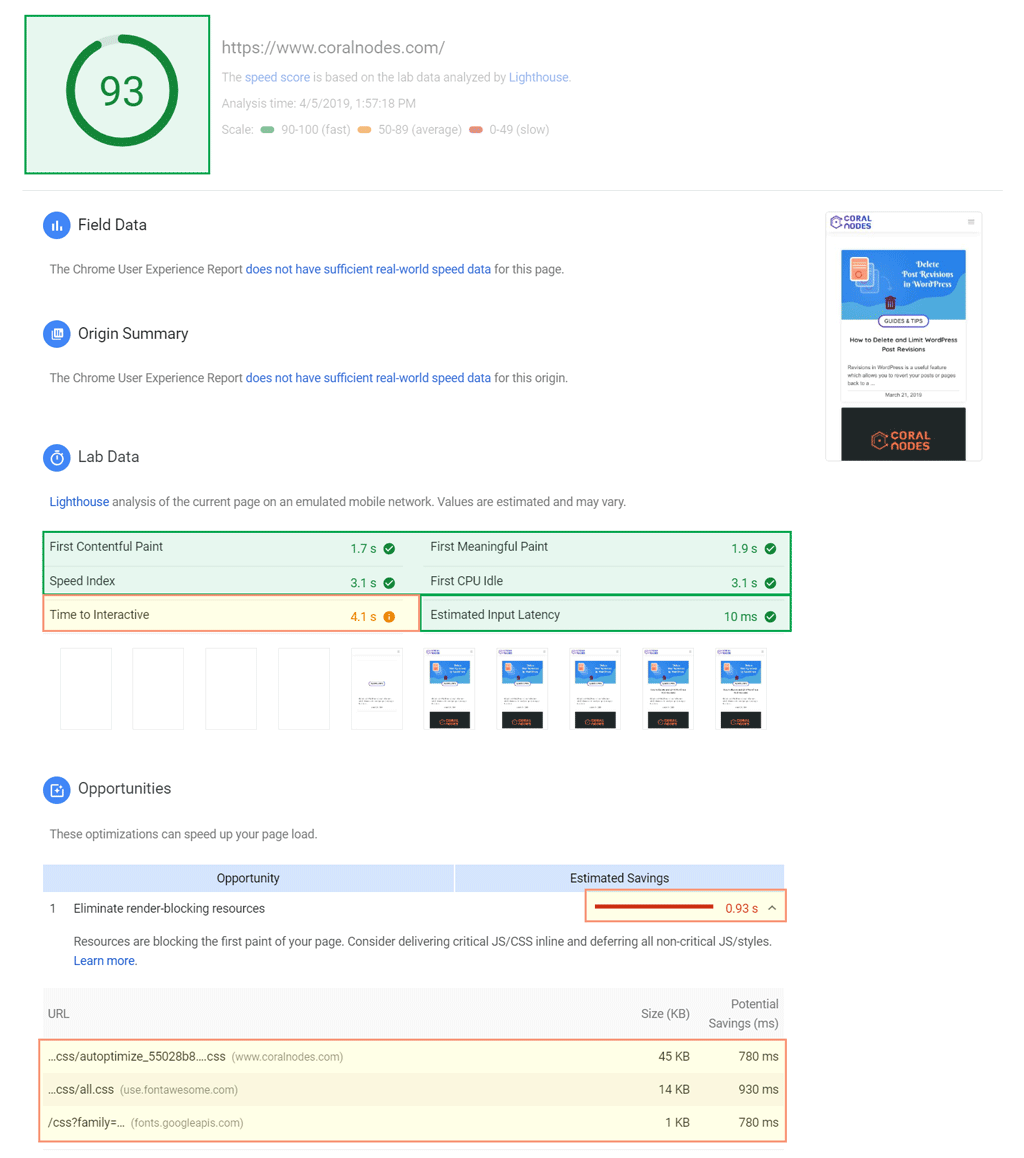
Results after combining CSS:
4. Defer CSS & Implement loadCSS
Combining multiple CSS files has helped to reduce the number of resources, thereby reducing the number of network round-trips to fetch the stylesheets. That's why the scores have improved.
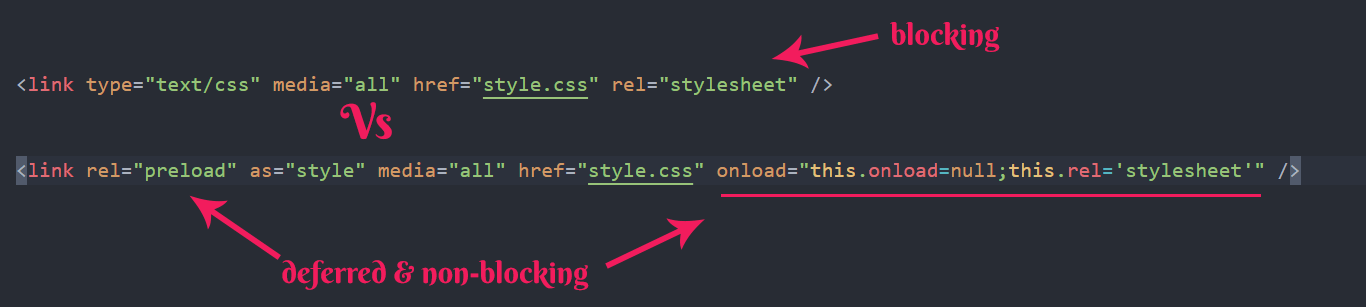
But still, the combined and optimized CSS file is loaded using the usual rel="stylesheet" link element. So it is still render-blocking.
To solve it, we will set the value of the rel attribute the preload. All recent browsers support it. It helps to access resources for future use without affecting performance.
So, moving our optimized CSS to a preload element instead of the stylesheet makes it non-blocking because the browser will not parse resource in the preload link element. This is what PageSpeed suggests to do by deferring CSS.
CSS loaded using link rel="preload" does not block rendering.
Later, we use Javascript in the onload attribute to change the rel value from preload to stylesheet, so that the browser can parse our CSS.
Autoptimize has the option to implement preloading as well so that you don't have to touch any code. Go and check the box against Inline & Defer CSS, and then click Save.

The plugin also implements the loadCSS javascript polyfill which makes the feature work in older browsers as well.
In addition to that, the normal stylesheet link tag is also placed inside a noscript tag for javascript disabled browsers.
Thus, we have completely removes all blocking CSS from the head.
Results after deferring CSS:
Although we have deferred our big external CSS file, we still have two more render-blocking files which are non-local. That's why there is not much improvement from the previous score. Autoptimize will not combine non-local files for a good reason. So let us keep it like that.
However, there is another issue. Since the browser starts to render content before parsing CSS, users initially see an unstyled web-page. Everything comes into place once the CSS gets loaded. This is known as flash-of-unstyled-content (FOUC).
To solve FOUC, we have to implement Critical Path CSS.
5. Finding & Inlining Critical CSS
With the above step, we have deferred CSS. However, it degrades user experience as your visitors can see unstyled content for a moment when the open your site. So we have to find critical CSS and inline it in the head.
What is Critical Path CSS?
In simple words, it is the minimum amount of CSS necessary to style the contents above the fold. In other words, it is the CSS required to style elements like site navigation, page headers, and contents at the top of a page.
Inlining critical path CSS directly in the head reduces the chances for your visitors seeing a flash of unstyled content.
Extracting Critical CSS
Manually finding critical CSS is quite difficult, especially if you have lots of elements on a page. Fortunately, there are a few tools to help us here. Critical CSS generator by Jonas is one such online tool, which extracts the CSS based on a URL.
First of all, enter the URL of the page. Open your Autoptimized CSS in a new window and copy-paste all its contents in the box on the left side. Then click the button which says Generate Critical Path CSS.

Now, we have generated the CSS for home page. Save it in a file called critical-home.css.
Combining CSS for Different Pages
Most sites have more than one layout in use over different pages. For example, the layout for your home page may be totally different from that of your single post page. That means generating only one critical path css (for the home page) is not sufficient.
So repeat the same procedure for any pages that look considerably different.
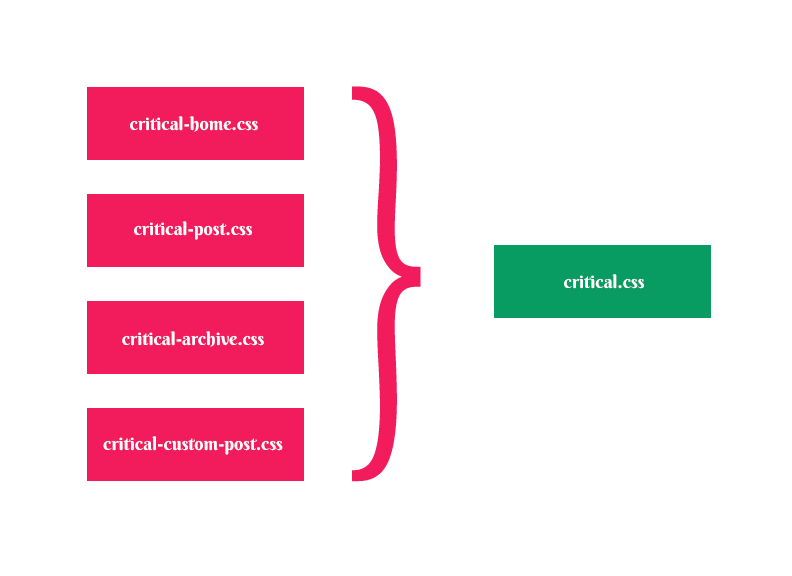
Now, we have multiple CSS files like:
- critical-home.css
- critical-post.css
and so on...
However, Autoptimize gives only one field to enter the inline CSS for all of your web-pages. So we have to combine them into one file.
The following NPM package has helped me to remove duplicate style rules from multiple CSS files and merge them. It's a convenient tool that you can use from the command line. However, to use it, you have to install NodeJS on your system.
If you are not comfortable with command line usage, you might want to use an online tool like DiffChecker to compare different files. Then you can manually copy the additional rules from each file to one file using Notepad or an. Yes, it needs a bit of work to get the best results.
Now, come back to your Autoptimize plugin page where you can see a text field to enter the CSS to inline.
Copy and paste the contents of the combined critical CSS file in that field and click Save.
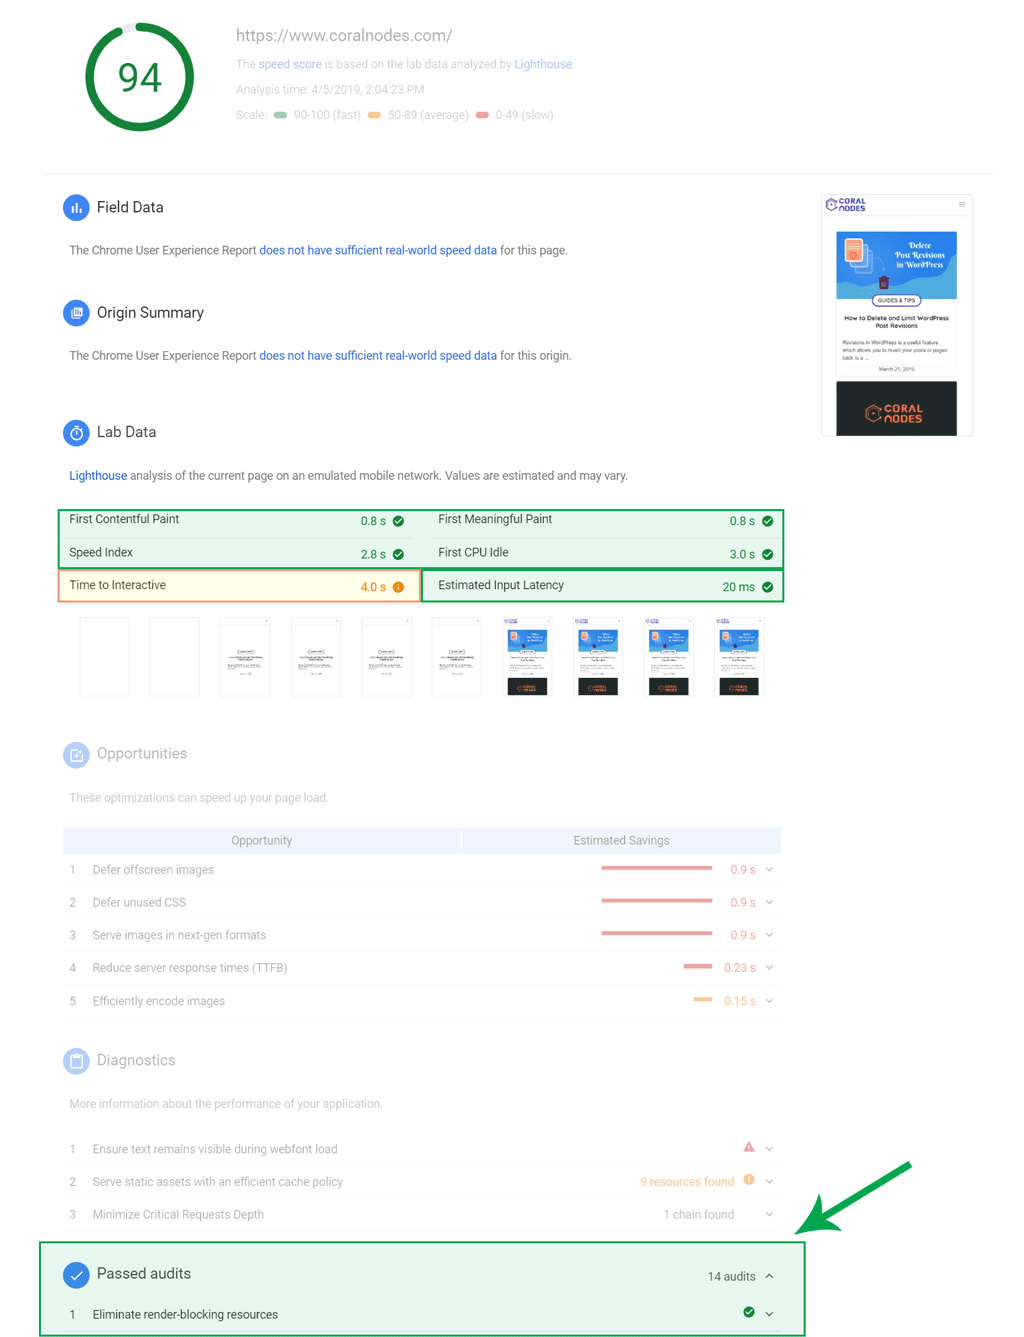
As you can see, after inlining CSS, the warning is gone, and now it appears under the Passed Audits section. Remember that we had two non-local blocking resources that could not be deferred. After inlining, that too is gone.
Why not Inline all CSS?
Below the field for inlining CSS in Autoptimize, you can see an option asking whether you want to inline all CSS. But you should not do it because inlining all the CSS rules increases the size of the HTML. Most themes have a few thousand lines of CSS code, which is not quite small.
So it is not a good idea unless you have a lightweight website with only a few lines of CSS rules.
Since the browser does not cache inline CSS, your visitor has to download all those heavy CSS for each page view. That's why we inline only the critical CSS and defer the heavy external file. The browser can cache the external file for subsequent page views. Thus, we have the best of both worlds.
Final Results
With these optimizations, we could completely remove the warning in PageSpeed Insights to remove render blocking CSS & JS. You can also see that our initial rendering also saw great improvement.
[table id=8 /]
Note that the Time to Interactive increased a bit and shows a warning. The Input Latency also went up. That may be partly due to testing inconsistencies and partly because we haven't removed unused CSS before optimizing. That is a subject for another article.
Our aim was to remove render blocking resources and we have succeeded in doing that.
Wrapping it Up
We have seen how render-blocking can adversely affect the load time and performance score of a website. Solving it may seem a bit daunting at first. However, you should do it even if you cannot perfectly implement it.