This article may contain affiliate links. If you buy some products using those links, I may receive monetary benefits. See affiliate disclosure here
If you are looking for a CDN that will not cost you a fortune, then you should consider BunnyCDN (or Bunny.net). I have been using it for more than five years now.
In this review, I will show you how it has helped me in making my sites faster while saving a lot of bandwidth on my origin server.
We will also discuss the important features and do some speed tests.
Initial Impressions
After starting this blog in 2019, I was looking for an affordable content delivery network. I had used Cloudflare in the past and had heard about Stackpath and KeyCDN, but BunnyCDN was a new name to me.
So, I was a bit skeptical at first. After looking at the figures on CDNPerf, I decided that it's worth a try.
Features & Ease of Use
BunnyCDN offers all the important features you expect from a typical CDN.
- 90+ PoPs in 50+ countries
- Multiple Pull Zones within one account
- Let's Encrypt SSL with Custom CNAME subdomain
- Edge Rules
- Set bandwidth and request limits
- Storage zones (but it's not S3-compatible)
- API & FTP access for storage zones
- Perma-cache & origin shielding
- On-the-fly image optimization & WebP conversion (at extra cost)
1. Edge Locations or PoPs
With 110+ PoPs spread across 50+ countries, BunnyCDN has its presence on six continents. Here is a continent-wise breakdown of the number of data-centers or edge locations (as of Mar 2024):
- North America - 22
- South America - 18
- Europe - 36
- Africa - 6
- Middle East - 6
- Asia - 27
- Oceania - 7
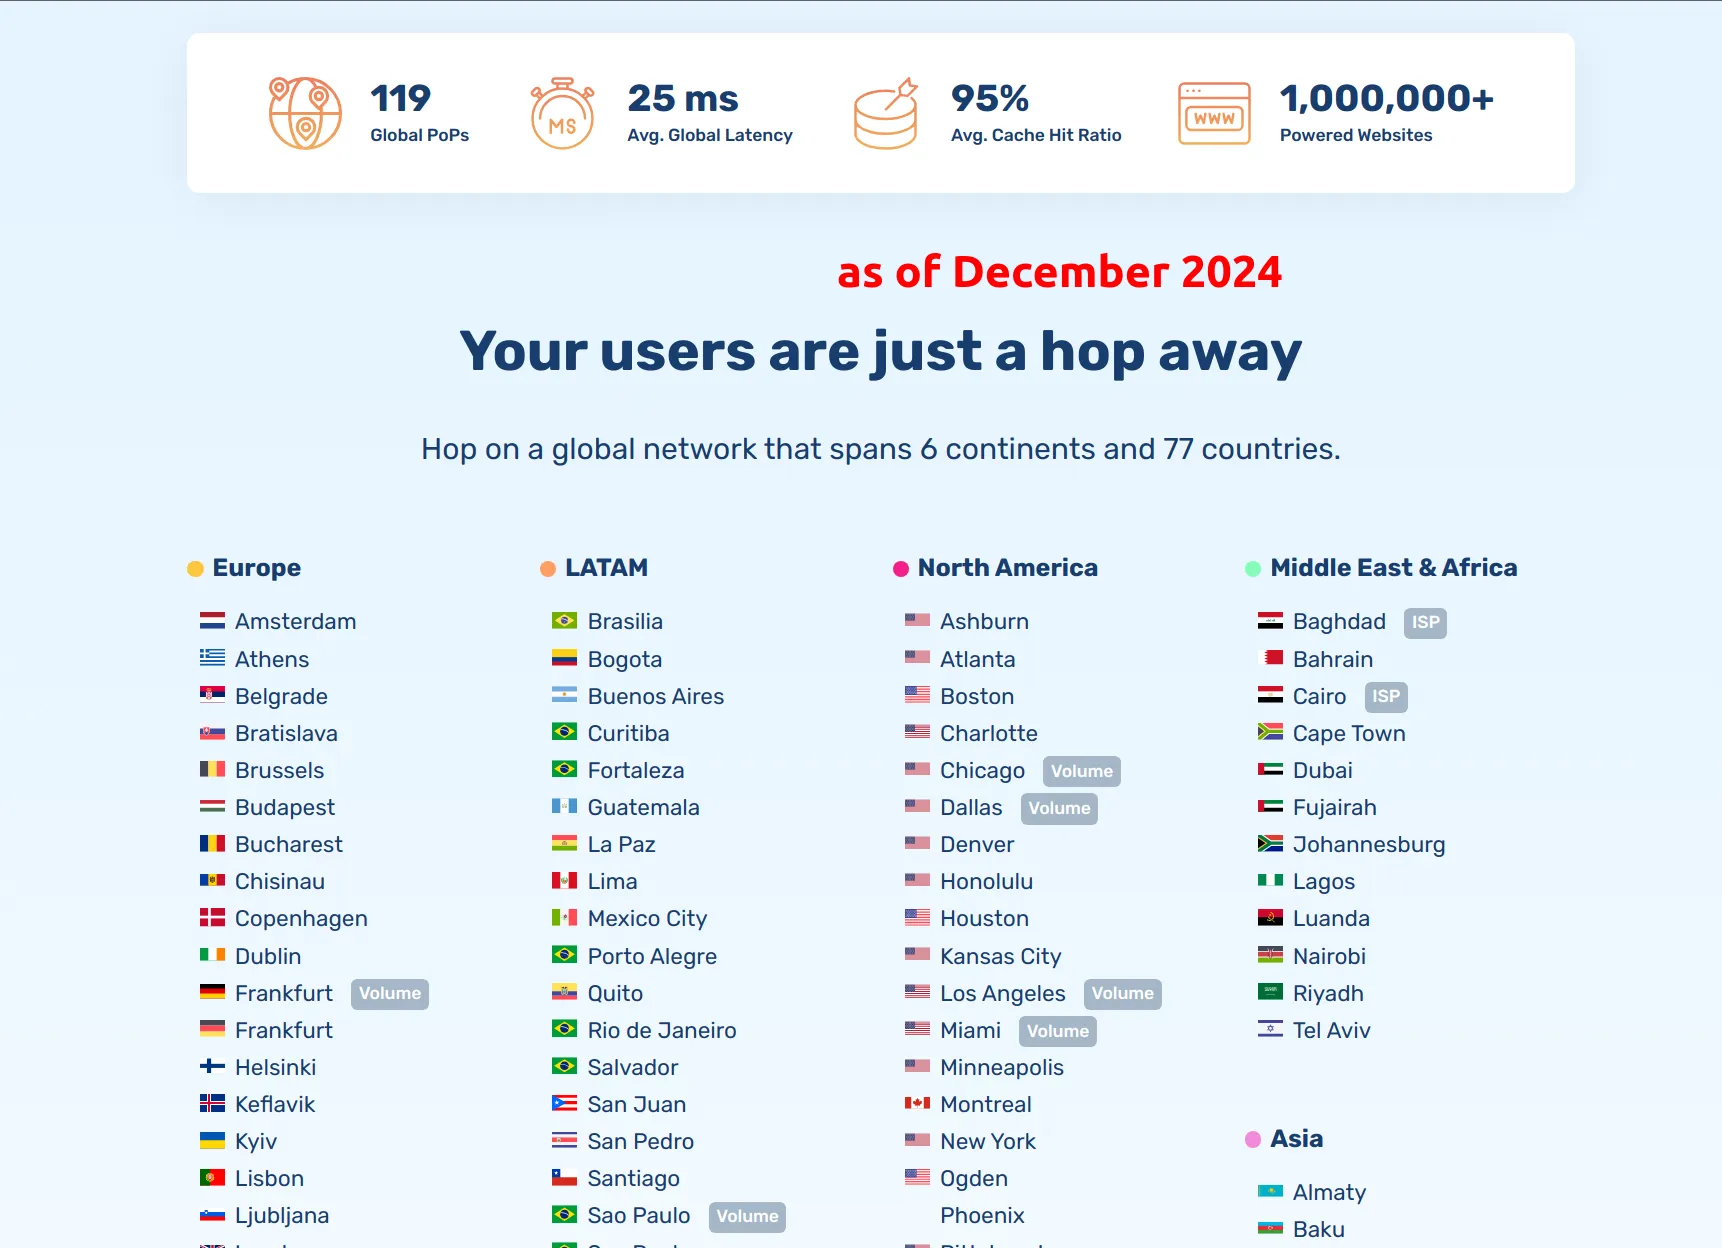
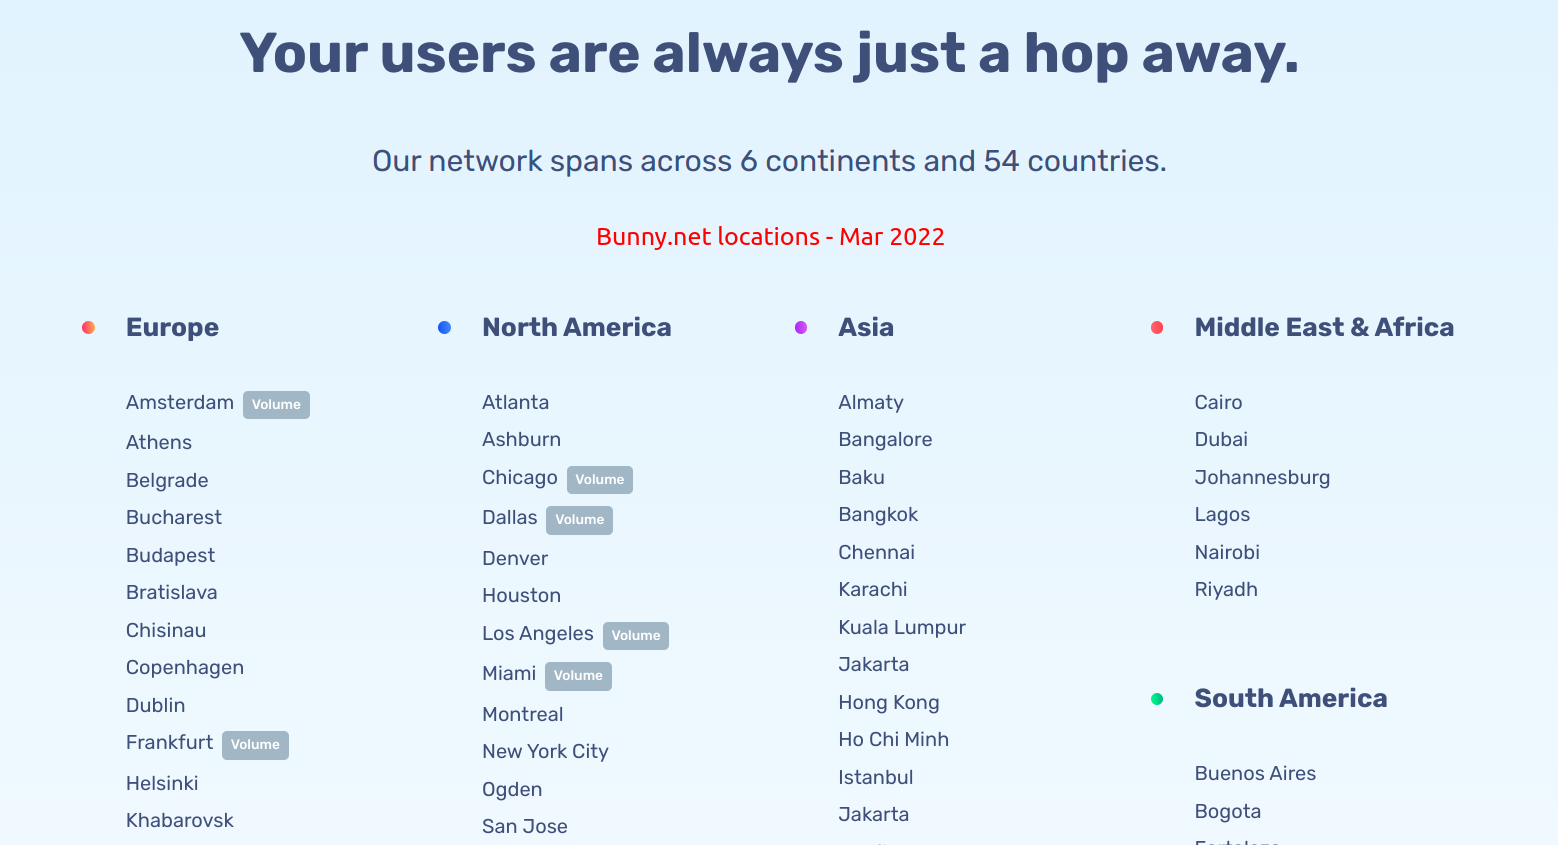
Here is an old screenshot I took in 2022. There is a noticeable increase in two years.
2. Pull Zones
A pull zone allows you to set the base URL from where the CDN should cache the files.
Configuring a pull zone involves two URLs:
- Origin URL
- Hostname or CDN URL
So, whenever a request hits a Hostname, the CDN checks if the file is available in the edge cache. If not, it pulls the file from your origin server and sends it to the user.
After that, it saves that file in the edge location's cache for future request. Thus, the next visitor from that region gets served faster.
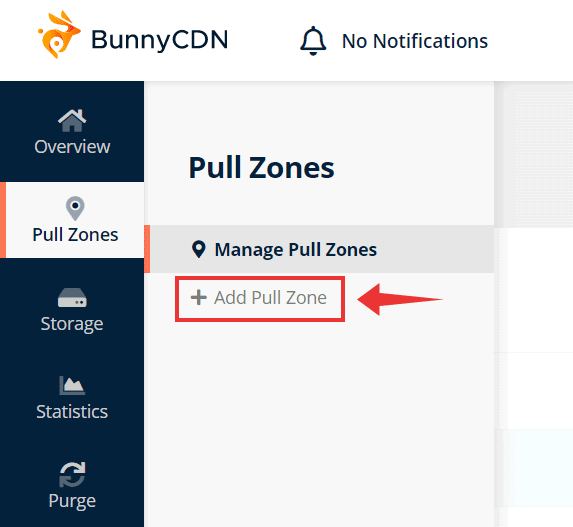
Creating a Pull Zone
Let's see how you can create a pull-zone for your website. After signing up and logging in, head over to the Pull Zones page and click the Add Pull Zone button.
On the next page you have to set three things:
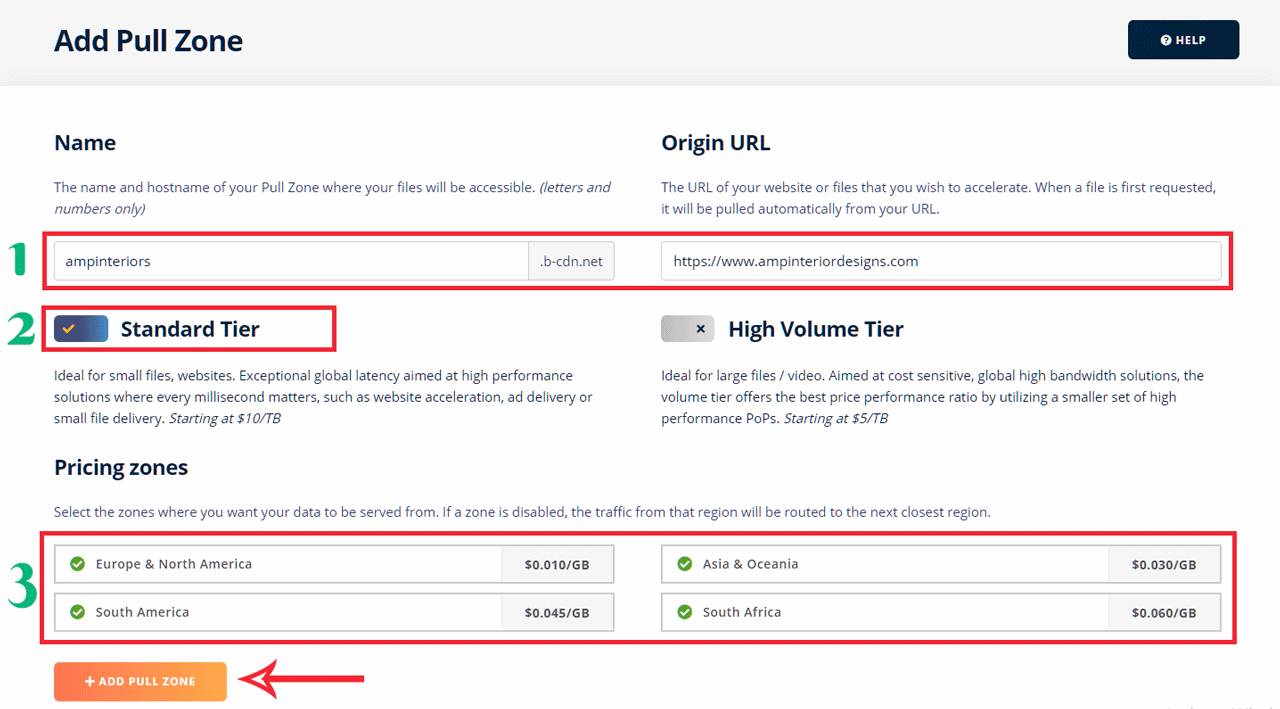
- URLs - Hostname & Origin - Give your site's name as the hostname. For the Origin URL, enter your site's domain. Alternately, if you want CDN on a specific folder only, add that to the domain name (eg., mysite.com/images). Note: You can have multiple pull zones for different directories of your site. For example, you can set one pull zone for mysite.com/images while another one for mysite.com/assets
- Standard or Volume Tier - Standard is the default choice. Keep it like that for most use cases.
- Prizing zones - Keep all the four zones checked if your visitors scatter all around the globe. Otherwise, you can uncheck any unnecessary zones.
South Africa and South America zones are more expensive than the other two. So, disabling it can reduce your monthly bills slightly.
Standard & Volume Tiers
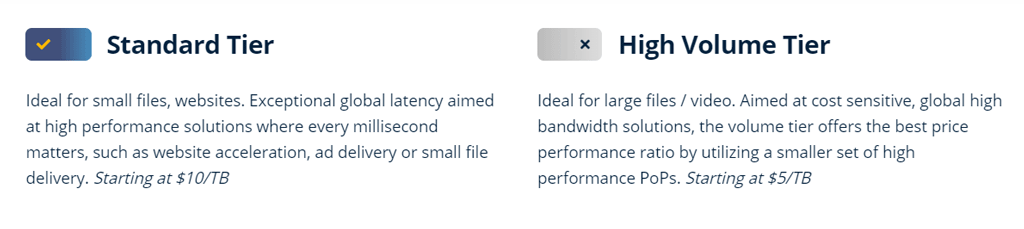
BunnyCDN offers two types of Pull zones - Standard and Volume. Standard will be the best option for most sites.
Volume tier is specially optimized for caching large files like videos. However, it is available on certain edge locations only (see the image above).
Finally, click the Add Pull Zone button to activate the newly added zone.
After that, you will see a page with instructions on how to integrate the Pull Zone with WordPress, Joomla, Drupal, or an HTML website.
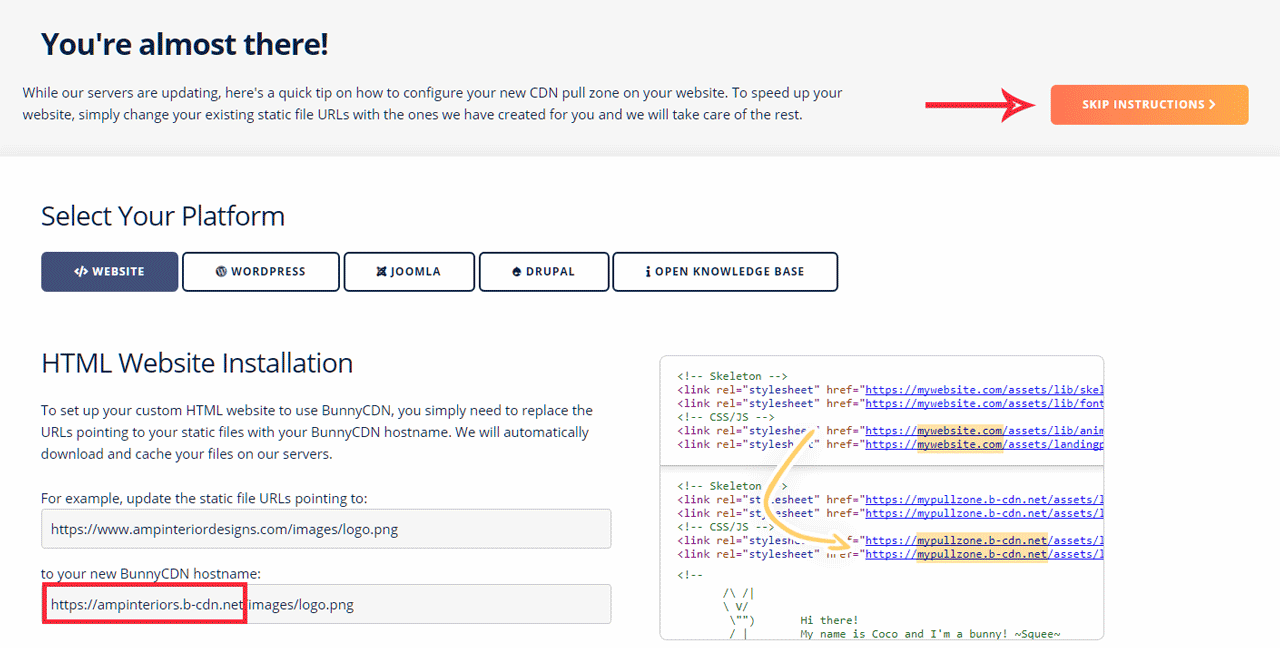
Note down the URL of the newly created pull zone (looks like ****.b-cdn.net).
Then click on the Skip Instructions button to go access the Pull Zone's Edit page.
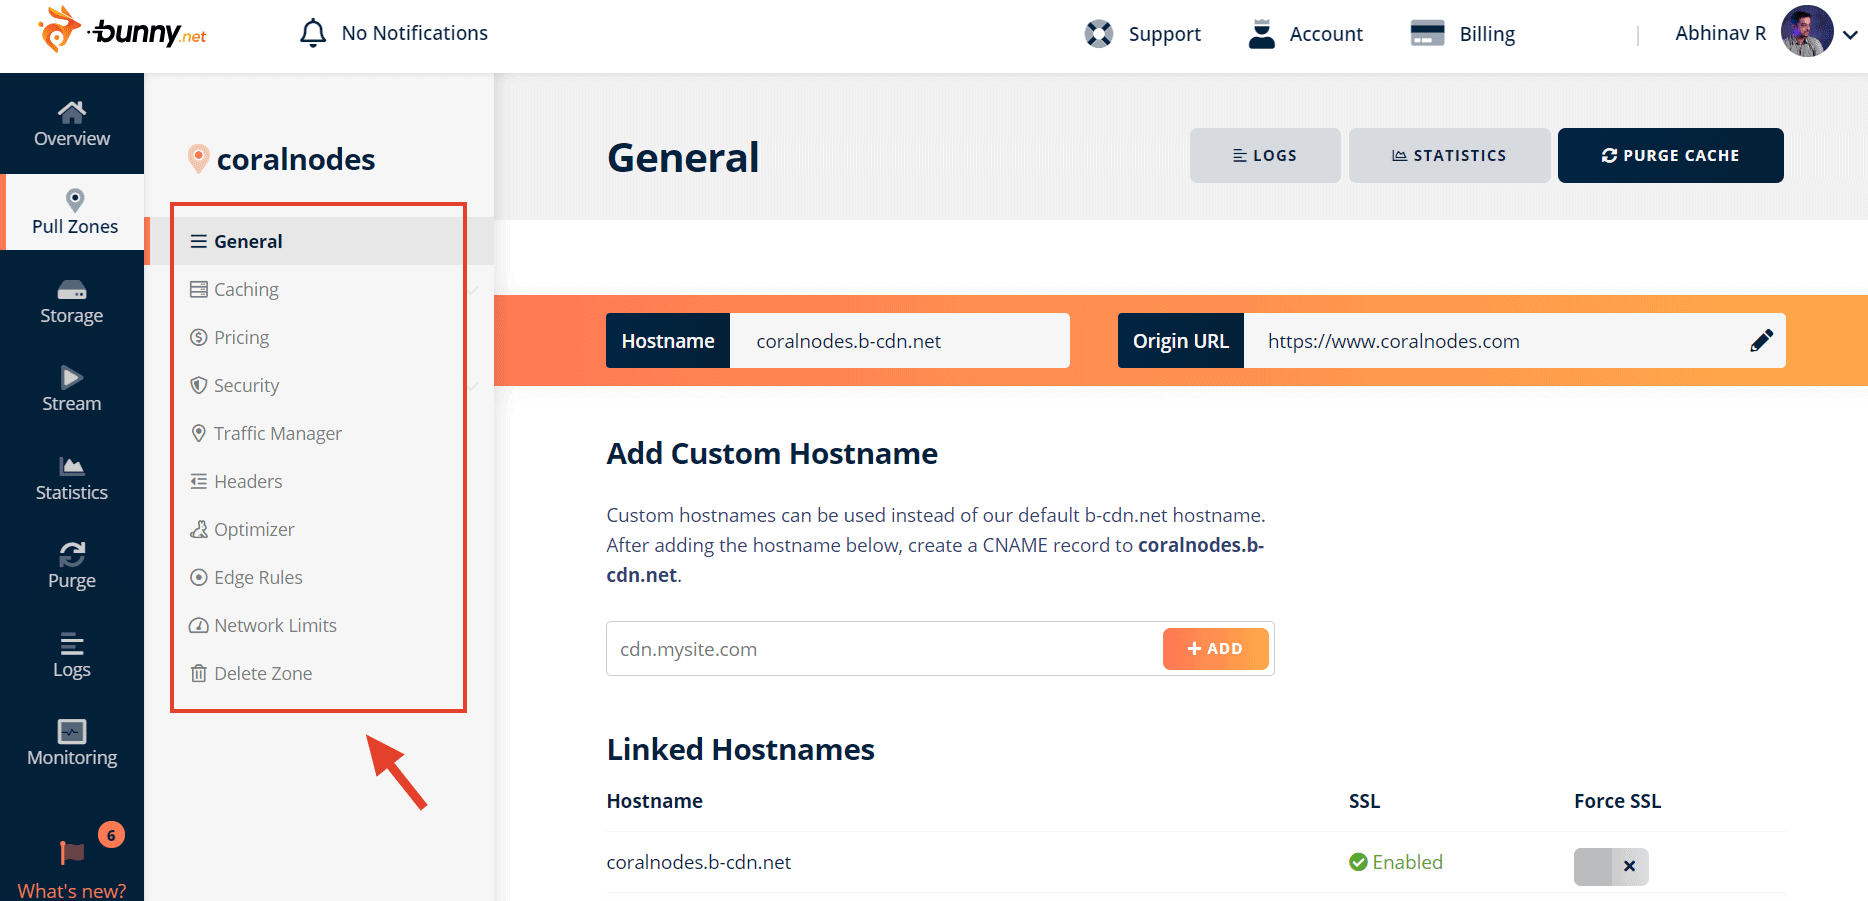
3. Custom Domain with Let's Encrypt SSL
Above, we have seen that the default URLs for your assets will be *.b-cdn.net. But with BunnyCDN's Linked hostnames feature, you can connect your custom sub-domain to it and serve the cached assets from that subdomain. So your visitors won't see BunnyCDN's third-party URLs.

The default Hostname looks like:
yourpullzone.b-cdn.net
With CNAME sub-domain support, you can set something like:
cdn.yoursite.com
Adding the CNAME DNS Record
Before entering the sub-domain on BunnyCDN's dashboard, you have to create a CNAME DNS record in your domain's DNS editor.
Open your domain's DNS editor in a new tab. Then create a CNAME record and point it to the BunnyCDN URL you've got in the previous step (****.b-cdn.net). Enter an appropriate name for the host field (eg., cdn)
If you are confused about adding a CNAME, see this guide on GoDaddy. The process is similar for most providers.
Now, your sub-domain (cdn.yoursite.com) is pointing to ***.b-cdn.net.
Enter Subdomain as Hostname
Now, come back to your pull zone's edit page on the Bunny dashboard. Under Add Custom Hostname, enter the new subdomain and click Add.
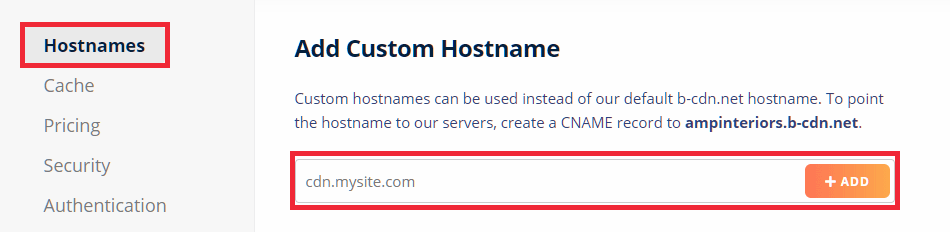
Now, the sub-domain should appear under Linked Hostnames.
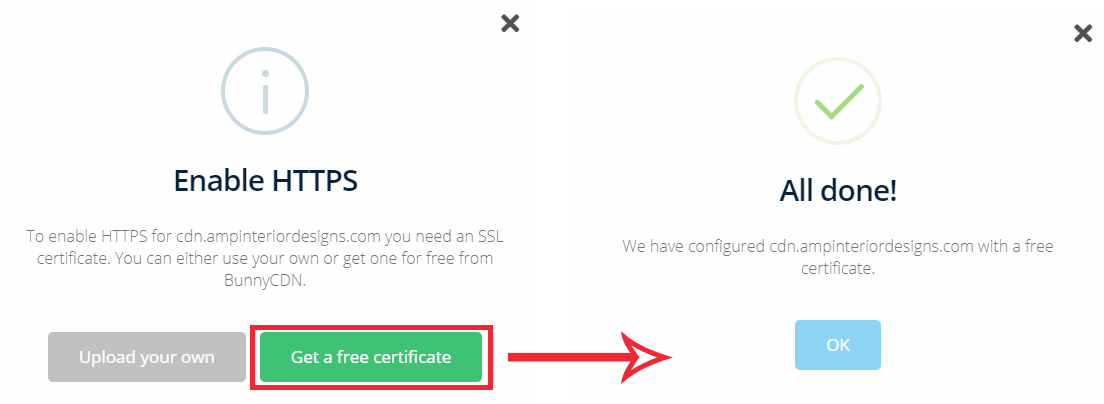
Enabling SSL for the new Subdomain
BunnyCDN offers one-click Let's Encrypt SSL certificates for sub-domains. If you wish, you can add a custom certificate from another authority also.

Other Settings for Pull Zones
There are also several other things you can configure for Pull Zones. I won't be going into the details of each. The below screenshot will give you an idea:
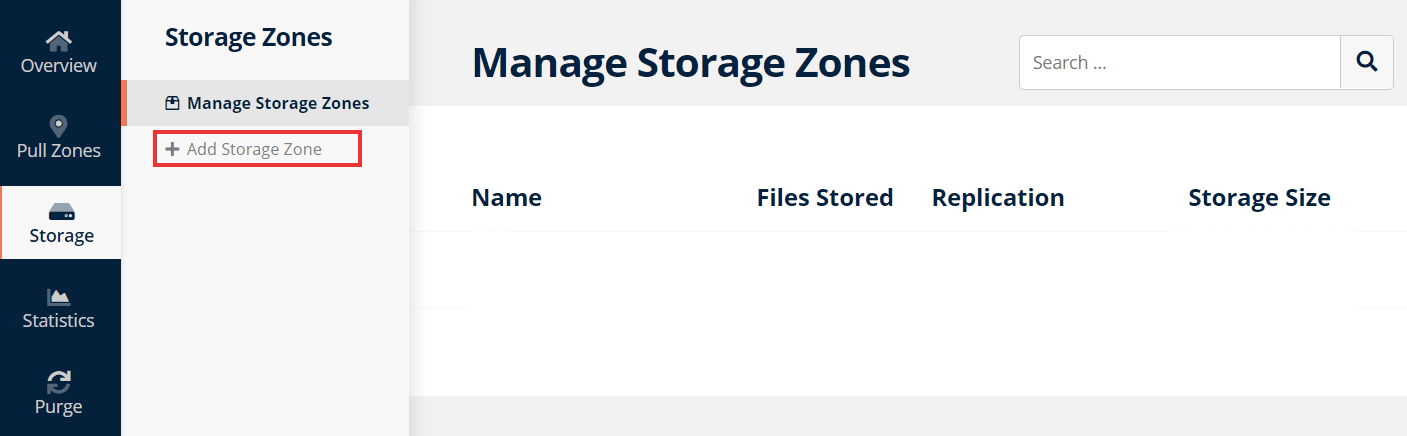
4. Storage Zones
With the pull zones we discussed above, you don't have full control over what files get cached. That means, pull zones retrieve data from your origin server only when it receives a request.
Whereas with Storage Zones (a.k.a Edge Storage), you can permanently store files on BunnyCDN's servers, just like you upload files to any web host. To upload files to the storage, you can use one of the following ways:
- Upload via the web interface
- FTP upload
- via BunnyCDN API
For backups and archiving purposes that don't need public access to the files, it is sufficient. You can consider it as a cheap alternative to S3 or Dropbox. The technology behind it is object storage rather than file-based storage. So there are no limits on the number of files you can store in a zone.
In addition, if you want to serve the files to your users from a public URL (like in a pull zone), you can do that too. Connect a pull zone (yes, pull zone), and point its origin URL to the Storage zone.
- In short, a Storage zone connected to a pull zone works like Push CDN (similar to an Amazon's S3 bucket connected to Cloudfront CDN).
The storage zones also supports geo-replication, which increases redundancy and reduces latency. Currently, replication is availabe in the following locations:
- Los Angeles
- New York
- London
- Stockholm
- Falkenstein
- Singapore
- Sydney
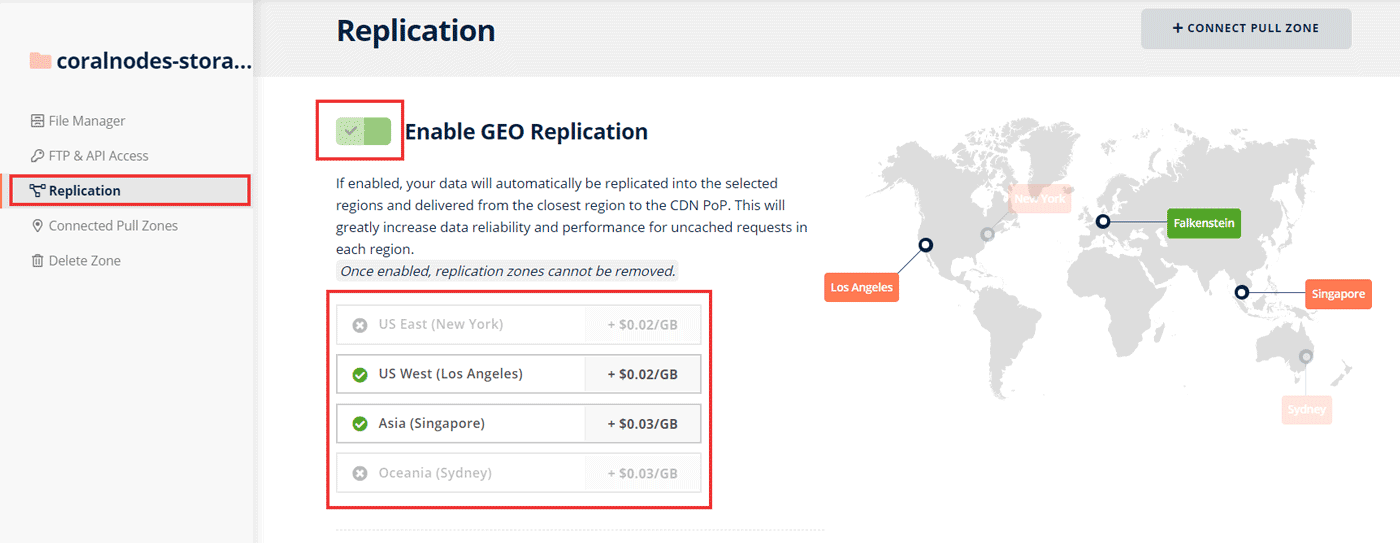
- The pricing is also quite cheap - $0.005 per GB per location per month. If you select all five locations, the total price becomes $0.45/GB/month.
5. Perma-Cache
With normal CDN caching, the assets in your pull zone's edge locations expire after a set time. After that, the edge servers re-pull those assets from the origin server once again.
However, BunnyCDN has a new feature that allows storing the assets permanently on their servers - Perma-cache.
To enable it, you have to create a Storage Zone and connect it from your Pull Zone settings page. Once enabled, the connected storage zone stands in between the edge servers and your origin server. It caches every request and stores it permanently.
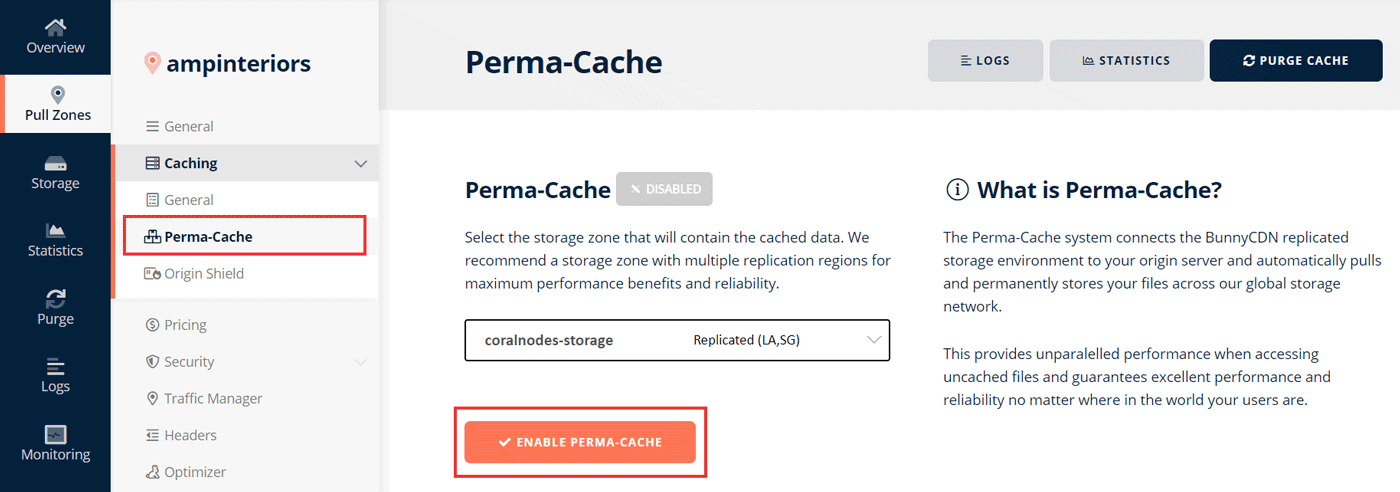
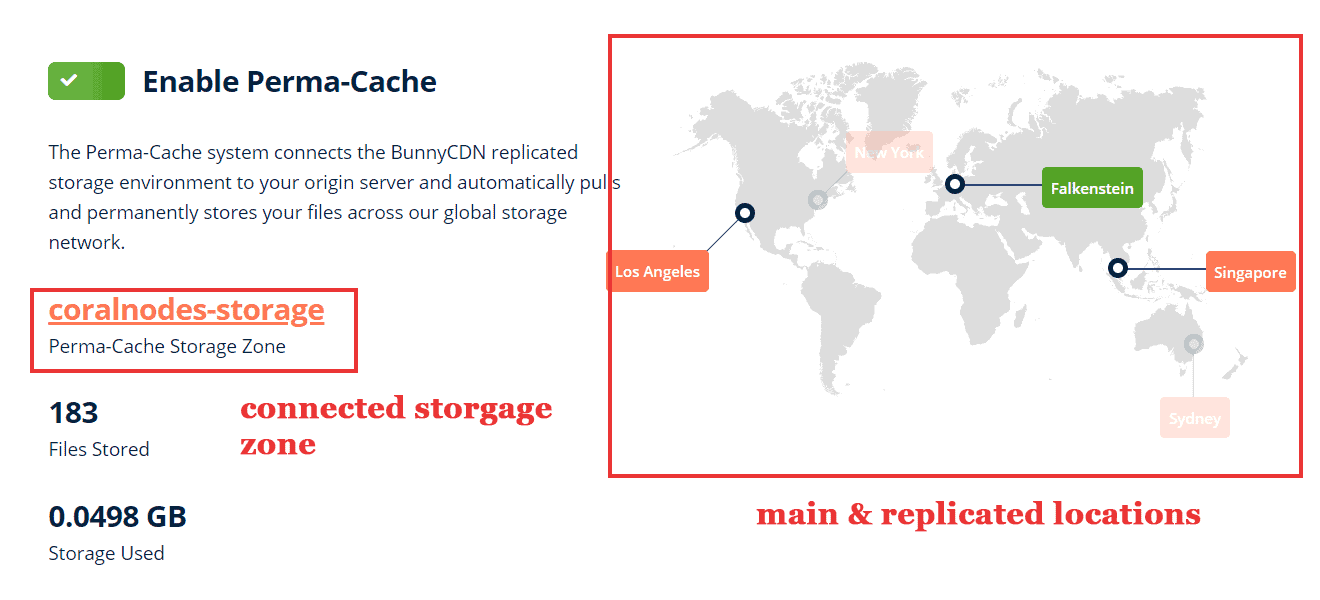
So, whenever a cached file expires on an edge server, it pulls from the storage zone instead of your origin server.
With replication, the edge servers pull from the nearest replication location. So, for expired cache files, the latency will be lower.
Overall, storage zones combined with perma-cache is a great way to reduce the load on your server while making the site load faster.
6. Origin Shield
Origin shield is another feature that is quite similar to Perma-cache. So, you need to activate only one of them.
With the origin shield enabled, all the requests to your origin servers pass through the shielding server. However, unlike Perma-cache storage zones, the shield locations do not cache files permanently.
7. Video Streaming
Recently, Bunny has introduced a new feature for streaming videos. You can create Video Libraries inside Storage Zones. There are two pricing tiers, Standard and High Volume. Since it is for videos, selecting the High Volume Tier will be suitable, which costs $5/TB of bandwidth.
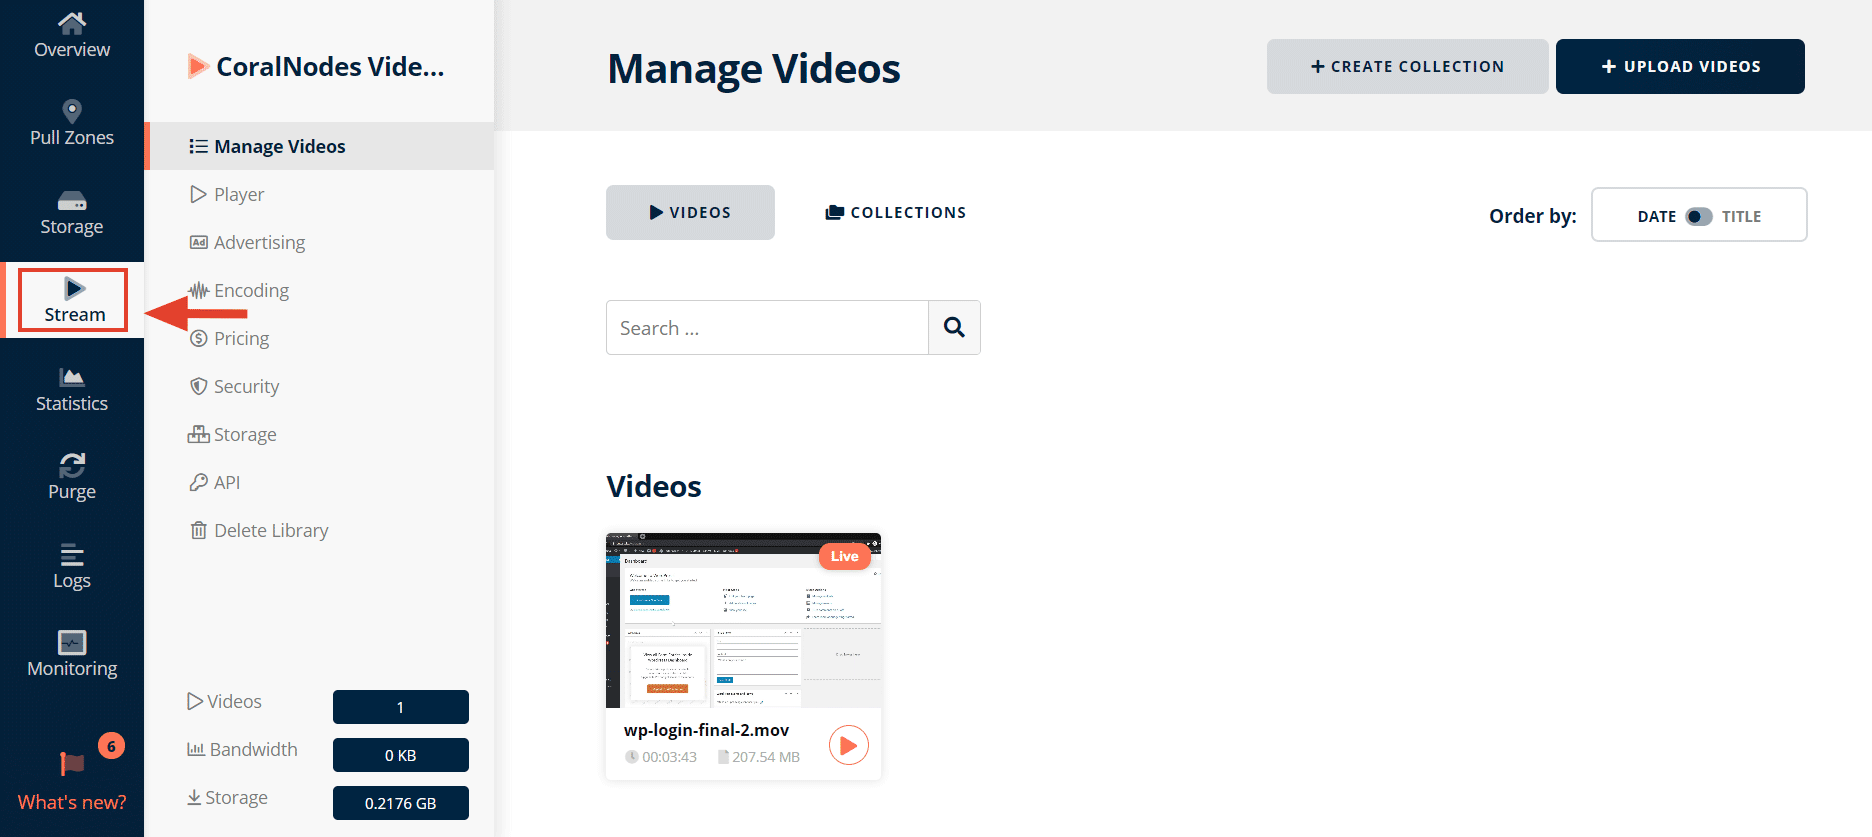
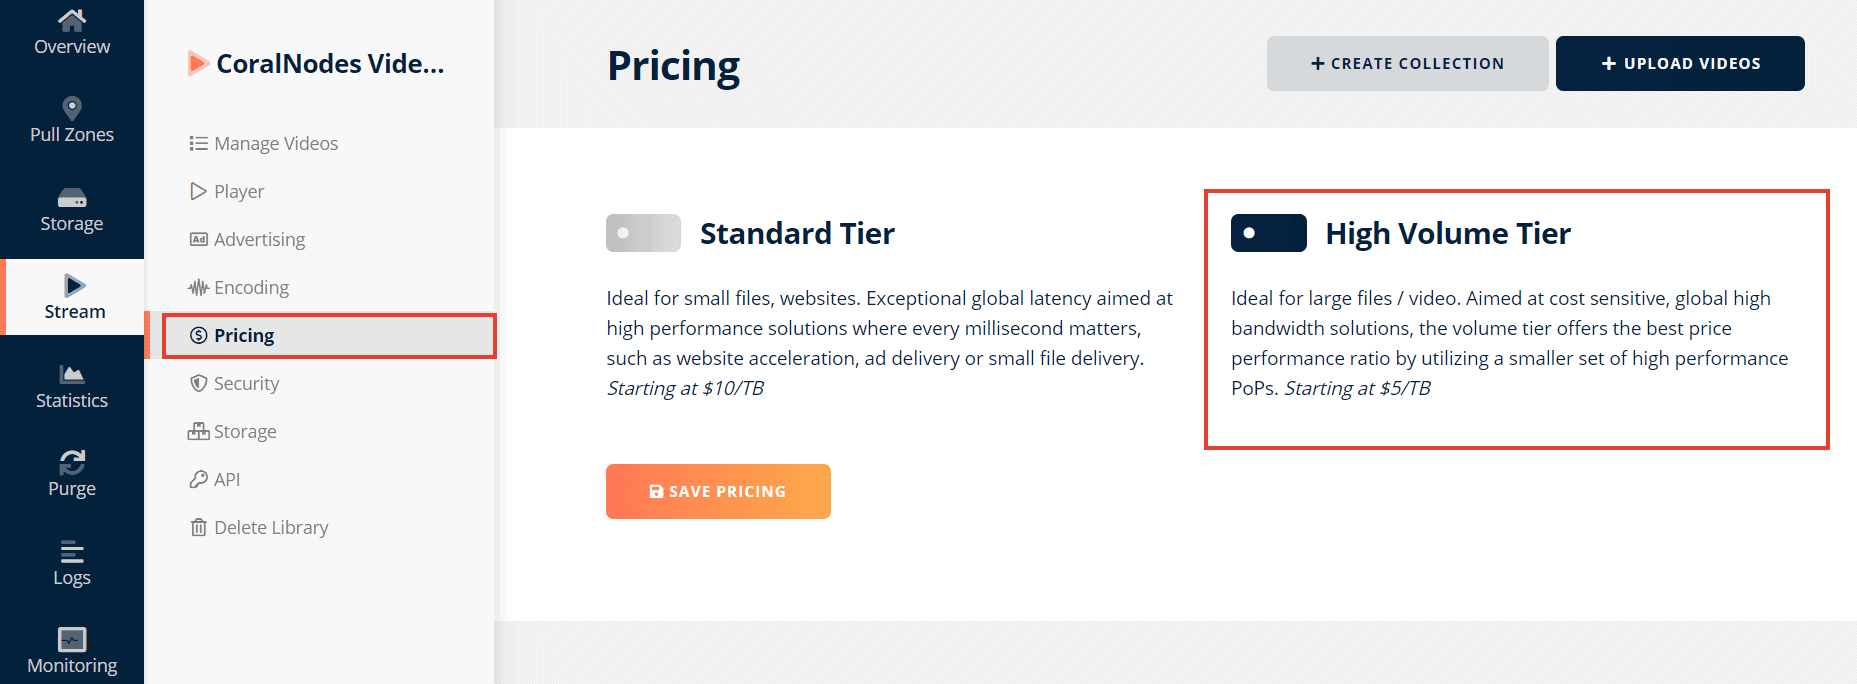
Not just hosting videos, Bunny also offers an HTML5 player that you can embed into your web pages. Overall, it is a potential alternative to other video hosting services like Vimeo and Wistia.
8. Statistics & Monitoring
Ability to know the usage statistics is a must-have for CDNs. With Bunny, it's easy.
At the top of your pull zone page, you can see the three important metrics - bandwidth, requests, and cache hit rate.

Usually, your cache hit rate should be around 60% or more. It may be lower during the initial days. But as more and more edge locations start caching your files, the rate should climb up.
In addition to this, the Statistics page show detailed information with line graphs and maps. You can filter metrics by date, location, and pull zone.
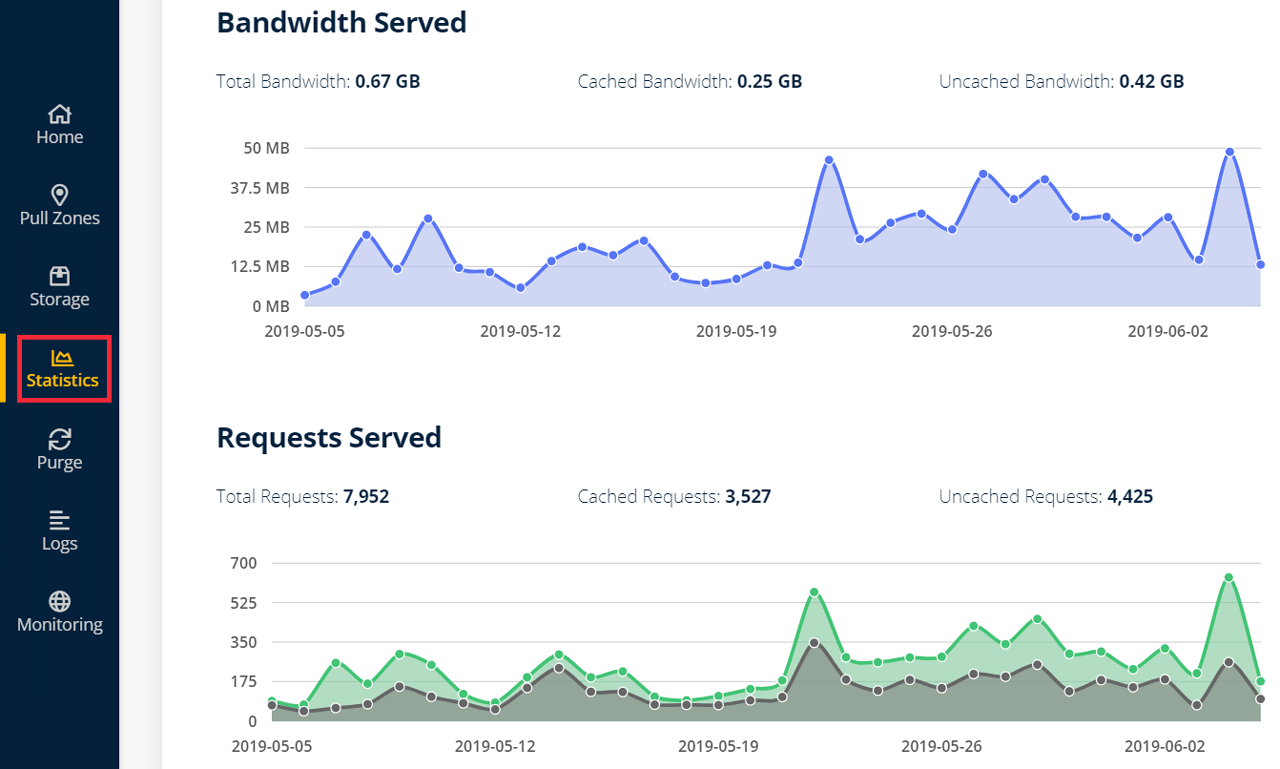
Apart from Statistics, the Logs section gives the details of each individual request. It includes HTTP status code, user's IP, data center, and browser info. Looking at the logs can help to figure out problems easily.
Integrating with Your Website
In the above section, we have discussed how you can create a pull zone. Now let us see how you can integrate it with your website.
Replacing links on your site
For the CDN to start caching, you have to replace the origin URLs with the new pull zone URLs, which depends on what content management system or site builder you are using.
First, let us discuss WordPress.
Integrating with WordPress
With BunnyCDN's WordPress plugin, integrating and enabling CDN is quite easy.
The first step is installing it from the WP dashboard.
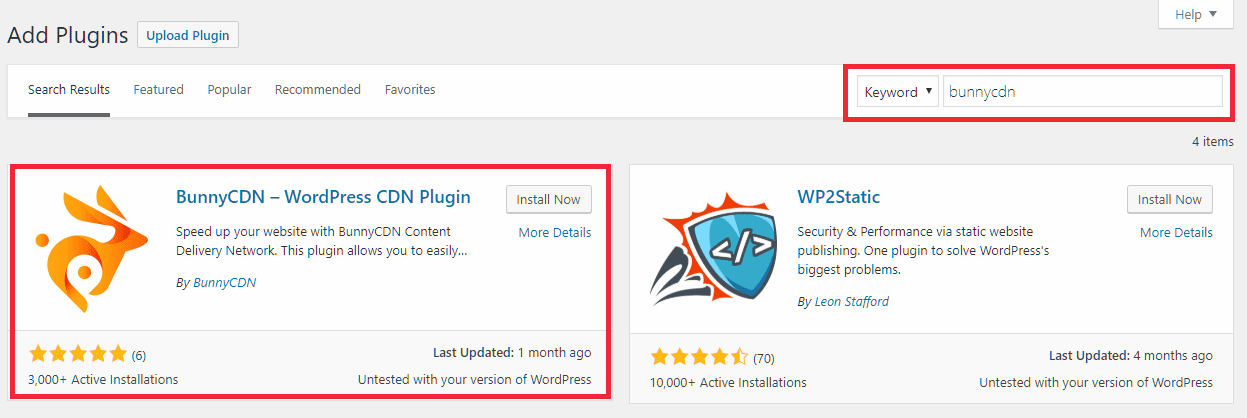
After installing it, go to the settings page of the plugin. If you hadn't set a custom sub-domain, just enter your pull zone's name and click Enable.
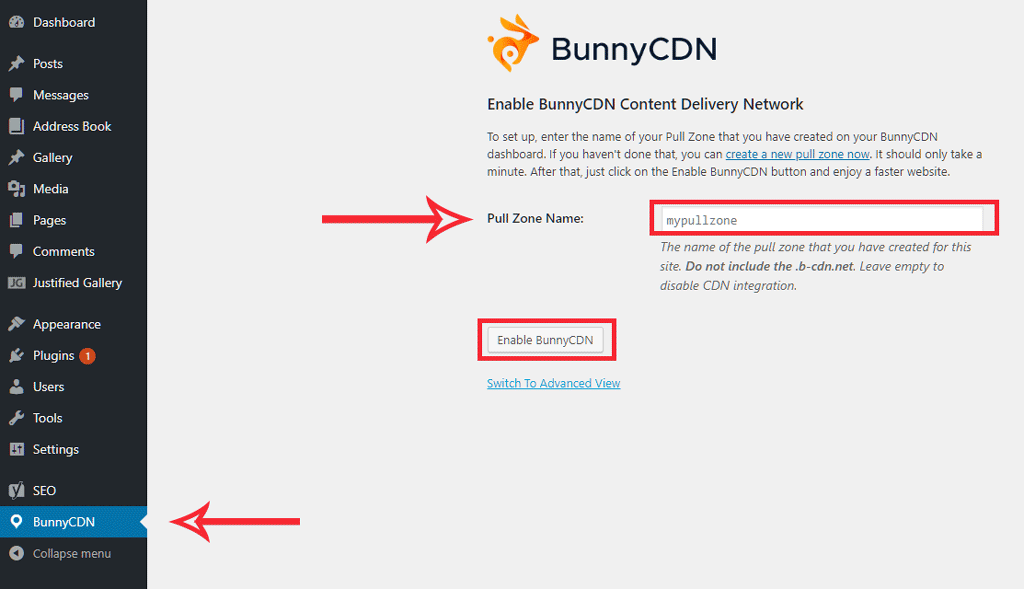
Otherwise, if you had set a sub-domain as per the previous steps, click Switch to Advanced View.
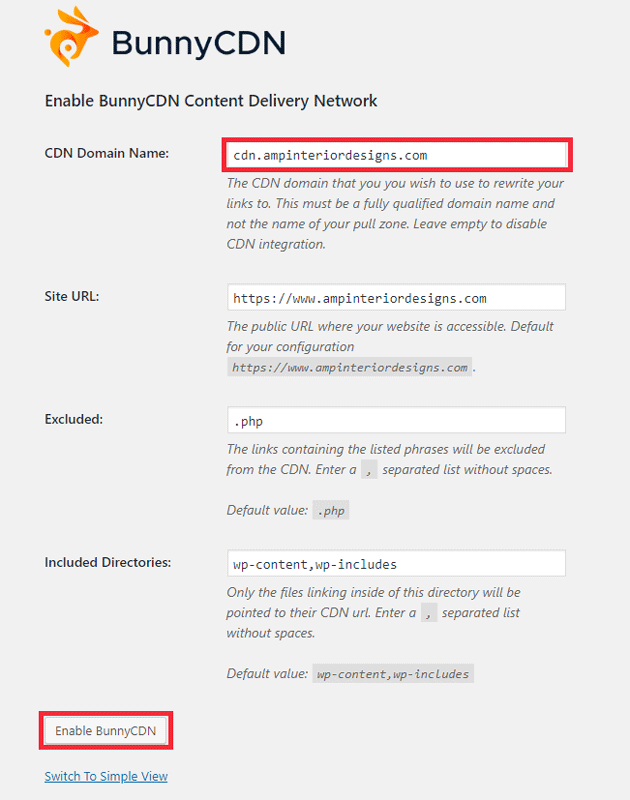
Enter the sub-domain and click Enable.
Now, all settings are complete. Open your site and inspect one of the assets to ensure that you are seeing the new CDN URL.
It is not a necessity to use the BunnyCDN WordPress plugin. If you are already using a caching plugin like W3 Total Cache or WP Super Cache, you can implement the link replacement from the respective cache plugin's settings page. Check the W3 Total Cache settings tutorial to learn how.
Note: Be sure to purge any cache after enabling CDN. Otherwise, the old links may persist.
Speed Tests - Before & After
A CDN is all about performance. So, what is the point of this review without some tests?
Test 1: Using sample HTML pages
For this test, I created two identical web pages.
On the first web page, the assets (images, CSS, JS, and fonts) were loaded from the origin server (hosted on a DigitalOcean droplet). On the second web page, the assets were loaded from BunnyCDN.
Then I conducted multiple tests from various locations using GTmetrix to find the average page load times for each location as well as the worldwide average.
These were the results:
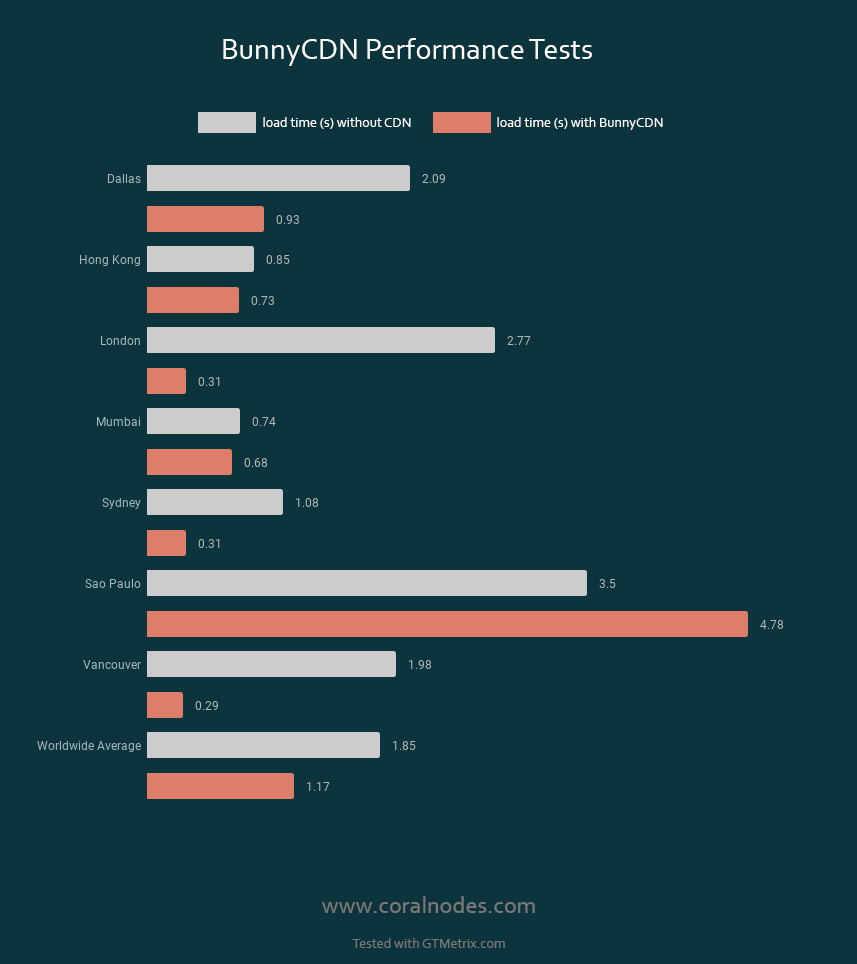
As you can see, using BunnyCDN improved page speed by almost 37% (average). Surprisingly, South America (Sao Paulo) was slower with BunnyCDN.
Test 2: Using a WordPress site
Using the above web pages was enough to get an idea. However, since WordPress is so popular, that's what most people want to know - how BunnyCDN speed up WordPress?
So I chose a WordPress site that was not well optimized. It also contained a few large images - perfect for testing a CDN.
These were the results:
- Average load time without CDN - 2.9s
- Average load time with BunnyCDN - 1.6s
With WordPress, BunnyCDN showed even better results with a 44% gain in speed. It confirmed the results from the previous test.
Also, according to the data from CDNPerf, it is faster than Stackpath and KeyCDN.
Pricing
Affordable pricing is the main attractiveness of BunnyCDN. They also give a 14-day trial. Here are the per GB price for Pull Zones for different regions:
- North America - $0.01
- Asia & Oceania - $0.03
- South America - $0.045
- Middle East & Africa - $0.06
The payment is in the form of recharges, which means you have to charge your account with a minimum of $10. Also, the minimum usage is $1/mo. Each year, you have to recharge with a minimum of $10 to prevent deactivation. Still, it is quite cheap in my opinion.
So, your credit card won't be charged monthly. The minimum recharge amount is $10 though.
Currently, you can pay with your credit card, PayPal, or bitcoin.
Support Quality
Currently, support tickets are the only way to request help. The account says that more options and a Slack channel are coming soon. They often post on Twitter with the latest news and asks for feature suggestions.
Apart from that, their knowledge base section covers almost all topics related to Account setup and CDN configuration.
During my time with Bunny, I had to contact the support a couple of times. And all the time, they were very knowledgeable and clearly answered my questions.
In another ticket, I was asking about how I can use Bunny for backups. And the reply was clear and assuring.
Pros & Cons of BunnyCDN
These are the advantages and disadvantages I felt after using BunnyCDN.
Pros
- Affordable
- Above average speed and response times worldwide
- Easy to Set Up
- User-friendly dashboard
- Efficient support
Cons
- Support options are limited
- Slower when tested from South America
- Storage service is not S3-compatible
- No storage locations in India
Conclusion - Do I recommend Bunny.net?
Absolutely. If you are searching for a CDN with a low price tag and great speed, you should consider BunnyCDN. Regarding the cons, I honestly couldn't find anything serious.


![5 Best Video Hosting Sites [for Businesses & Educators]](https://cdn-2.coralnodes.com/coralnodes/uploads/medium/2021/10/video-hosting-sites-featured-1.jpg)