This article may contain affiliate links. If you buy some products using those links, I may receive monetary benefits. See affiliate disclosure here
You know that every resource on the web has a URI (Unique Resource Identifier). Normally, when someone requests a resource on your website, the server sends back a successful response along with the content (HTML for web pages like this).
Not just the body, the response also includes headers. And the first line of an HTTP response is the status line.
For successful responses, the status code will be 2xx. Whereas if it's an error, the status code will be 4xx or 5xx.
But the responses may not be always a success or an error. For example, if your WordPress site address is www.example.com and someone entered only example.com, then the server redirects the user to the www domain.
Similarly, you can create redirects for a variety of use-cases. That's what we're going to discuss in this article - how to create redirects in WordPress.
Also, just like successes and errors, redirects also have a separate category of status codes - 3xx. We'll discuss the details below.
First of all, let us see the different scenarios where redirections come useful.
Reasons to Create Redirects
1. URL Slug Changes
Suppose you want to change the permalink of a blog post. In WordPress, you can easily do that by editing the URL slug.
However, search engines won't know that you've changed it. So when they crawl the old URL, they get a 404 error, and you lose the SEO link juice you gained until then.
Not only the search engines, but you will also lose backlinks and bookmarks.
To avoid all such issues, you should set up a permanent 301/308 redirect from the old URL to the new URL.
2. Changes to Permalink Structures
Changing permalink structures have a sitewide effect, not just one post or page. So without proper redirects in place, you might ruin all your site SEO.
Take extra care if you are using a permalink structure with a category base. If you rename a category, then it changes the URLs of all the posts under that category.
Again, to avoid broken links and SEO, you should redirect the old category to the new one with a 301/308 status code.
3. Temporary URL Changes
Temporary URL changes may be rare in WordPress. But if for some reason, you want to move a specific page to another location, make sure you use 302/307 Temporary Redirect.
4. Post/Page Deleted
If you delete a page on purpose, then there isn't much to worry about. WordPress will automatically send a 404 Not Found error for deleted resources.
However, to make it better, you can set up a 410 Gone code to explicitly tell the search engines that you deleted the page on purpose. According to this article on SEJ, 410 may help to quickly remove the pages from search engine indexes. It can be especially useful after deleting spam pages after a hack attempt.
Note that 410 is an error code, not a redirect. Since sites like Yoast mention it along with redirects, I thought it will be useful to include it here as well.
5. Link Cloaking
If you have an affiliate website, you might want to link to several merchant sites. But most often, these affiliate links are long and unfriendly.
That's where link cloaking is useful. You can make URLs on your site that points to affiliate links. For example, create a URL like yoursite.com/go/affproduct/ and redirect it to example.com/affproduct?someid=num1, which is the actual affiliate link.
Also, even if the original affiliate link changes in the future, you don't need to edit it everywhere. Just change the redirect link and it gets updated everywhere.
6. Domain Changes
Another major use of redirects is when you are moving your site to a new domain. After a domain migration, you should make sure all your old URLs are redirecting (with a 301/308 status) to the corresponding address on the new domain.
Types of Redirects
No doubt, 301 is the most used redirection type, which is one type of permanent redirect. But that's not the only one. There are a few more. Let's have a brief look at each of the codes in the 3xx series.
- 300 Multiple Choices: More than one choice available for the requested resource, so the server responds with multiple choices from which the user can select one and redirect itself.
- 301 Moved Permanently: The requested resource has been moved permanently to another URI. The client can change the request method from POST to GET.
- 302 Found: URI changed temporarily, and expects to return after a while. Method can be changed from POST to GET.
- 303 See Other: Redirecting to another resource, which may not be identical to the original requested resource.
- 304 Not Modified: Used for browser caching. Resource not modified, so the client can reuse the cached version.
- 305 Use Proxy: Depecated.
- 307 Temporary Redirect: Similar to 302, but the request method should not be changed.
- 308 Permanent Redirect: Similar to 301, but the request method should not be changed.
Looking at the above list, you can see that there is a bit of ambiguity here and there. For example:
- Should you use 301 or 308 for permanent redirects?
- Is 302 and 307 the same?
I think this Stackoverflow thread can better answer such questions. It shows a flowchart to pick the right codes.
But for simple WordPress use cases, you need not worry about all these confusing codes. Because for web pages, 301, 302, and 303 will be sufficient. 307 & 308 are primarily intended for APIs that deal with POST requests.
So let's see how to do that.
Setup Redirects in WordPress using Redirection Plugin
I use the Redirection plugin to manage redirects on this website. Without editing any server configuration files, you can do all create redirects from the WordPress admin interface.
Not just redirects, you can also manage error pages, such as 410 Gone, with this plugin.
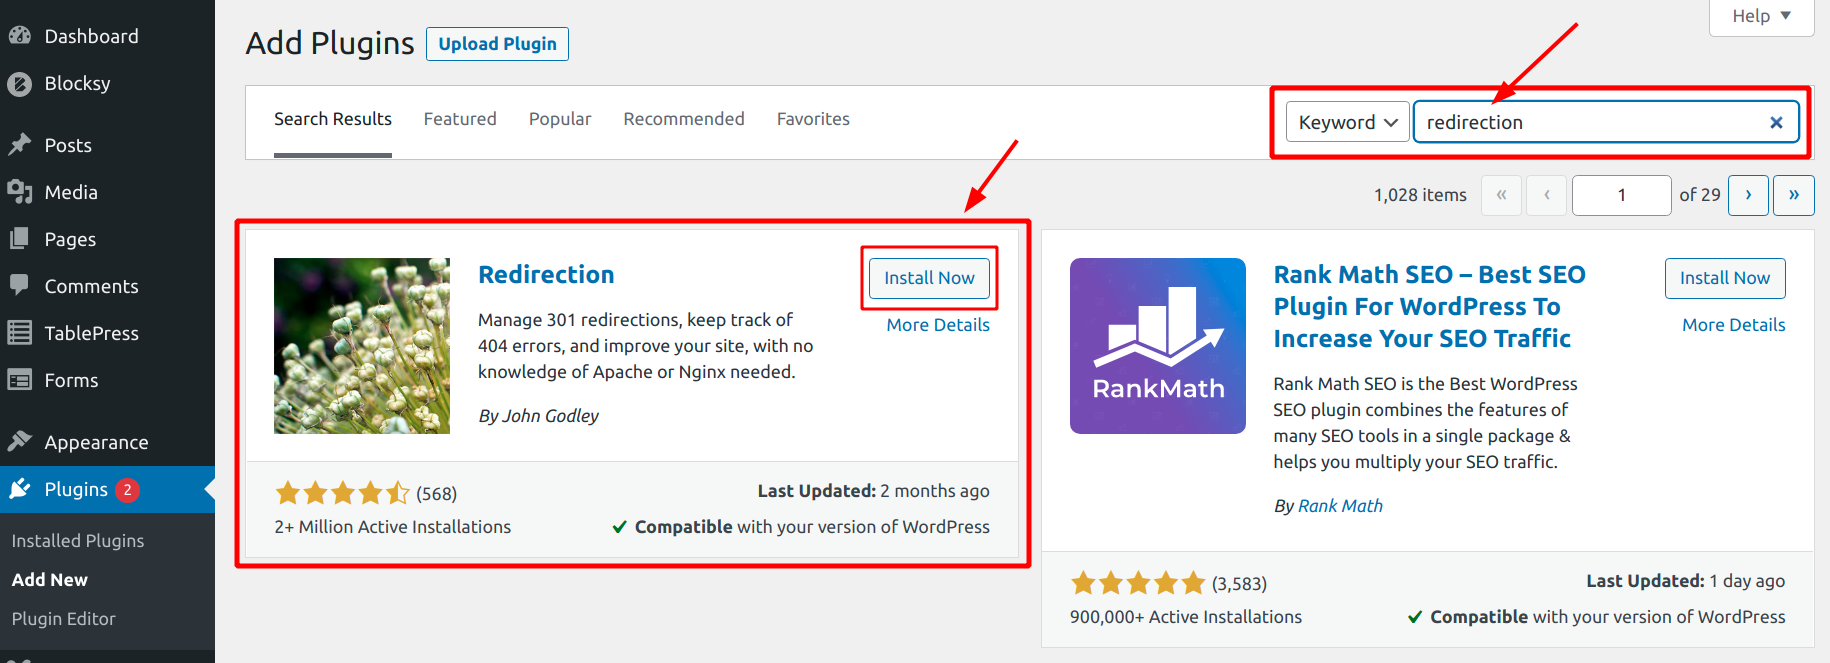
So, the first step is to install the plugin. And as you might guess, it is a completely free plugin. Go to the Add Plugins page, and search for 'redirection'.
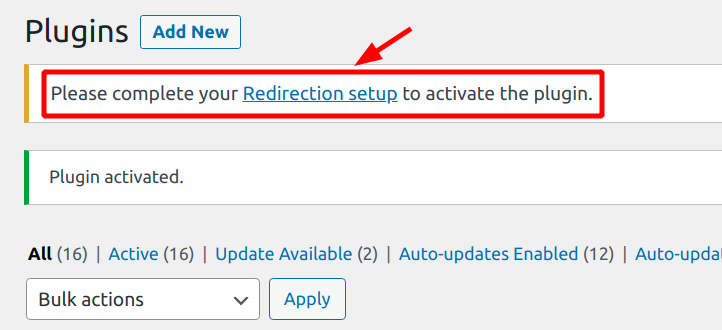
Then click Install Now, followed by Activate.
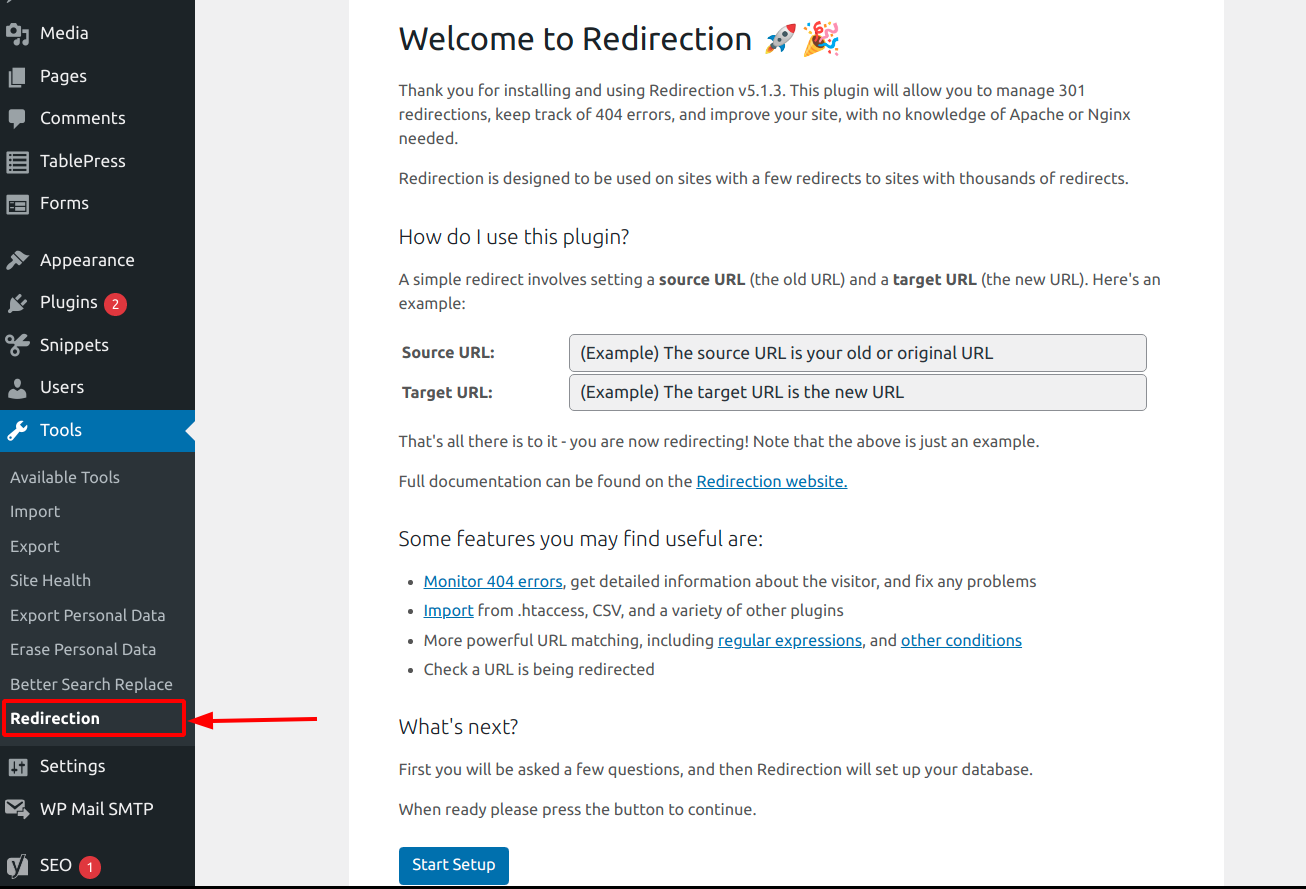
You can go through the setup wizard to configure the plugin.
You can access the plugin page under Tools > Redirection.
There is an option to monitor permalink changes. With that enabled, when you change any permalink, the plugin detects it and redirects the old URL to the new one.
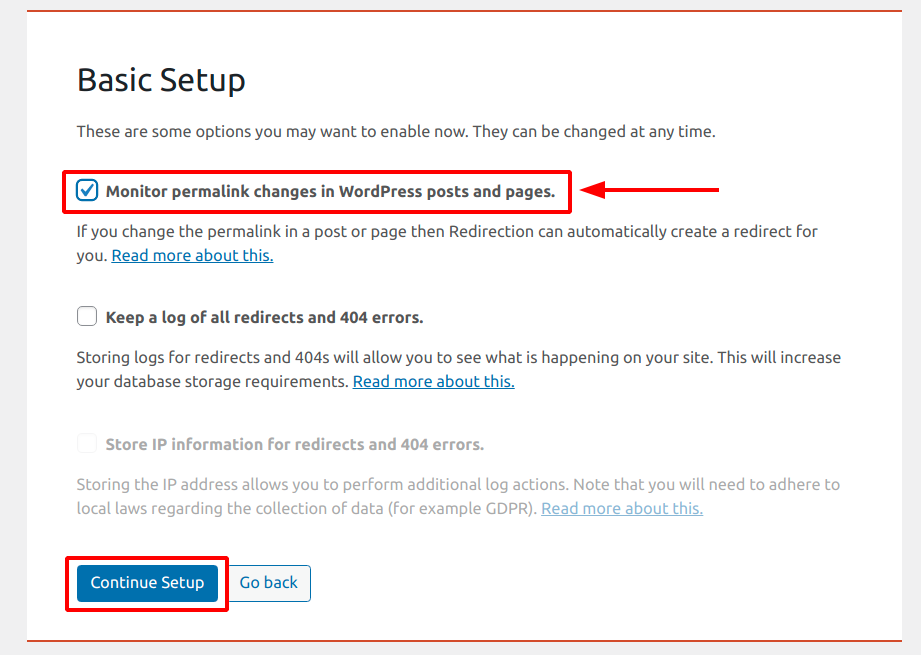
Ensure that you have the WordPress REST API working fine for the plugin to run smoothly.
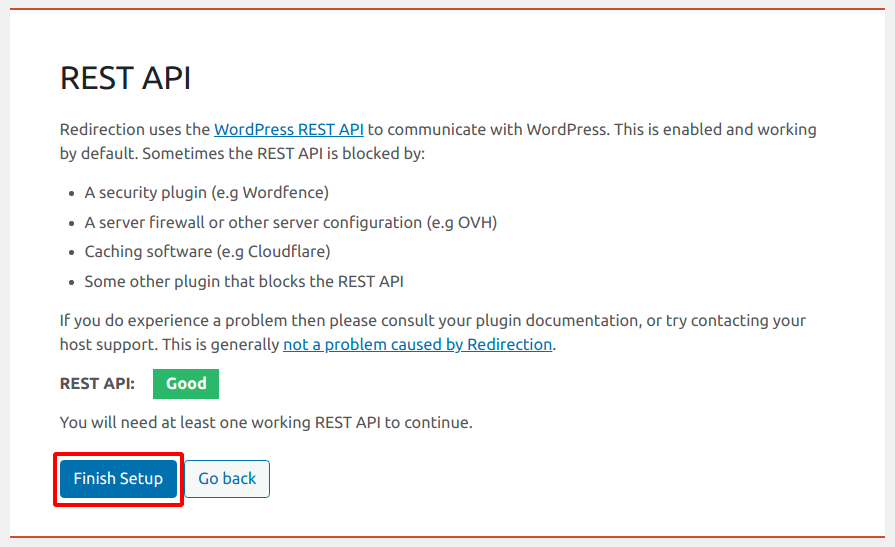
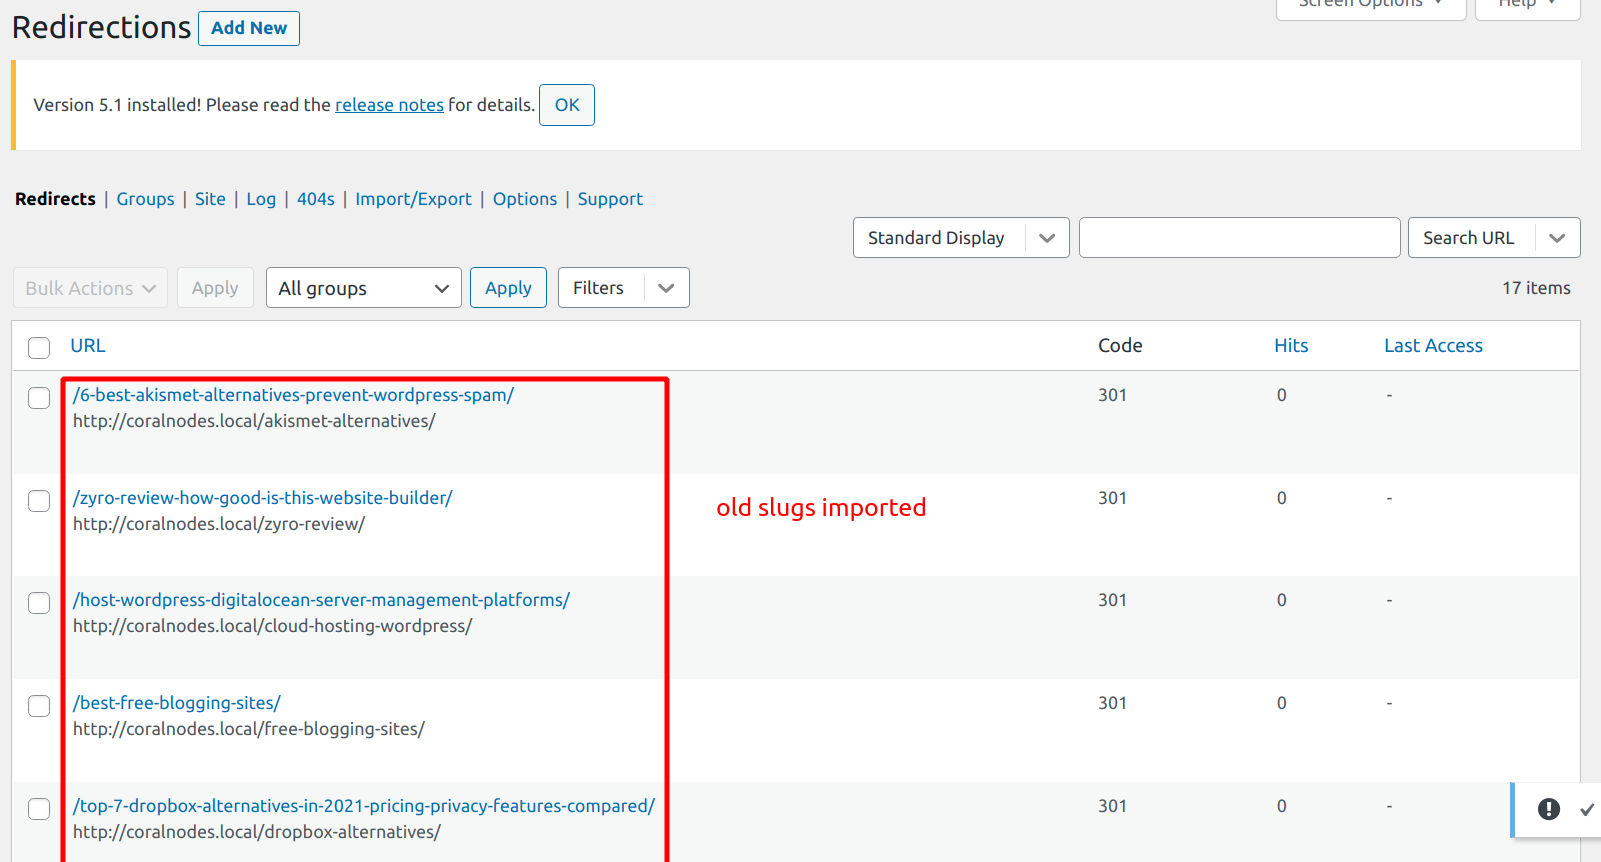
After the setting up, you can optionally import old slugs to the redirection database. WordPress does it automatically, but you can add it here as well.

That's all with the setup and installation.
Now let's create new redirects.
Single URL Redirections
Click Add New to open the form, which has five fields:
- Source URL
- URL Options
- Query Parameters
- Target URL
- Group

To create simple redirects, you need to think of only the Source URL and Target URL fields.
Above, I am creating a URL on my site (mysite.com/go/google/) that redirects to Google.
Enter the relative path in the Source URL field, the absolute URL in the Target URL field, and click Add Redirect.
It's created and appears in the table below.
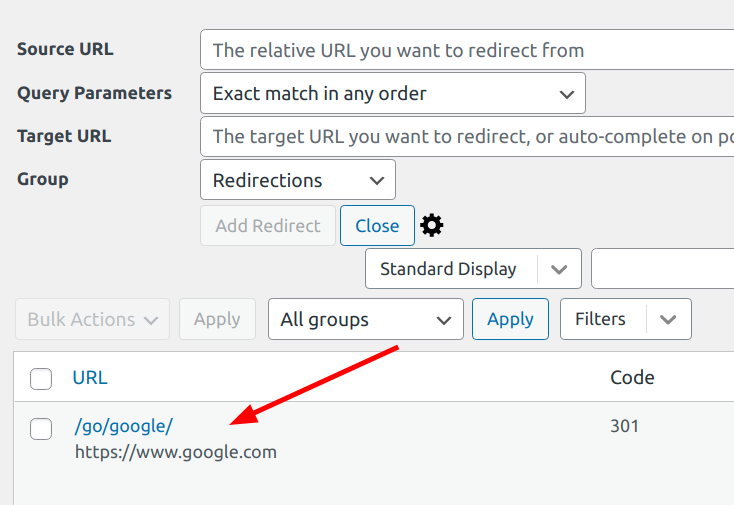
Now if someone visits mysite.com/go/google/, they will land on the Google home page.
If you want more control, click the little cogwheel icon to open the advanced options:
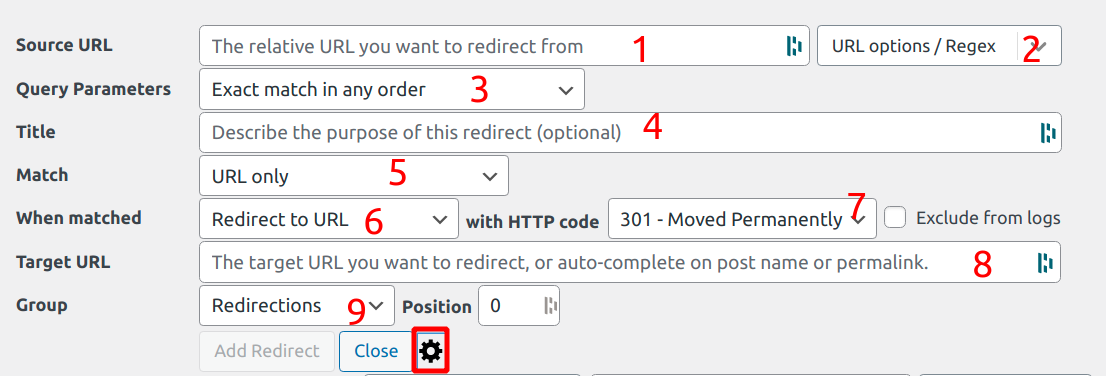
Here is a list of all the available options:
- Source URL: we've already seen it above
- URL Options: check whether you want to ignore trailing URL slashes, and case sensitivity. You can also use regex to match multiple URLs at once.
- Query parameters: The default option is 'Exact match in any order'. You can also set to 'Ignore all' or 'Ignore and pass to target URL'.
- Title: Optionally give a title for the redirect
- Match: The default match condition is 'URL only'. You can check other conditions as well, like login status, user role, referrer, user agent, cookie, IP, server, HTTP header, custom WordPress filter, post type, and language.
- When matched (redirect/other): By default, it redirects the source URL to the target URL. Other options available are: redirect to a random post, pass-through, show error, or ignore.
- When matched (set HTTP status code): The default redirection code is 301 - Moved Permanently. However, codes from 302-308 are also available. Also, if you select 'Error' in the previous field (6), then you can select from one of the error codes: 400-504.
- Target URL: we've seen it above.
- Group: Optionally organize redirects into groups; useful if you have hundreds of redirects.
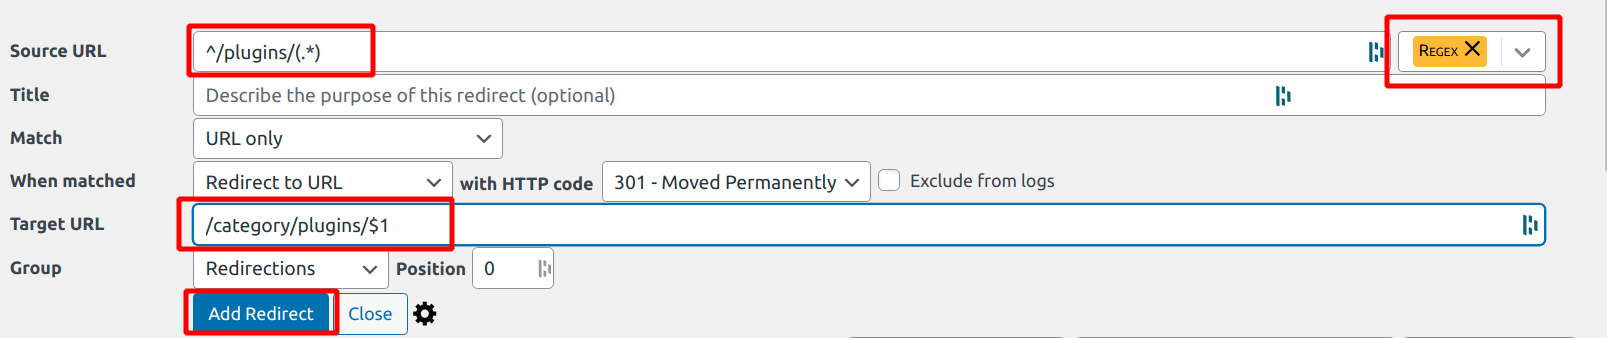
Using Regex to Create Multiple Redirections
Want to redirect a subdirectory or a path?
Use regular expressions to redirect multiple URLs that follow a pattern.
In the example below, I want to redirect all URLs that end with /plugins/something/ to /category/plugins/something/.
Make sure you check the 'Regex' option under the URL options field.
Domain Redirection
Suppose you're migrating your entire website to a new domain. To avoid losing any SEO, you need to move all the URLs to the new domain.
In such cases, setting up the redirects from the server level is a better approach than using a plugin. Because it allows you to uninstall WordPress from the old domain and free up some space.
Based on your particular server software, you can create the redirect in a few lines.
In Apache
If your website is running on an Apache server, add the following line to the .htaccess file located at the root of your domain.
Redirect 301 / http://example-2.com/It redirects all requests to the new domain (change example-2.com to your new domain) while preserving the path.
In Nginx
Similarly, in Nginx, you can use the return directive (based on the resource here).
Nginx does not have a file like Apache's .htaccess. So you may need to add it to the Server Block, which is the Nginx equivalent of Virtual Host.
return 301 http://example-2.com$request_uri;Conclusion
I hope now you know how to create different types of redirects in WordPress. Also, the Redirection plugin offers a lot more options than we discussed above. Do take a look at the documentation as well, when you have enough time.

![HTTP Status Codes: A Guide for Beginners [with Infographic]](https://cdn-2.coralnodes.com/coralnodes/uploads/medium/2021/09/http-status-codes-featured-image-1.jpg)