This article may contain affiliate links. If you buy some products using those links, I may receive monetary benefits. See affiliate disclosure here
ShortPixel and Smush are two popular names when it comes to compressing WordPress images. If you are confused between the two, this post will help you. In this ShortPixel vs WP Smush comparison, we will take a detailed look into the features, pricing, and performance of the two plugins.
![]()
By the end, you will be able to pick one. Also, these two are not the only image optimization plugins available out there. So check out this post as well:
Let us begin by comparing the features.
Feature Comparison
| Feature | Smush | ShortPixel |
| Lossless compression | Yes | Yes |
| Lossy Compression | Pro | Yes |
| WebP | Pro (works with CDN only) | Yes |
| CDN | Pro | Separate plugin |
| Serve scaled images | Pro | Separate plugin |
| Compress full-size images | Pro | Yes |
| Backup & original images | Yes | Yes |
| Lazy loading | Yes | Separate Plugin |
| REST API | Pro (with CDN only) | Yes |
| PDF Compression | No | Yes |
| Max files size | 5MB (free), 32MB (pro) | No limit |
| Images/month | No limits | 100 (free), plan-based |
ShortPixel vs Smush - Comparing important features
Searching for a hosting provider for your WordPress site? Then try Cloudways, which comes with advanced performance features like Varnish, Redis, and CDN integration.
Overview
Looking at the above table, you can see that Smush locks most of the features under the pro plan, which makes the free version quite limited. On the contrary, ShortPixel's free plan is fully functional.
But there is a caveat:
ShortPixel allows compressing only 100 images per month with the free plan. After that, you have to purchase additional image credits to compress more.
So if you have only a few images to process each month, then ShortPixel is better. Otherwise, Smush allows losslessly compressing an unlimited number of images. However, there the maximum file size is 1MB.
WebP & CDN
Another point against Smush is that it doesn't save WebP files on your server. That means you have to enable their CDN feature to serve WebP. So if you don't plan to use Smush CDN, it's better to look for some other plugins.
- Smush doesn't store WebP on your server
ShortPixel also offers CDN but within a separate plugin called ShortPixel Adaptive Images (SAI). The good part is, you can use both the plugins together. The main plugin - ShortPixel Image Optimizer (SIO) - optimizes and saves images on your server (including WebP), while the other one optimizes and serves images from ShortPixel CDN directly. If you later decide to use a different CDN, deactivate SAI and keep SIO without losing WebP support.
- ShortPixel has two plugins: ShortPixel Image Optimizer & ShortPixel Adaptive Images - both can use either one or both.
API Access
Lastly, if you want to programmatically optimize images, ShortPixel offers a REST API:
- ShortPixel Reducer API
You can send a regular HTTP request along with your API key and the URL of the image to compress. Apart from that the Post-Reducer API allows compressing images that are not available online.
![]()
In contrast, Smush doesn't mention any direct API on its product page. I enquired about it to WPMUDEV, and the reply was that they support API with CDN only. So if you are a programmer, ShortPixel gives a better solution to optimize images.
Winner: ShortPixel - for giving a fully-functional free plugin, along with more features than Smush Pro.
Pricing & Plans
You know that both ShortPixel and Smush offers free plugins available in the WordPress directory.
![]()
Now let's discuss the paid options.
Smush Pro Pricing
There are two plans:
- Smush Pro only - $6/mo or $49/yr for one site (ticket support only)
- Performance Package - $9/mo or $79/yr for one site (includes Hummingbird Pro, Uptime Monitor, and live chat support)
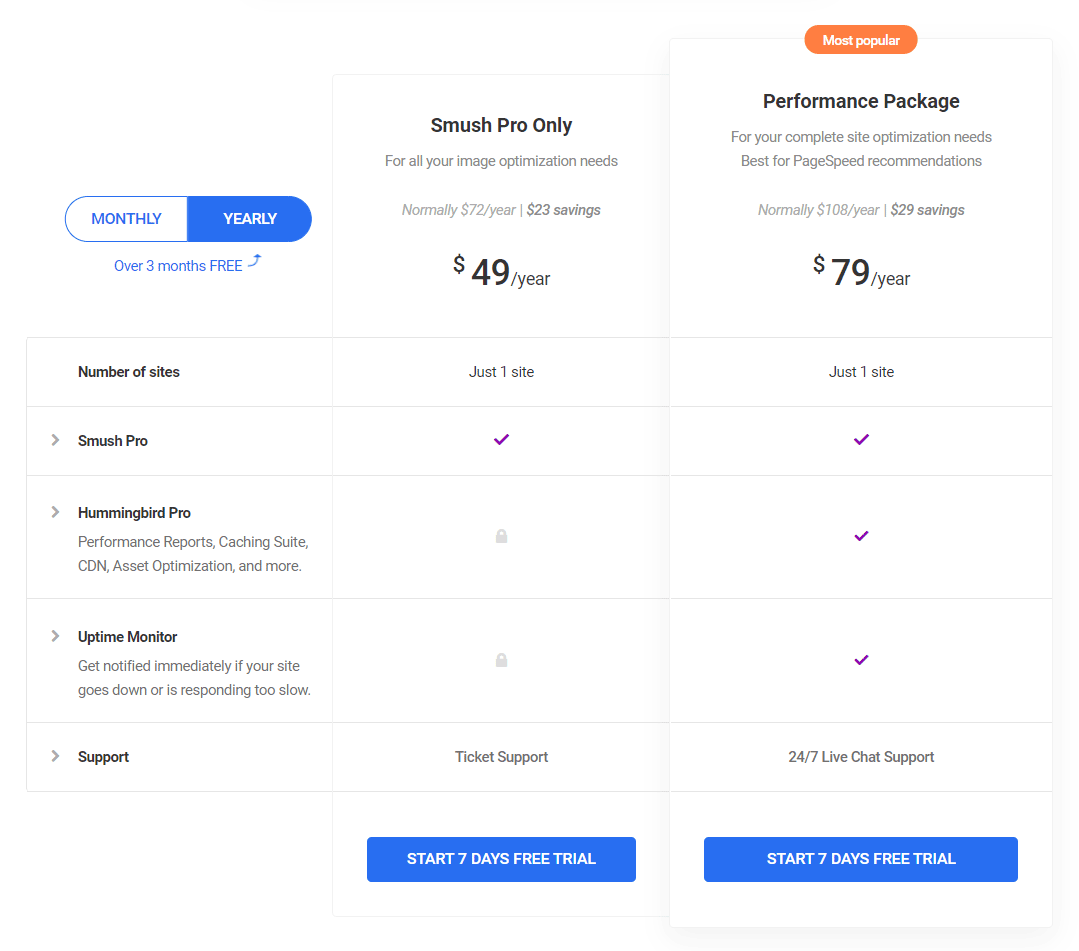
You might be thinking about what the Performance plan is. If you don't know, Smush is created by WPMUDEV, who also creates a bunch of other plugins. Hummingbird is one of them, a performance plugin.
Unless you need these extra things, the standalone Smush Pro which costs $6/mo can do all the image optimization jobs.
ShortPixel Pricing
The pricing for ShortPixel is totally different from that of Smush. Unlike Smush, ShortPixel doesn't have a separate pro version for the plugin. Instead, the difference is in the no. of images you can compress in a month. The free plan allows only 100 images/mo.
There are two ways to get extra credits:
- Monthly plans - starting at $4.99/mo for unlimited images
- One-time plans - starting at $9.99 for 10k images
![]()
![]()
Another difference is, ShortPixel doesn't limit the no. of sites on which you can use the same API key. For example, if you buy 10k image credits, you can use it over all your sites until it gets used up.
Installation & Activation
With both the plugins, the first step is to install the free plugin from the WordPress plugins area.
ShortPixel Installation & upgradation
![]()
After installing and activating the free plugin, go to Settings > ShortPixel.
If it's the first time, enter your email address and ShortPixel will send you the API key along with the login credentials.
![]()
Check your inbox, then copy the API key they've sent, and paste it back in the admin.
![]()
Later when you want to buy more image credits, you can log in to ShortPixel with the same email and purchase a plan.
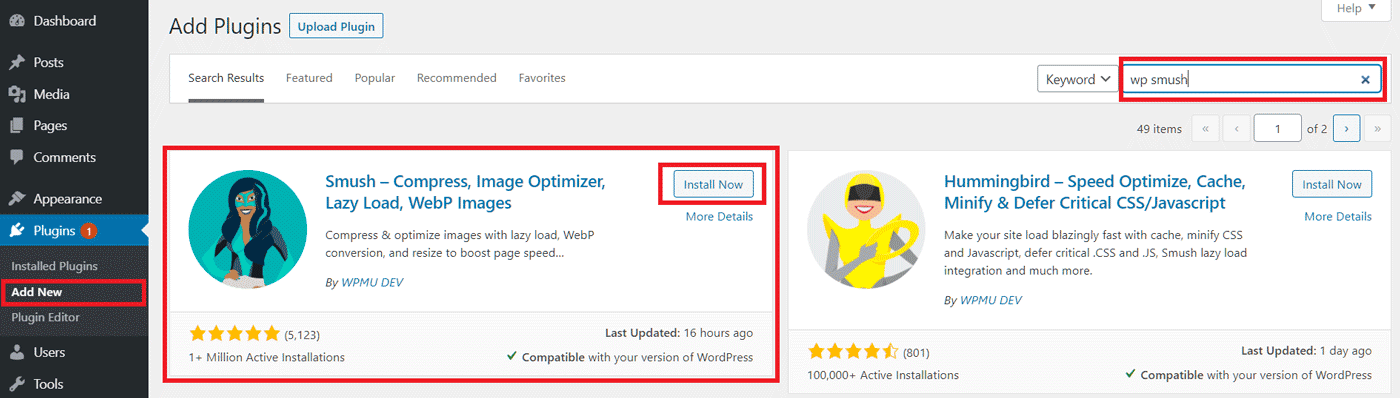
Smush Installation & Upgradation
Search for 'smush' and install the free plugin, which has over 1 million installations as of now.
Compared to ShortPixel, upgrading Smush is a lengthier process. To do it, go to the Smush website and pick one of the plans to start the 7-day free trial.
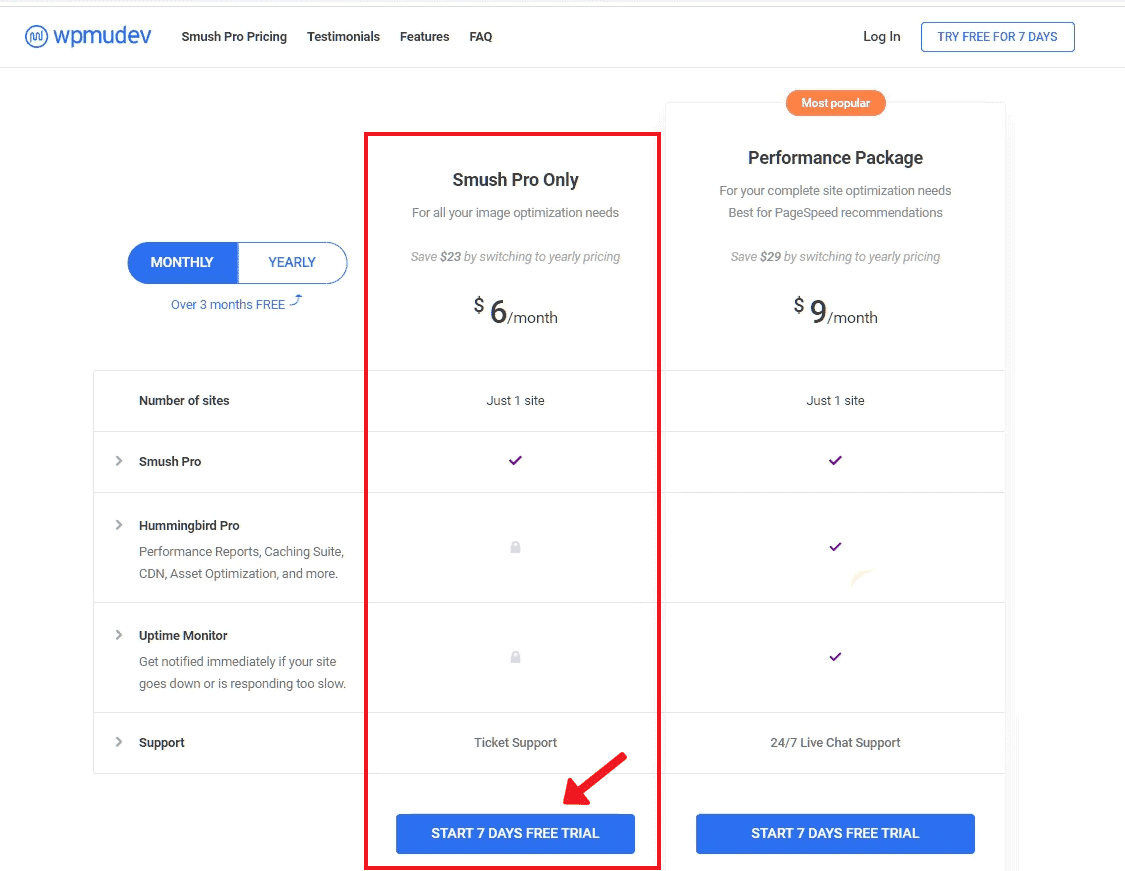
However, to begin the trial, you have to register and provide your credit card details. They currently don't allow using PayPal either. Although you can cancel the subscription and remove the credit card details before the trial ends, I felt it as a disadvantage.
In the next step, you have to connect Smush with your site. For that, there are two methods:
- Enter your WordPress credentials right in their website, or
- Install another plugin called the WPMUDEV Dashboard and enter the API key.
If you don't like to enter your username and password, you can take the second approach. All the premium features get unlocked after the activation.
- Check out my review of Smush to view the complete steps.
Winner: ShortPixel. Overall, I felt that ShortPixel is more straightforward to activate. Also, you don't have to provide credit card details beforehand.
User Interface
ShortPixel UI
The interface of ShortPixel Image Optimize is somewhat minimal with just four tabs:
- General
- Advanced
- Cloudflare API
- Statistics
It works well. There is nothing fancy.
![]()
However, as I have said above, it doesn't include the options to enable CDN and adaptive images. For that, you have to install the ShortPixel Adaptive Images Plugin.
![]()
Although you can use both together without issues, you have to make sure two main things:
- When using CDN with SAI, select lossless compression with SOI. Otherwise, images might be over-compressed, noticeably reducing the quality of images.
- Disable WebP on SOI while using SAI.
Overall, I think it's a mess when using the two plugins together. I don't quite like the way they split the features into two plugins instead of one.
Smush UI
Compared to ShortPixel, Smush's gives a beautiful interface. There is even a quick setup wizard that configures all the important features the first time you install the plugin. Also, since there are no monthly caps, you can almost set it and forget it.
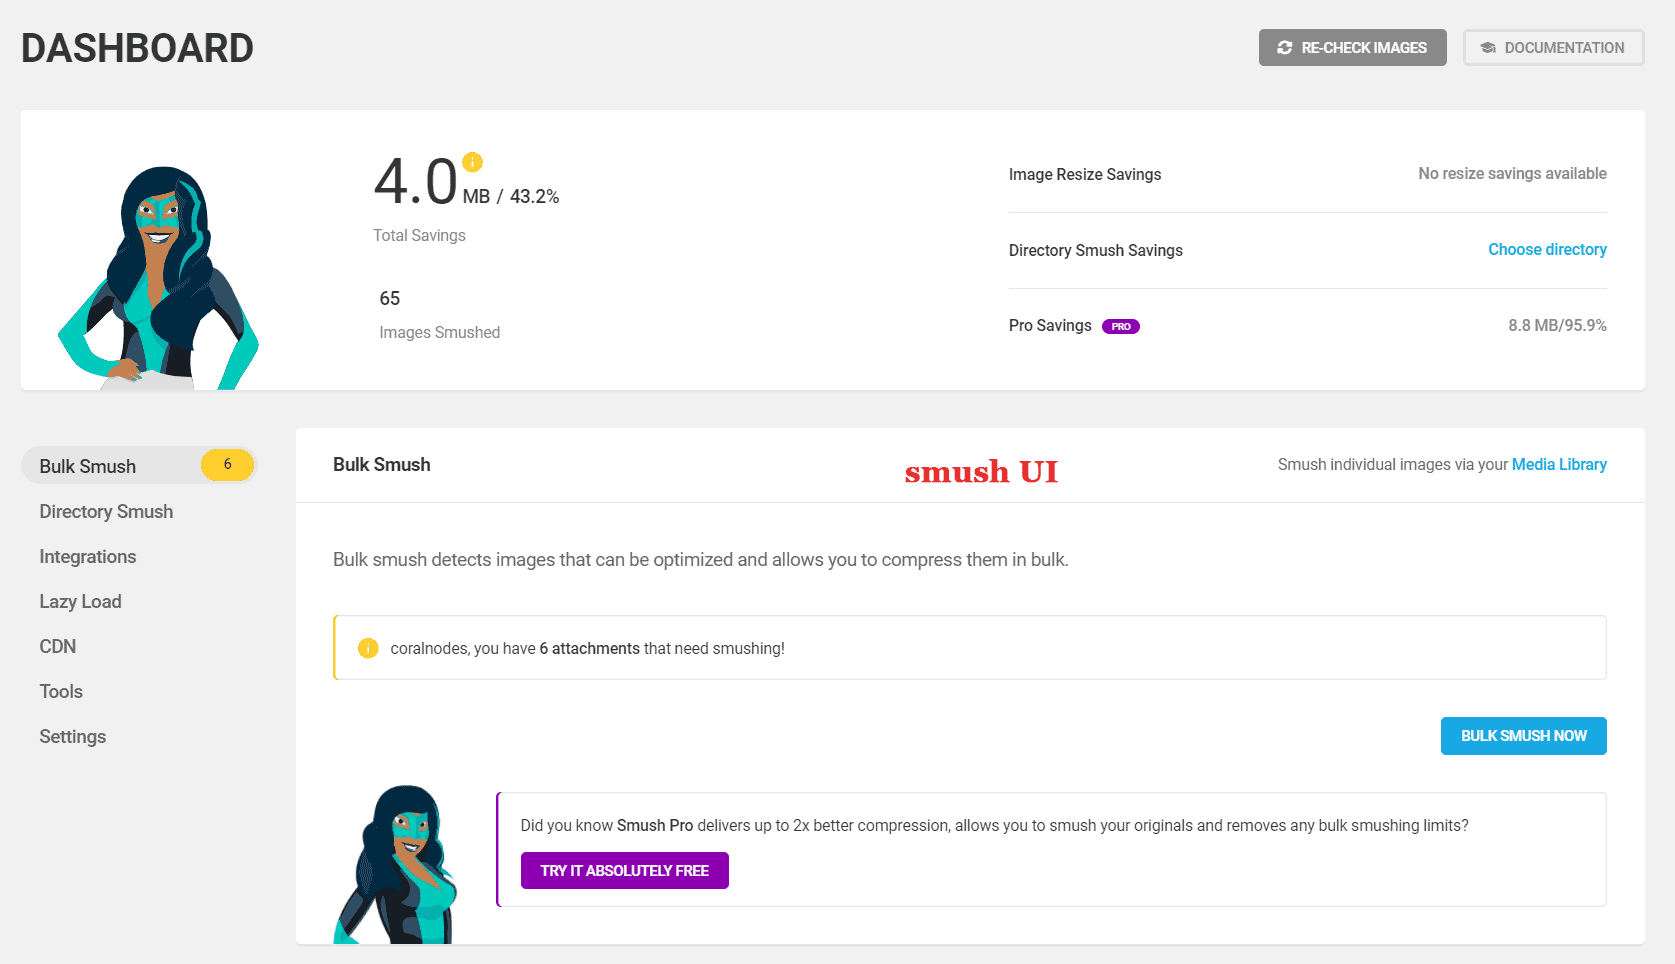
Winner: Smush.
Compression Benefits
Smush Pro offers two compression techniques:
- Lossless
- Super-smush (lossy)
whereas ShortPixel gives three:
- Lossless
- Glossy
- Lossy
To compare the size savings between the different settings of the two plugins, I created sample web pages with the following settings:
- 3 JPEG images
- 3 PNG images
- Some dummy content
- GeneratePress theme
- No other plugins other than Smush and ShortPixel
First I uploaded the original unoptimized images to a page and measured the page size and speed using GTmetrix. Then I repeated the same process with the same set of images while switching the settings and plugins. Hope you got the idea. And here are the results:
| Setting | Total Image Size | % Savings |
| No optimization | 1.41MB | -- |
| Smush lossless | 1.37MB | 2.83% |
| Smush lossy | 590KB | 58.15% |
| Shortpixel lossy | 530KB | 62.41% |
| Shortpixel lossless | 1.32MB | 6.38% |
| Shortpixel glossy | 729KB | 48.29% |
ShortPixel vs Smush - Image Size Savings
Winner: ShortPixel.
With both lossy and lossless algorithms, ShortPixel gave more size savings. In addition to these two settings, ShortPixel also offers a technique called Glossy, which stands in between.
Support Quality
With the free plugins, WordPress forum is the primary way to solve your problems, be it Smush or ShortPixel. Looking at the no. of issue resolved recently, it seems ShortPixel has a better rate.
However, Smush has a better overall rating (4.8/5), while ShortPixel is a tad lower - 4.6/5. Also Smush has over 1million installation, while the SP is way behind - 200k+ (as of writing this review).
- Smush - 4.8/5, 1m+ installations
- ShortPixel - 4.6/5, 200K+ installations
![]()
Coming to the paid plans, both the plugins offer email support. But Smush gives more options including live chat if you go for their higher plans.
Also, if you plan to join WPMUDEV, which costs $49/mo, you can access the community as well.
Since I haven't tried any of the supports personally, I cannot comment on their effectiveness. But based on the options offered, overall rating, and popularity, WPMU's Smush is the winner.
ShortPixel vs WP Smush: Conclusion
From what I've understood, ShortPixel seems to be the main product of its creators. In contrast, Smush is only one of the products that WPMU offers. That might be the reason why both the plugins differ a lot in all aspects, mainly pricing.
So, for a small blogger or website owner, ShortPixel is the right options. It's gives better compression and features for a smaller price. ShortPixel is the plugin I currently use on this blog as well.
On the other hand, if you have couple of WordPress sites, then you might want to look Smush Pro and WPMU.
So here is the summary:
-
Free plugin with lossy/lossless compression: ShortPixel (but 100 images/mo)
-
Free plugin with unlimited lossless compression: Smush Free
-
Small site owners on a budget: ShortPixel (with their one-time plans)
-
Large site owners/agencies who manage multiple sites: Smush Pro
Hope you found this comparison useful. Also, check out this post too, if you want to know about more options: