This article may contain affiliate links. If you buy some products using those links, I may receive monetary benefits. See affiliate disclosure here
Initially, the goal of WordPress was to be a blogging platform where you can publish blog posts, receive comments from users, and so on.
But during later years, the WordPress software witnessed several updates and upgrades, which transformed it into a complete content management system.
If you ask me, there are several factors that contributed to this evolution. The main one among them is the introduction of custom post types in version 3.0.
Custom post types give you a way to expand your content beyond just blog posts, static pages, and media attachments.
Multiply that with the ability to add extra attributes to posts in the form of custom fields and metadata, and WordPress becomes a complete CMS. You can even create relationships between different post types to make it more robust.
There are several plugins like Metabox and Advanced Custom Fields that allow you to create and manage this metadata.
However, WordPress does not allow you to create custom post types from the admin by default. So that's what we are going to look at in this post - how to create custom post types in WordPress.
Also, a post about custom post types won’t be complete if I exclude custom taxonomies and custom fields. So we will discuss that too.
Understanding Post Types in WordPress
A fundamental concept in the WordPress ecosystem is that every piece of content is a Post. In that sense, pages, media attachments, menus, etc. are also posts, just like a regular blog post is.
Maybe it still doesn't make sense to you. So I will try to explain it in another way.
WordPress website stores all its data in a MySQL database which is a relational database. The data is kept in the form of rows and columns, using tables.
This database contains several tables such as wp_posts, wp_users, etc. When you create a new blog post from the WordPress admin, it gets stored inside the wp_posts table.
Similarly, when you upload an image, its details are also stored inside the wp_posts table. And the actual file goes inside the /wp-content/uploads folder.
- Now you can see that WordPress uses the same table to store different types of content. Then how does the system distinguish between these different types?
That's where the concept of post type comes in. The wp_posts table has a column called post_type, where it saves the type of that post.
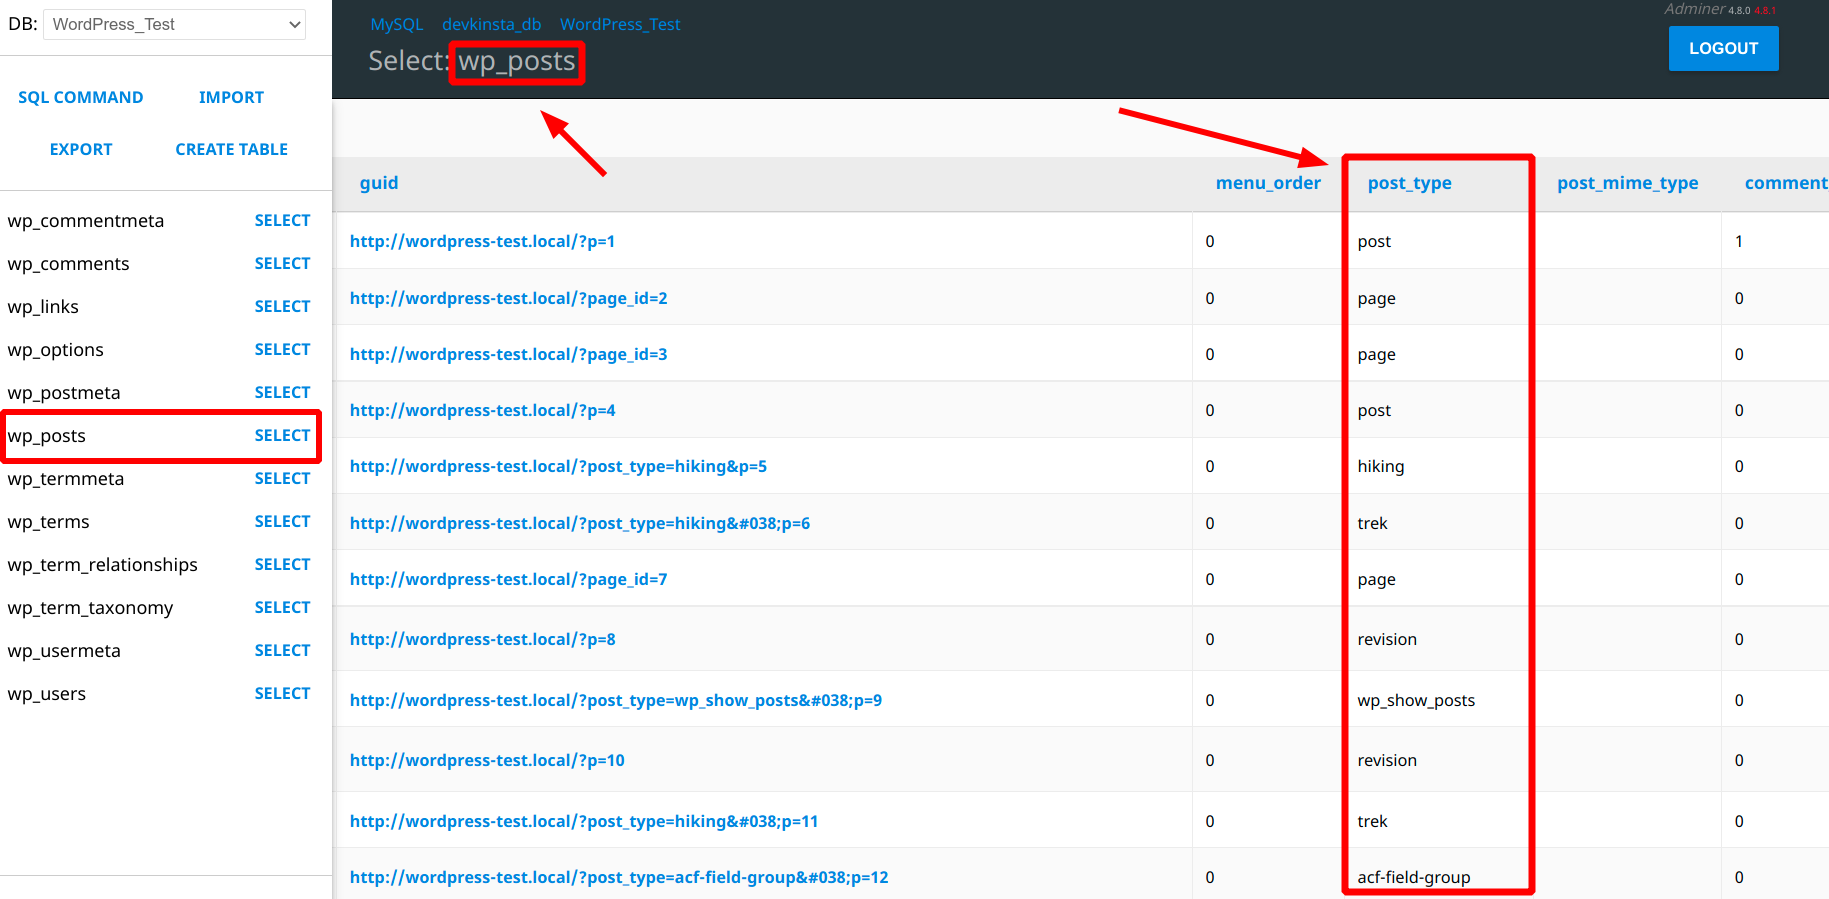
post_type column in wp_posts table - viewed on Adminer
According to the WordPress documentation, there are 7 different post types:
- Post: Anything you create from the add new post page.
- Page: Created from Add new page.
- Attachment: Includes media uploads such as images videos PDF files etc
- Revision: When you update an existing post wordpress save the old version as a revision This allows you to restore the post to an older version if required.
- Navigation: the main use you create Under the appearance section
- Custom_CSS: The wordpress customizer allows you to add additional CSS which gets saved as a custom CSS post type This is separate for each theme.
- Changeset
Out of these, posts, pages, and media attachments are the main types. Others are just secondary because they are used either for backend or design purposes only.
For instance, you can view the revisions only from the WordPress admin area. It does not have any existence on the front.
- Custom post types are created when you feel that certain pieces of content do not fit into one of the above-mentioned built-in types.
When to use Custom Post Types
So what are those scenarios when you want to create a new post type?
Technically, there is no problem in adding every content either as a post or a page. But it may not look ideal always.
Suppose you are a tour operator who conducts tour packages across the world. And you want to list the packages on your website so that visitors can check the available dates and book them.
One way is to add all your packages as pages, then use custom templates to display them on the front. Or you can also use a page builder like Elementor to make the design process easier.
But still, there are a few problems. Pages by default do not have an archive section. So you need to create custom archive pages to list the tour packages.
But then it will appear alongside other generic pages like about, contact, terms of use, etc, which looks highly unnatural.
Adding them as posts is also not ideal because then it appears alongside your blog articles.
So instead of all these, a better way is to create a custom post type just for your tour packages, which gives you more freedom and flexibility.
Popular use cases of CPT
If you look around the web, you yourself can identify several use cases like the tour package example we discussed above. Here are some of the things that came to my mind:
- Events
- Job Boards
- Portfolio Items
- Products in an online store
- Employee/Staff listing
- Videos
In many cases, you can find ready-made plugins that automatically register the custom post type along with the necessary custom fields. You don't even need to manually create the post type.
So whenever you feel the need for a new post type, the first thing you should do is to do a quick search on the WordPress plugins directory. You'll highly likely find an existing plugin that makes most of the things easier.
For instance, take the case of the Events Calendar plugin, which is one of the most popular plugins to create and manage events on a WordPress site.
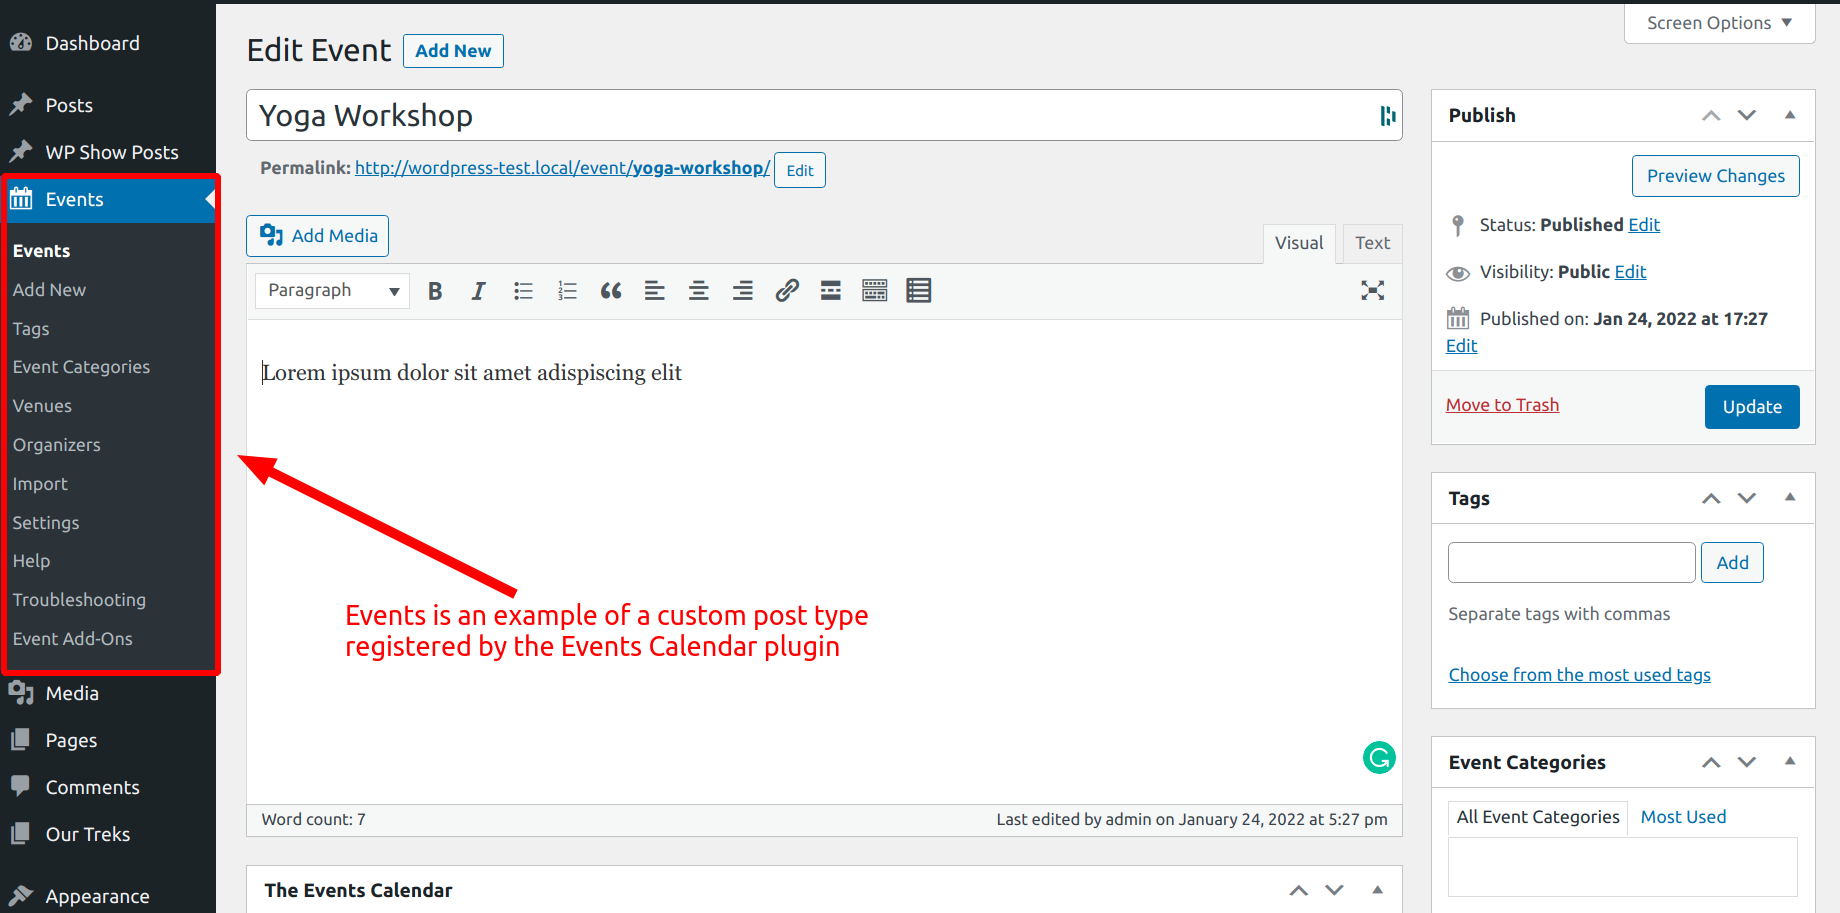
Events custom post type
It comes with date pickers, maps, and a nice user interface that allows visitors to filter the events based on several criteria.
From the admin, you can set venues, organizers, locations, etc, along with several other neat features.
Behind the scenes, the plugin is using a custom post type to store the event-related data.
The Simple Job Board is another example, which also uses a custom post type to store the job data.
Instead, if you try to replicate these features on your own, then it would be a lot of work.
Plugins to Add Custom Post Types
If there are no plugins that can meet your requirements, then the next solution is to create a new post type on your own.
There are a couple of plugins that help you to create custom post types for any purpose. Two well-known among them are:
Below, we look at Custom post type UI, which has over 2 million active installations.
How to Use Custom Post Type UI
Let me take the example of a tour operator that organizes trekking in several regions such as the Himalayas and the Western Ghats. We want to add each trek as a custom post and list them on the archive page.
The first step is to install the Custom Post Type UI plugin. Go to the Plugins page on your WordPress admin and search for it.

After installing and activating the plugin you will find a new menu item called CPT UI on the left side.
The plugin allows creating post types as well as custom taxonomies. Under the Add New Post Type tab, you can find several fields and settings.
Under Basic Settings, you can enter the slug as well as the plural and singular labels, which are all self-explanatory. For now, I am sitting them as “Trek” and “Treks”.

Below that, you can find additional labels followed by more settings. You can find the details of all these parameters on this documentation page. So we're not going to discuss all of them here.
Out of these, set the Has Archive option to true if you want the post type to have an archive page. Otherwise, leave it to the default option, which is false.


Finally, click add post type button below. Now you should see a new menu item called “Our Treks” on the left side.
Next, add some content and view them on the front end.

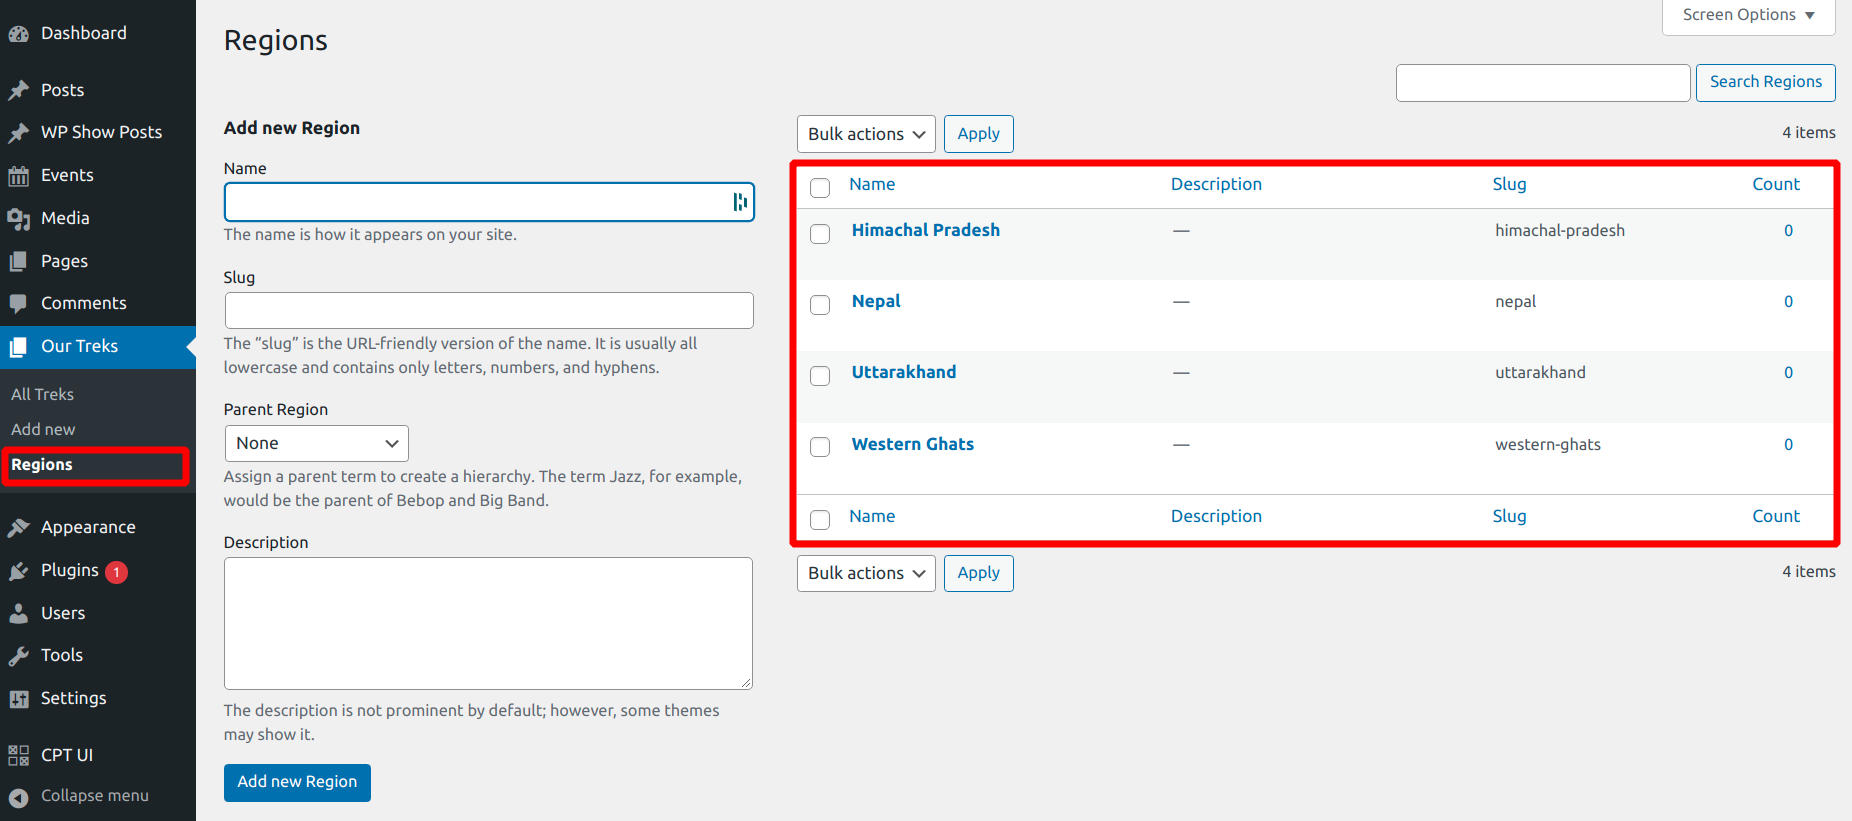
Custom Taxonomies
Next, suppose I want a way to group the treks based on the region. Just like our regular posts have categories and tags.
We can create the same plugin to create a custom taxonomy called Regions.

Under that, I am going to add several regions like Himachal Pradesh, Uttarakhand, Western Ghats, Nepal, and so on.
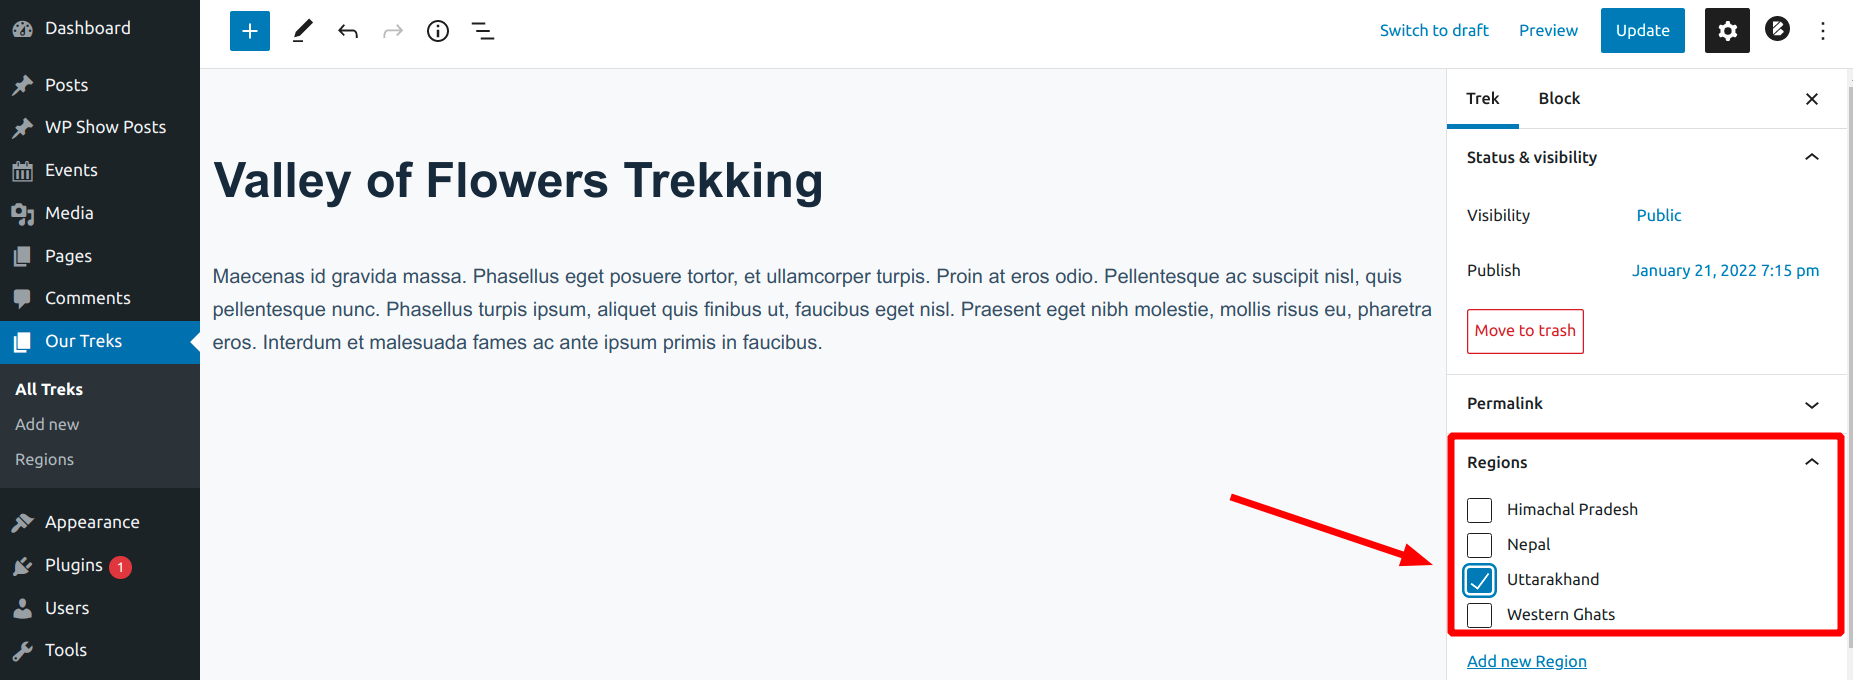
Now if I open a trek page, I should see the option to select the region from the settings panel on the right side.
Add Post Meta (Custom Fields) to the Mix
Now we can set up the following things from the post editor:
- post title
- post body
- taxonomies
- excerpt
- featured image
But what if you want to add more details? Suppose in our example, I want to add additional details like the tour leader, trek duration, and the maximum group size.
You might be thinking why can't I add them as custom taxonomies as we have done above.
But remember that taxonomies are meant for grouping posts not for adding extra information.
Here is an excellent article that explains when to use taxonomies versus custom fields.
Why custom fields when we have the block editor?
Another option is to add all the extra information inside the post editor using the block editor.
With the release of the block editor, the significance of custom fields has decreased. But custom fields allow more separation between the data and the design. So I think it still has a place.
For instance, I want to highlight the tour duration, team leader, difficulty level, etc in a separate box at the top of each post. If I do it within the block editor, then I have to repeat the same thing for all the posts. Of course, I could save it as a reusable block but still, it is quite cumbersome.
Instead, if I set these as custom fields, I can use the backend as a place to enter only the data and then control all the design and layout-related things from the theme. Although it requires some custom coding it will be easier to manage in the long run.
Advanced Custom Fields
To create these custom fields we are going to use a plugin called Advanced Custom Fields. It's a free plugin, so you can install it from the WordPress admin right away by going to the Add Plugins page.
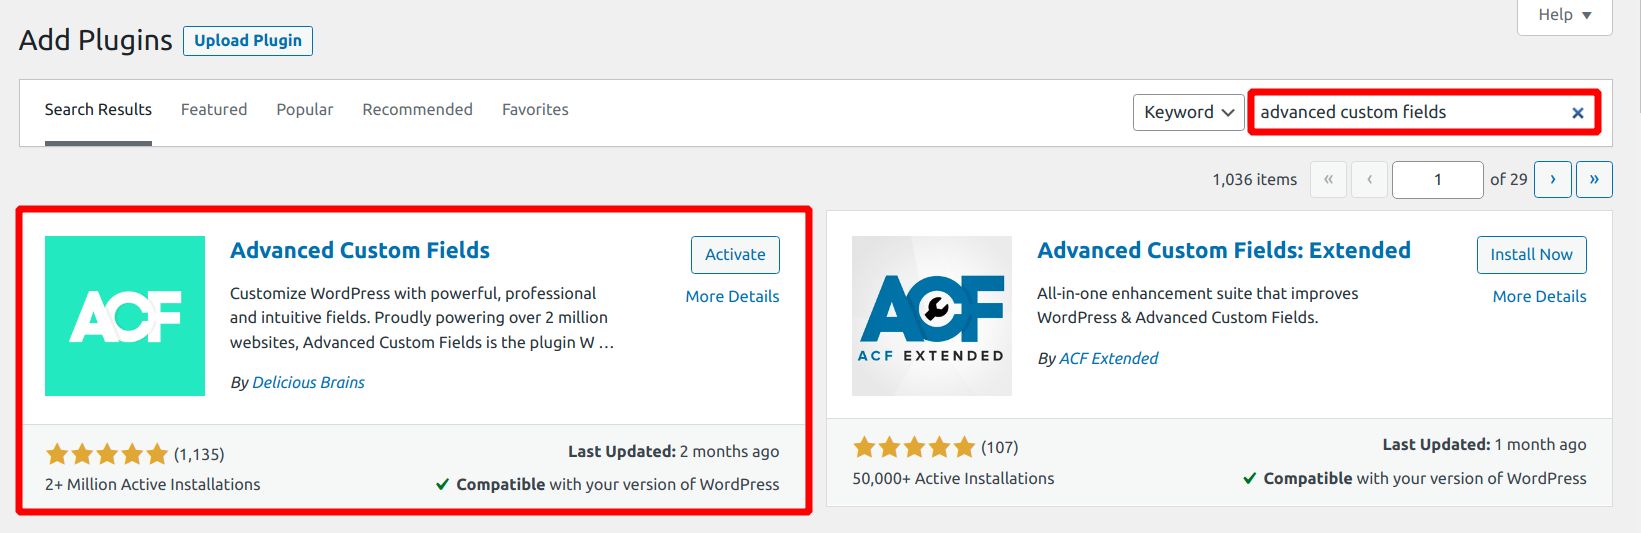
After that, you will find a new menu item on the left side - Custom Fields. The plugin allows you to create fields and group them together, then attach them to the post type you want.
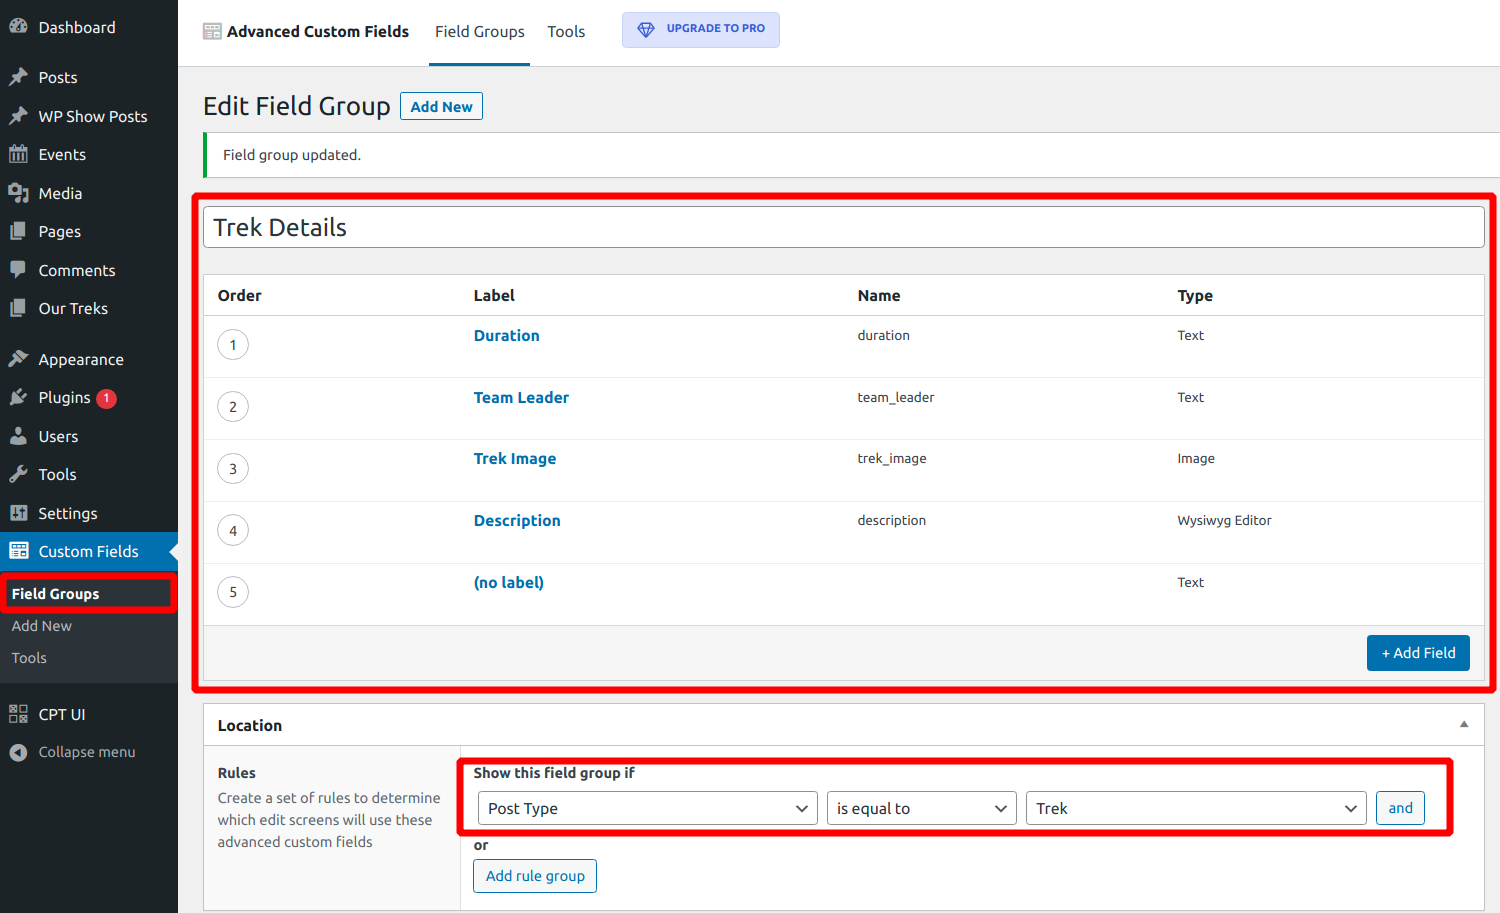
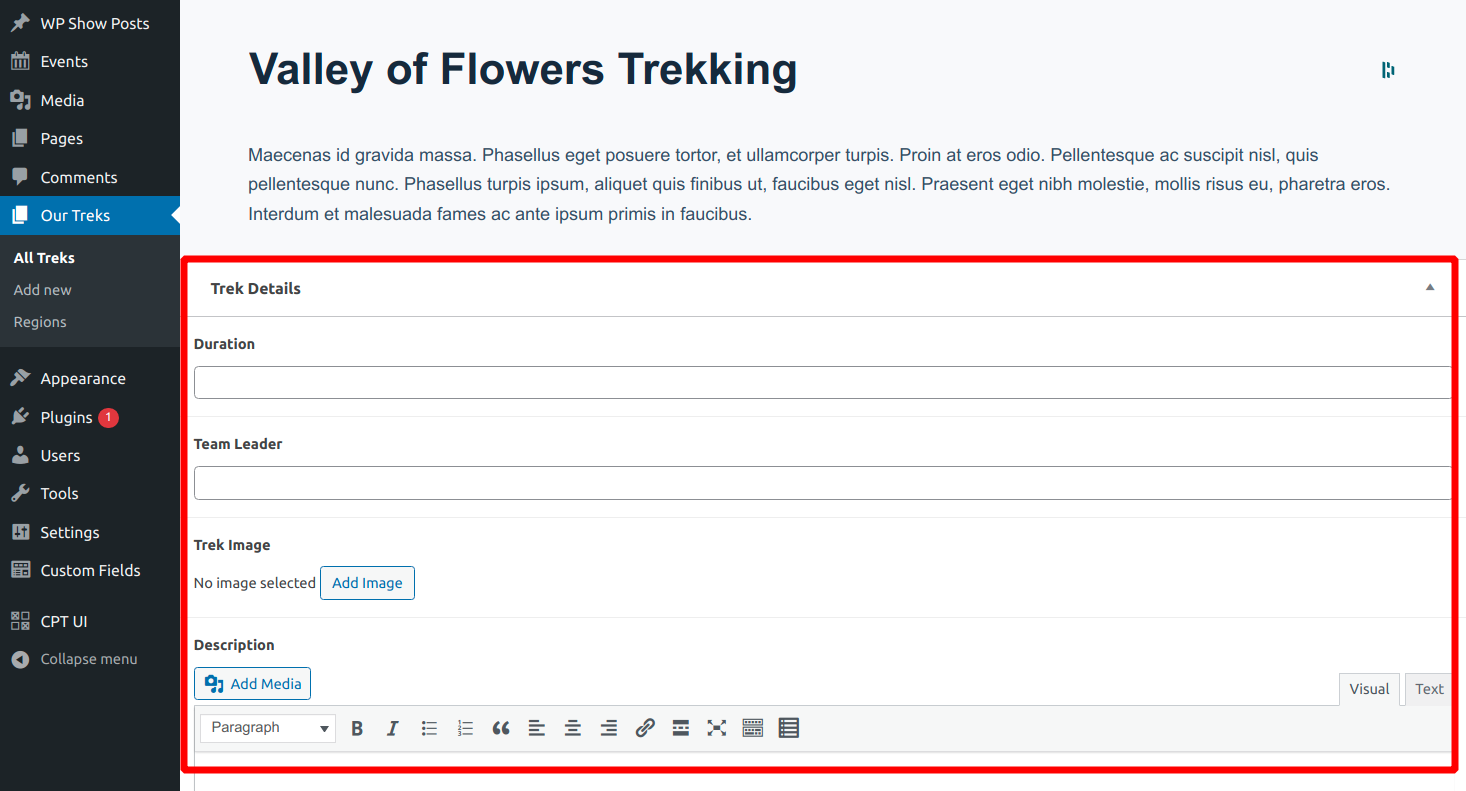
Now if you go to the post editor you will see a new field group underneath:
ACF also gives easy-to-use PHP functions to display these details on the front-end.
Note: WordPress has built-in support for custom fields. But it's quite rudimentary when compared to the flexibility that ACF offers. If you want to enable that in the block editor, check the ‘custom-fields’ option under ‘supports’ when registering the post type.
Manually adding Custom Post Type & Taxonomy without Plugins
If you are at least slightly comfortable with code, then you may not even need the CPT UI plugin to create the post types.
WordPress gives the register_post_type() and register_taxonomy() functions to manually add them. The CPT UI plugin is only allowing you to register all these from a user interface.
There are multiple ways to add custom PHP code to your WordPress website. But the recommended way is to create a site plugin to add the code.
You could also add the code to the theme's functions.php file. But that has a problem. If you change/update the theme, then you will lose the edits, including the CPTs.
Here is the code that registers the custom post type - ‘trek’.
<?php
/*
    Plugin Name: Site Custom Post Types
    Description: Custom post types and taxonomies for this website
    Author: Abhinav
    Version: 1.0.0
*/
function site_custom_post_types() {
    register_post_type('trek',
        array(
            "label" => "",
            "labels" => array(
                "name" => "Treks",
                "singular_name" => "Trek",
                "menu_name" => "Our Treks",
            ),
            "public" => true,
            "publicly_queryable" => true,
            "show_ui" => true,
            "show_in_nav_menu" => true,
            "has_archive" => true,
            "show_in_menu" => true,
            "menu_icon" => "dashicons-admin-page",
            "supports" => array("title", "editor", "thumbnail", "excerpt", "comments"),
        )
    );
}
add_action('init', 'site_custom_post_types');
And here is the code that registers the taxonomy - Regions - and attaches it to the ‘trek’ post type.
function site_custom_taxonomy() {
    register_taxonomy('region', array('trek'), array(
            "labels" => array(
                "name" => "Regions",
                "singular_name" => "Region"
            ),
            "public" => true,
            "publicly_queryable" => true,
            "hierarchical" => true,
            "show_in_nav_menu" => true,
        )
    );
}
add_action('init', 'site_custom_taxonomy');
You can register the custom fields also using manual code. However, it is more complex than registering post types and taxonomies. So I still prefer to use the ACF plugin to do the job.
Conclusion
I hope this post helped you to get a detailed understanding of custom post types, taxonomies, and custom fields. If you can master these three topics then you can build websites of any complexity using WordPress.