This article may contain affiliate links. If you buy some products using those links, I may receive monetary benefits. See affiliate disclosure here
You know that Google Analytics helps to track the number of visitors or page views your website receives in a timeframe. However, this tool can do a lot more than that. Event tracking is an example. In this article, we will touch the basics of setting up click tracking in Google Analytics.
Events refer to the interactions your visitors make while they are on your web page. Here are some of the most common examples of event:
- Click events
- Form submissions
- Scrolling
- Ajax events
For example, clicking on a menu item is a click event while submitting a contact form emits a form submission event.
This guide assumes that you have already set up Google Analytics using Tag Manager on your site. If you haven't, I suggest you read the following guides:
Where Event Reports Appear in Google Analytics
Event reports appear under the Behavior tab in Google Analytics. The overview section gives a quick summary of all the events you are tracking, along with a timeline graph.

Below that, you can also see the pages from which the events occurred. This is good to gain insights about the top pages that drive user interaction.
Finally, the Event Flow tab shows chains of interactions users make while on your site. You can use this to find out the points at which drop-outs occur and make necessary changes.
Setting Up Click Tracking in Google Tag Manager
If you install the Analytics code directly using the Global Site Tag (gtag.js), you have to write custom Javascript code to set up event listeners. But with Tag Manager, you can set up all these from a web interface without touching the code. That's one main reason to implement Tag Manager, especially if you are not a developer.
GTM collects the click events as it occurs and send the data to Analytics.
The main steps involved in setting up click tracking are:
- Enable the built-in click variables in GTM (if not already enabled)
- Set up the click trigger for the element you want to track.
- Create a Universal Analytics Tag (event type) in GTM and attach it to the trigger.
All Elements vs Just Links
GTM has two types of built-in triggers for detecting click events:
- All Elements
- Just Links
The first one allows you to track clicks on any HTML element like button, div, span, etc. It works for links as well although not meant for that.
The second type - Just Links - is meant to track clicks on HTML anchor elements only. So if you want to track link clicks, this one is more appropriate.
Example #1 - Tracking an Element Click
Suppose you have a button on your site which opens a contact form in a lightbox. You have to track the clicks on that button. Let's see how to do that.
![]()
Step 1 - Creating the Trigger
In this case, the element we want to track is not an anchor (link) element. So, we have to select the All Elements trigger type.
![]()
Since we are tracking the clicks on a particular element, select the Some Clicks option. Now, we have to specify the criteria to match that element. For that, there are three fields to match the click variable with our expression.
In this example, we use the following settings:
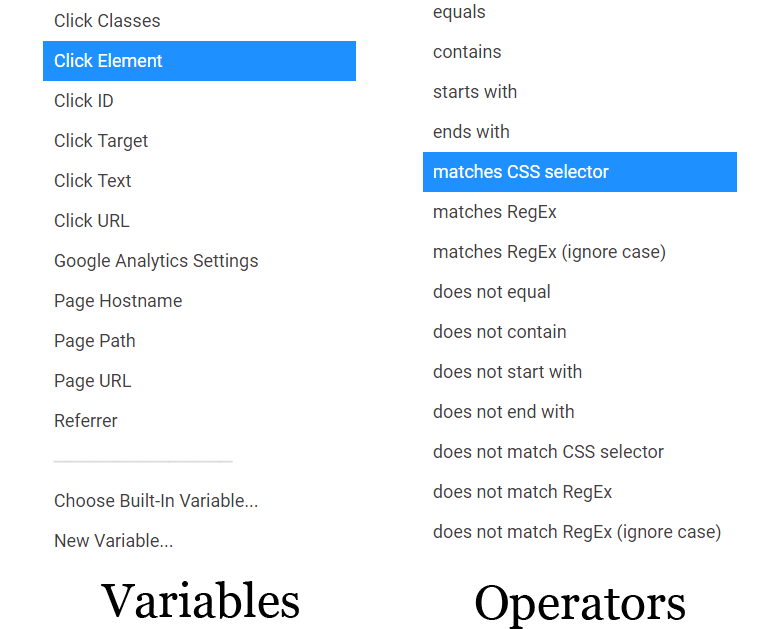
- Variable - Click Element
- Operator - matches CSS selector
- Expression - .get-quote button
![]()
Note that, GTM also offers several other options for the Variable and Operator fields. So, select one according to the element you want to match.
That's it. Finally, give the trigger a proper title (e.g., CTA Click Trigger) and click Save. Now let us move on to create the Tag.
Step 2 - Setting up GA Tag
The trigger we have set up in the previous step has no use if it has no tags attached to it. Tags work like an intermediary which send our data to third party tools like Google Analytics.
![]()
Click the New button from the Tags page. Now select Google Analytics - Universal Analytics as our Tag Type. This is one of the built-in tag types available in GTM.
The GA tag type requires you to select the Track Type. Since we are tracking an event, select Event from the drop-down list.
The next step is to fill up the Tracking Parameters. This involves mainly the following fields:
- Category
- Action
- Label
These three parameters act as the Primary Dimension choices in GA's event reports with the event category appearing as the default.
Generally, the category helps to group similar events together whereas the action denotes the particular interaction the user has made, such as click, download, etc. There are no strict rules in specifying the values of these parameters. So, give sensible values for each.
After filling the three parameters, select the Google Analytics Settings variable. You might have already created the variable when you set up the page view tracking.
Finally, under the Triggering section, choose the trigger we have created in the previous step.
After giving our tag a proper title, click the Save button.
Step 3 - Previewing & Publishing
Always preview the changes before hitting the Publish button. This ensures that all the tags are firing correctly.
Example #2 - Tracking a Link Click
Suppose you want to track the clicks on a telephone link. All the steps are similar to that of the above example except for setting the trigger. So, let us look that in detail.
![]()
Start by creating a new trigger like the one above. As you reach the point of selecting the trigger type, choose Just Links instead of All Elements. The remaining steps are similar.
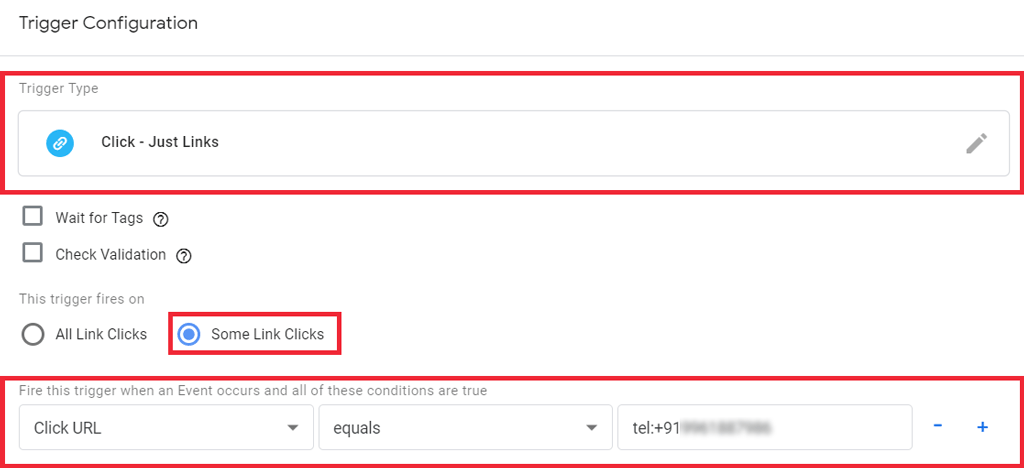
With this option, you have two additional settings at your disposal:
- Wait for Tags - delays opening the links for a specified time so that the tags get enough time to fire.
- Check for Validation - Tags fire only for valid clicks.
In most cases, you can keep these options unchecked.
Remember that Just Links works for direct links as well as link elements with other elements nested inside it.
That means, if you have an image inside a link, you should still use the Just Links option. When someone clicks the nested image, the event bubbles upwards to find the wrapping link and fires the trigger.
On the other hand, if you use the All Elements trigger, the click won't be fire the trigger as the clicked element is the image, not the wrapping link.
Wrapping Up
Now you understand that setting up click tracking is not that overwhelming as it may look at first.
Deciding between links and other elements is the crucial step here. That's the only step you can get confused. However, if you have a basic understanding of HTML tags, you can get this easily. When in doubt, use Chrome's inspection tool to see how the element is placed inside the page's HTML.
I hope the post was helpful. If I am unclear or wrong in some steps, let me know in the comments.