This article may contain affiliate links. If you buy some products using those links, I may receive monetary benefits. See affiliate disclosure here
One of the first things you should do after launching a website is to integrate an analytics system. In this post, you will learn how to do that using Google Analytics.
_Update: In October 2020, Google rolled out a new version of the Analytics platform, which is vastly improved from the previous version. Also, the way you create new properties has completely changed. So, parts of this article may not be relevant now. Hope I can update this article with the new information soon._
But before that, why you even need an analytics system?
Who doesn't want to know the no. of visitors on their site? So, an obvious benefit is knowing the basic metrics like page views and visitor counts.
But that's not all. An analytics tool helps to gain more advanced insights. For example, if you have a business website or an eCommerce store, then you can set up conversion tracking, click tracking, etc. All this feedbacks help to improve your site, thereby increasing the profits.
Here are some of the important data that you can track using Google Analytics:
- No. of Visitors - Know the no. of visits your site gets during a day, month, year, or any custom time period.
- Pageviews
- Real-time analytics - users currently viewing your site
- Page-wise metrics - find out the popular pages on your site that are driving more traffic than others
- Device types - from what devices people visit your site, such as mobile, desktop, and tablet.
- Visitor demographics & geography
- Percentage of new visitors vs. returning visitors
- Bounce rate
- Event analysis - button clicks, form submissions, product purchase etc.
- ...and much more
What is Google Analytics & How does it work?
An analytics tool generates useful graphs, reports, and statistics about your visitors' activity. Based on this information, you can develop strategies to improve your site and enhance the user experience.
For example, from the page reports, you can find pages with a high bounce rate. That means visitors don't find those pages interesting enough. So you can implement new things, like a redesign, or rewrite the content, to improve the pages.
Google Analytics is by far the best tool available today to do this job. Like many other Google products, it is also free to sign-up and use. It also offers a premium tool for enterprises. However, we will be looking only at the free version in this post.
Coming to the integration part, there are mainly two ways to add GA to a site:
- Simplest Method - Directly adding the gtag.js to your site code.
- Advanced - Adding via Google Tag manager - The first method is perfectly fine as far as your tracking needs are only basic. But as your needs evolve, you might want to add more features like event tracking or conversion tracking. If you do it manually, you have to modify HTML code each time you want to set up something. Instead, if you use Google Tag Manager, you can easily set up many of these things from a graphical user interface. It makes things much easier for marketers to manage their Google Analytics settings without depending on a developer.
Simplest Method to Set Up Google Analytics on a website
It is a four-step process:
- sign-up on Google Analytics
- create a property (that is, your website)
- add the tracking code in the HTML
- verify the code is working
Step 1 & 2: Sign Up for a Google Analytics Account & Create a Property
You can use your Google account to sign up on Google Analytics. So, after logging into the Google account, go to the analytics website, where you will be invited to a web page describing the three steps.
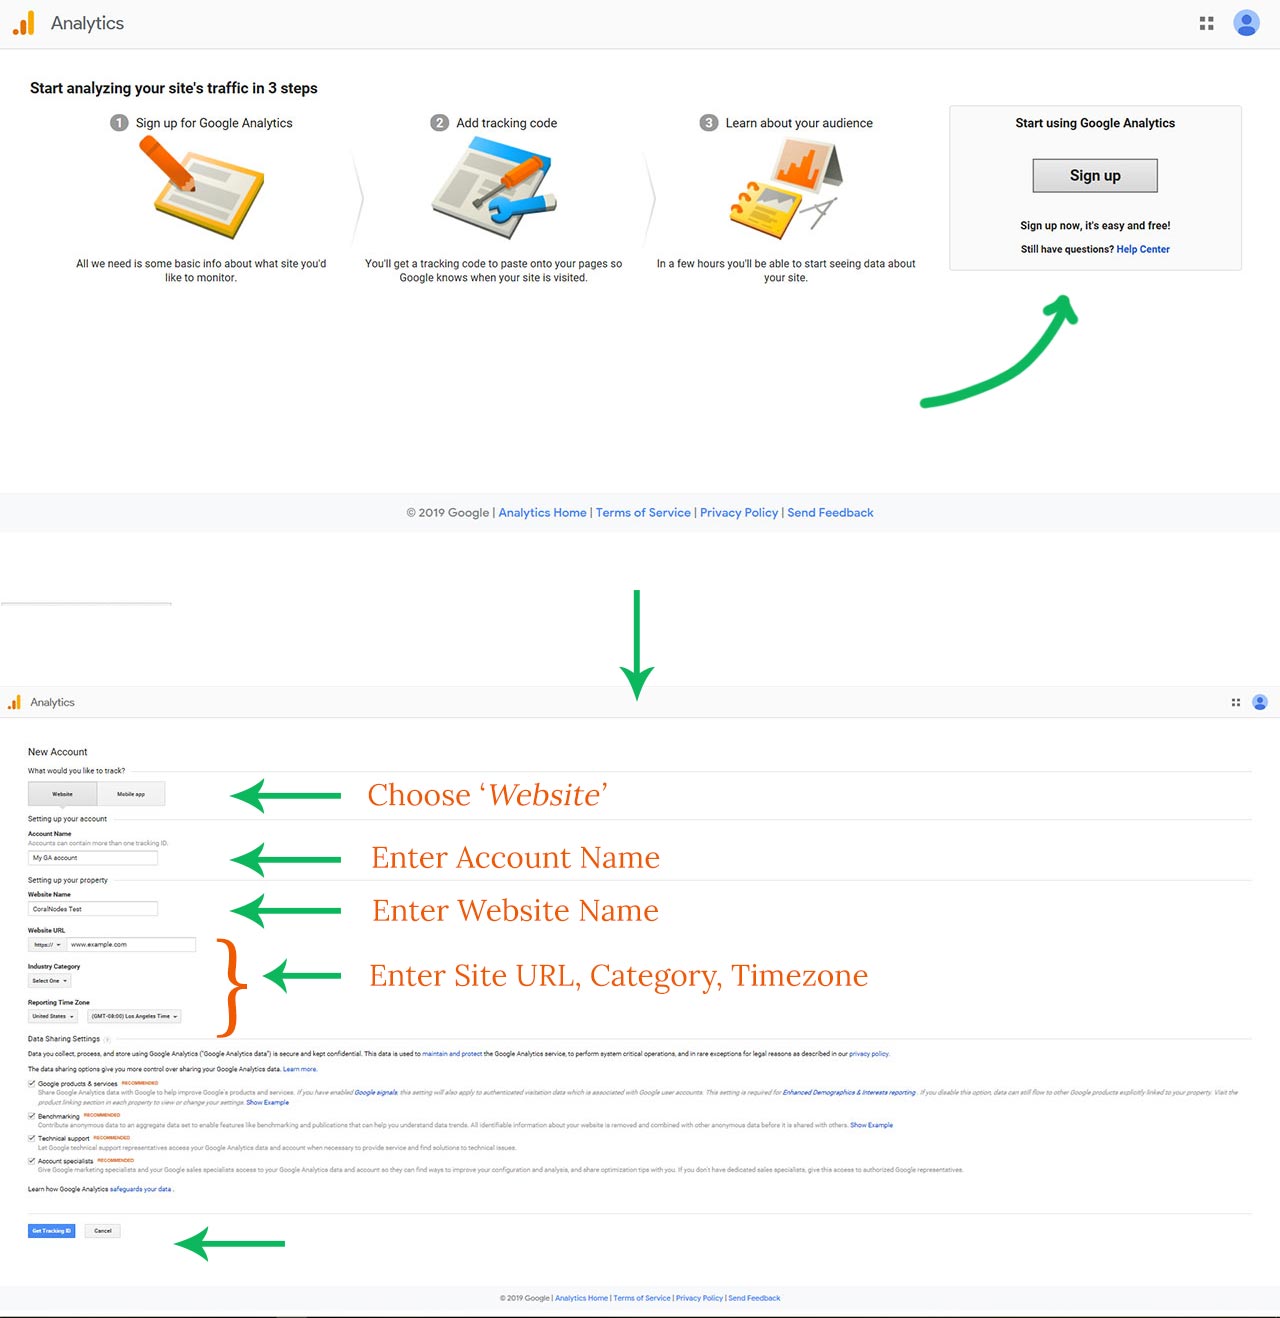
Now click on the Sign-Up button towards the right, which takes you to the registration page. Since we are looking to install GA on our website, select the website option. Ignore the Mobile App option for now.
In GA, you can add up to 100 websites or apps (properties) under one account. While registering for an account, you have to register a property along with it. Later you can add more.
Enter an appropriate name for your account (eg., your personal name or company name), website (usually the website title), and the URL of the home page. Also, select an appropriate category for your website, the country, and the timezone.
Below that, you have the option to choose how Google can use your analytics data. Uncheck them for better privacy. Otherwise, if you don't mind sharing the data, then keep them checked.
Finally, click the blue button which says - Get the tracking Id. You will probably get a popup asking you to accept the terms and conditions. Accept them and continue.
The registration part is now complete and you have arrived at the next page which displays the tracking code. It is called the Global Site Tag or simply gtag.js.
![]()
The code includes an Id that looks like UA-XXXXXXXXX-X, which is your unique tracking Id.
Step 2: Adding the Code to your site's HTML
Now the registration is complete. But still, your website - residing on another server - does not know that you have registered on Google Analytics. So we want to connect the two. For that, you have to add the code you got above to all the pages on your website, preferably just below the opening <head> tag.
<head>
    <!-- Global site tag (gtag.js) - Google Analytics -->
    <script async src="https://www.googletagmanager.com/gtag/js?id=UA-31952548-1"></script>
    <script>
        window.dataLayer = window.dataLayer || [];

        function gtag() {
            dataLayer.push(arguments);
        }
        gtag('js', new Date());

        gtag('config', 'UA-XXXXXXXX-X'); //Paste your tracking Id here
    </script>
    <meta charset="UTF-8">
    <meta name="viewport" content="width=device-width, initial-scale=1.0">
    <meta http-equiv="X-UA-Compatible" content="ie=edge">
    <title>Test Site</title>
</head>
If you are not confident in editing the HTML, ask a developer to do it for you. If you are using WordPress, there are plugins that make it easier. On this website, I am using the Insert Headers & Footers plugin, which allows adding the code from the WordPress admin.
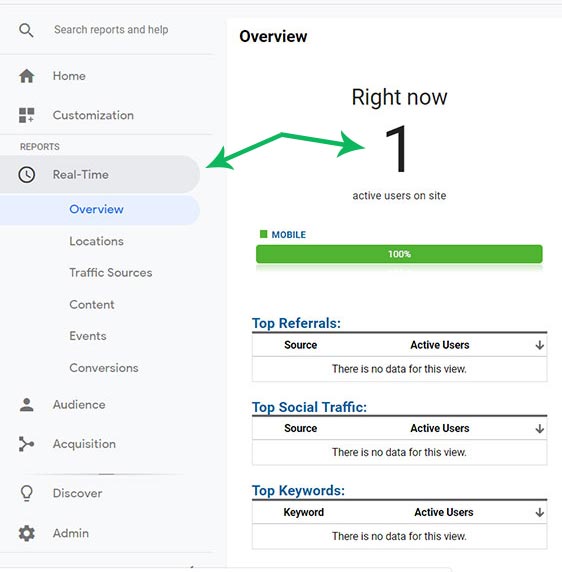
Step 3: Verify that the tracking is working
Lastly, we want to verify that Google Analytics is recording the visits correctly. For that, visit any random page on your website from any device. At the same time, check the Real-Time reports on the Analytics dashboard. If it appears there, then the tracking code is working.
Here I have made a visit from my mobile. Look at the green bar says - 1 active user from a mobile visiting the home page.
Going forward, you may not want to record your own visits. There are several methods to filter them out. One of the easiest is to use the Google Analytics opt-out extension on your browser. But remember, it blocks Google Analytics on all the websites you visit, not just yours.
Advanced Method: Using Google Tag Manager
In the introduction, I had mentioned that Tag Manager helps implementing several Google Analytics features without editing code. Not only that, you can also add other tools using Tag Manager's interface. The list of supported services include Hotjar and Facebook Pixel.
So in the long run, Tag Manager is beneficial for managing multiple things from a single dashboard provided by Google.
So these are the steps to integrate Google Analytics via Tag Manager:
- Signup and create a property in Analytics
- Create an account & a container in Tag Manager
- Create a container (container refers to the website you want to track)
- Add the tag manager code to your website (yes, you have to deal with the code, but only once)
- Set up a variable to store your GA tracking Id
- Add the built-in Google Analytics tag
- Preview & Hit the Publish Button
Step 1: Create an Analytics account
The process is already described in the previous method. Refer to it.
Step 2: Create a Tag Manager account
Head over to https://tagmanager.google.com. You can use the same Google Account to sign-up. On the next page, give a name for your Account. Similar to the account in GA, you can manage multiple websites under one account.

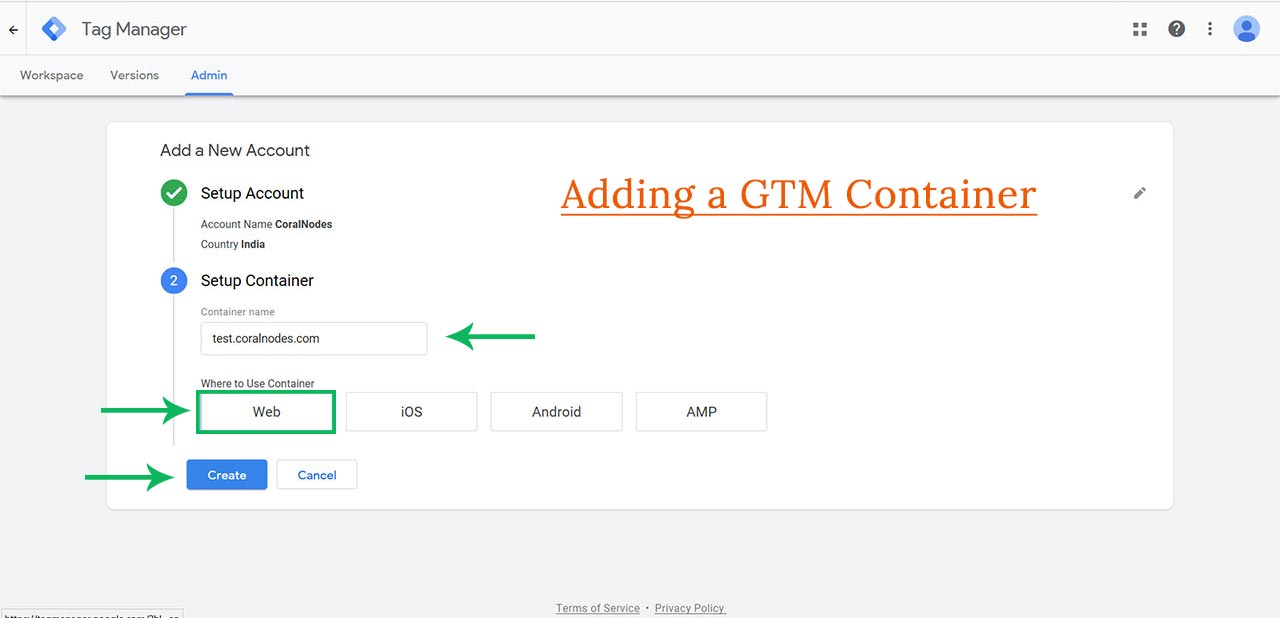
Step 3: Create a Container
Containers in Tag Manager are almost synonymous to properties in google analytics. Enter the URL of your website as the container name. Choose Web & click the Create button.
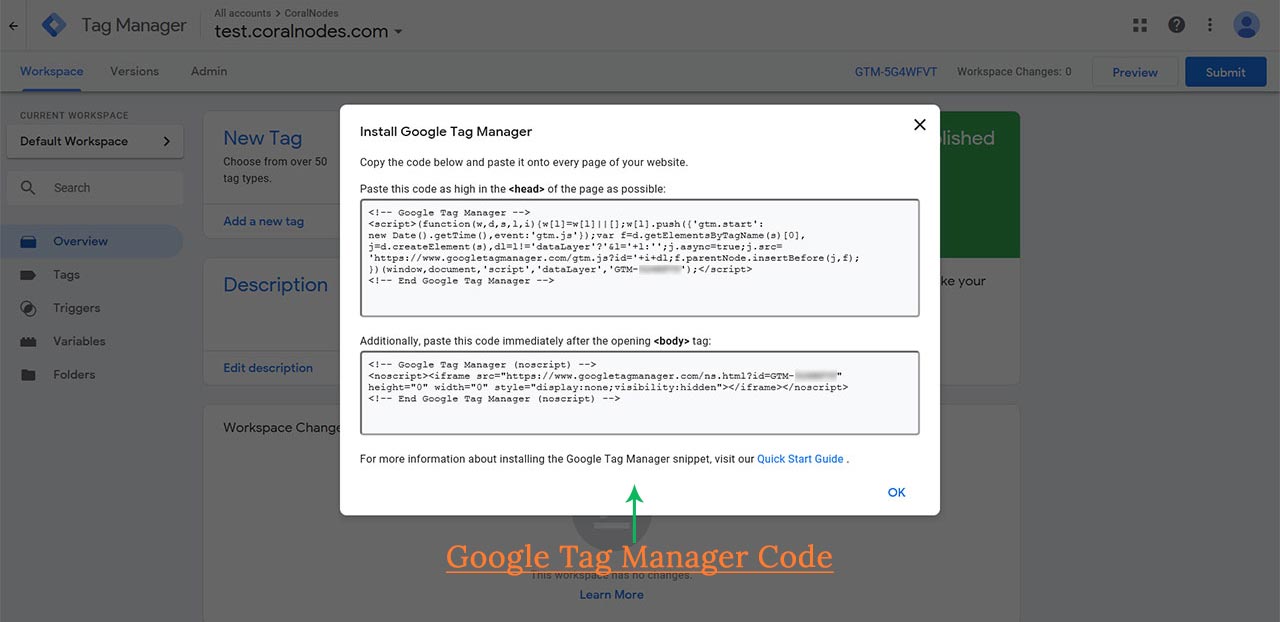
Step 4: Add the Tag Manager Code to the site
After creating the container, you get a popup box on the next page with the code you have to add to your site. Luckily for GTM, you have to do this once only. The GTM code takes care of all the other tags you add in the future.
<!doctype html>
<head>
    <!-- Google Tag Manager -->
        <script>(function(w,d,s,l,i){w[l]=w[l]||[];w[l].push({'gtm.start':
        new Date().getTime(),event:'gtm.js'});var f=d.getElementsByTagName(s)[0],
        j=d.createElement(s),dl=l!='dataLayer'?'&l='+l:'';j.async=true;j.src=
        'https://www.googletagmanager.com/gtm.js?id='+i+dl;f.parentNode.insertBefore(j,f);
        })(window,document,'script','dataLayer','GTM-XXXXXXX');</script>
        <!-- End Google Tag Manager -->

    <meta charset="UTF-8">
    <meta name="viewport" content="width=device-width, initial-scale=1.0">
    <meta http-equiv="X-UA-Compatible" content="ie=edge">
    <title>Test Site</title>
</head>
<body>
    <!-- Google Tag Manager (noscript) -->
    <noscript><iframe src="https://www.googletagmanager.com/ns.html?id=GTM-XXXXXXX"
    height="0" width="0" style="display:none;visibility:hidden"></iframe></noscript>
    <!-- End Google Tag Manager (noscript) -->

    <!--Rest of the Code goes here-->

</body>
</html>
Step 5: Set up a Variable in Tag Manager
Now let us connect the GA Property to GTM Container. For this, go to the Variables Section and create a new user-defined Variable. Choose Google Analytics Settings as the Variable Type.
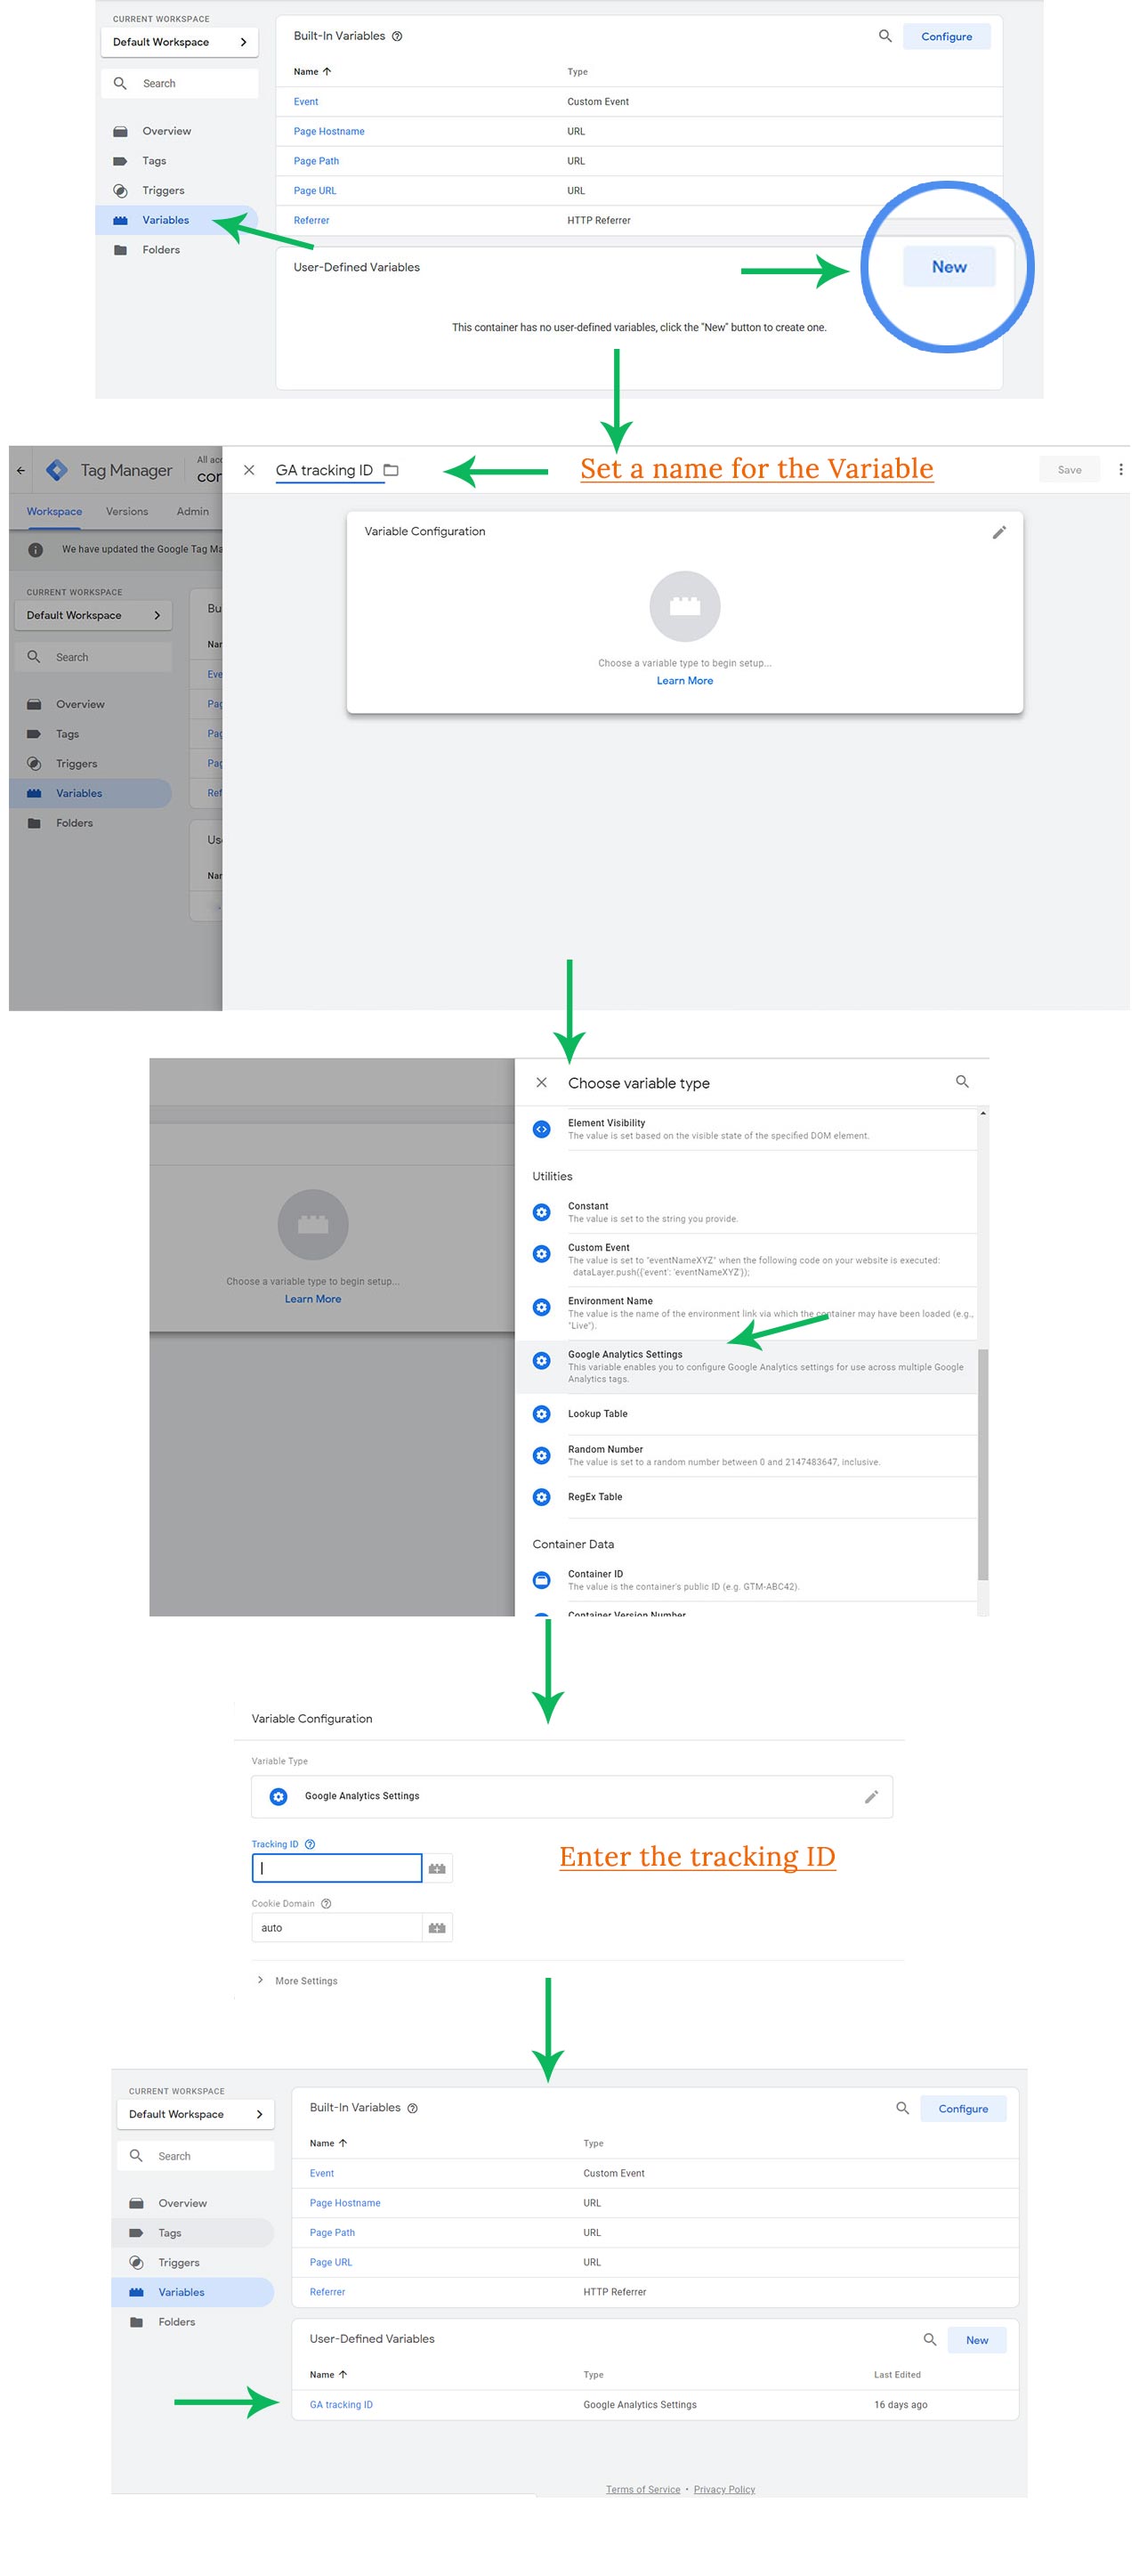
Fill the Tracking Id field with the tracking Id you created in the first step.
Also, give a name to the variable - GA tracking Id. Let us leave the other fields as it is and click Save.
The new variable is ready to use and it appears under user-defined variables.
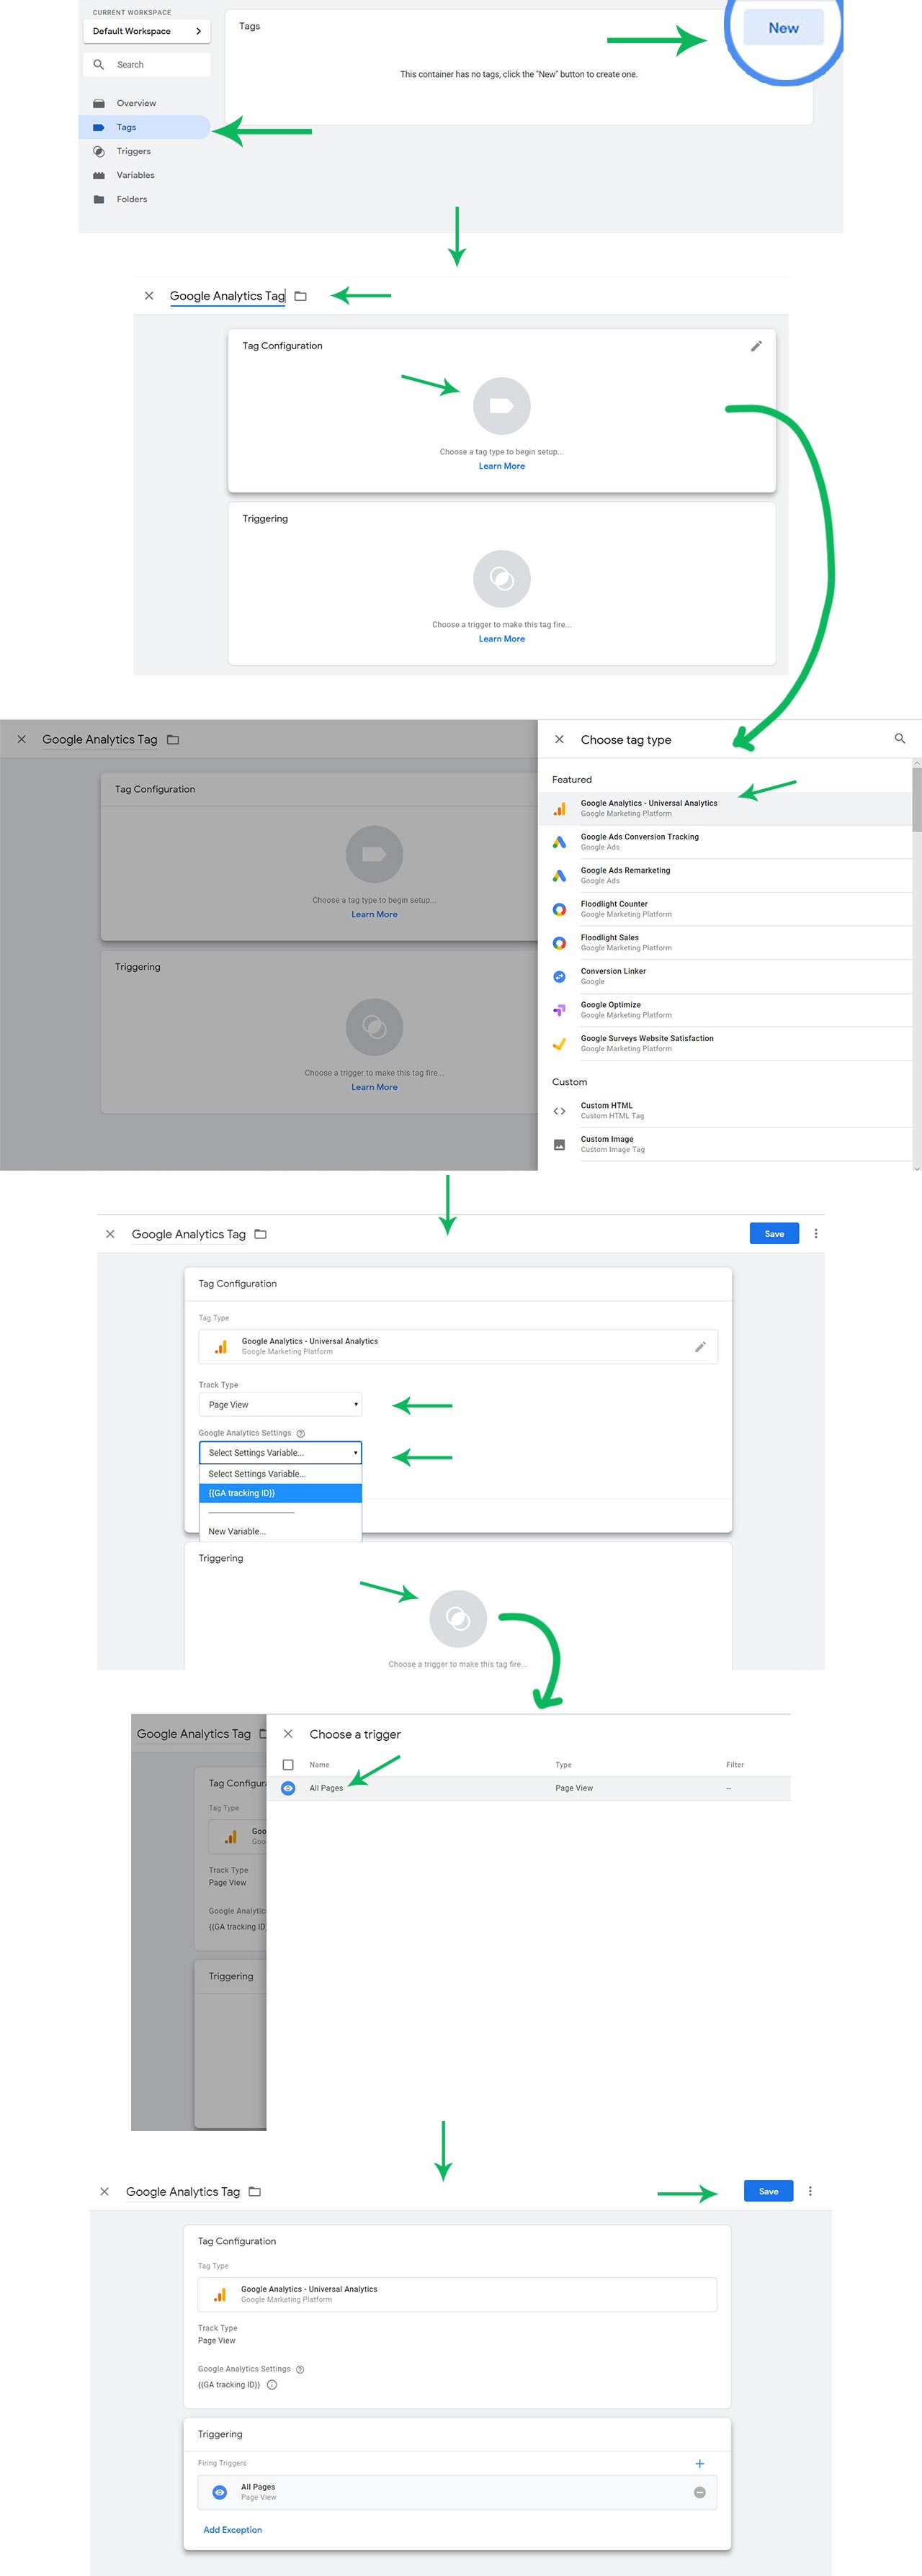
Step 6: Add the Google Analytics Tag
Navigate to the Tags section and click New. Select Google Analytics - Universal Analytics as the tag type. It is one of the integrations available in GTM right out of the box.
On the next section, under tag configuration, select the variable - GA tracking ID - we have created in the previous step.
Below that, set the trigger to All Pages. This tells GTM to load the GA tag for all page views.
Step 7: Preview & Submit the Changes
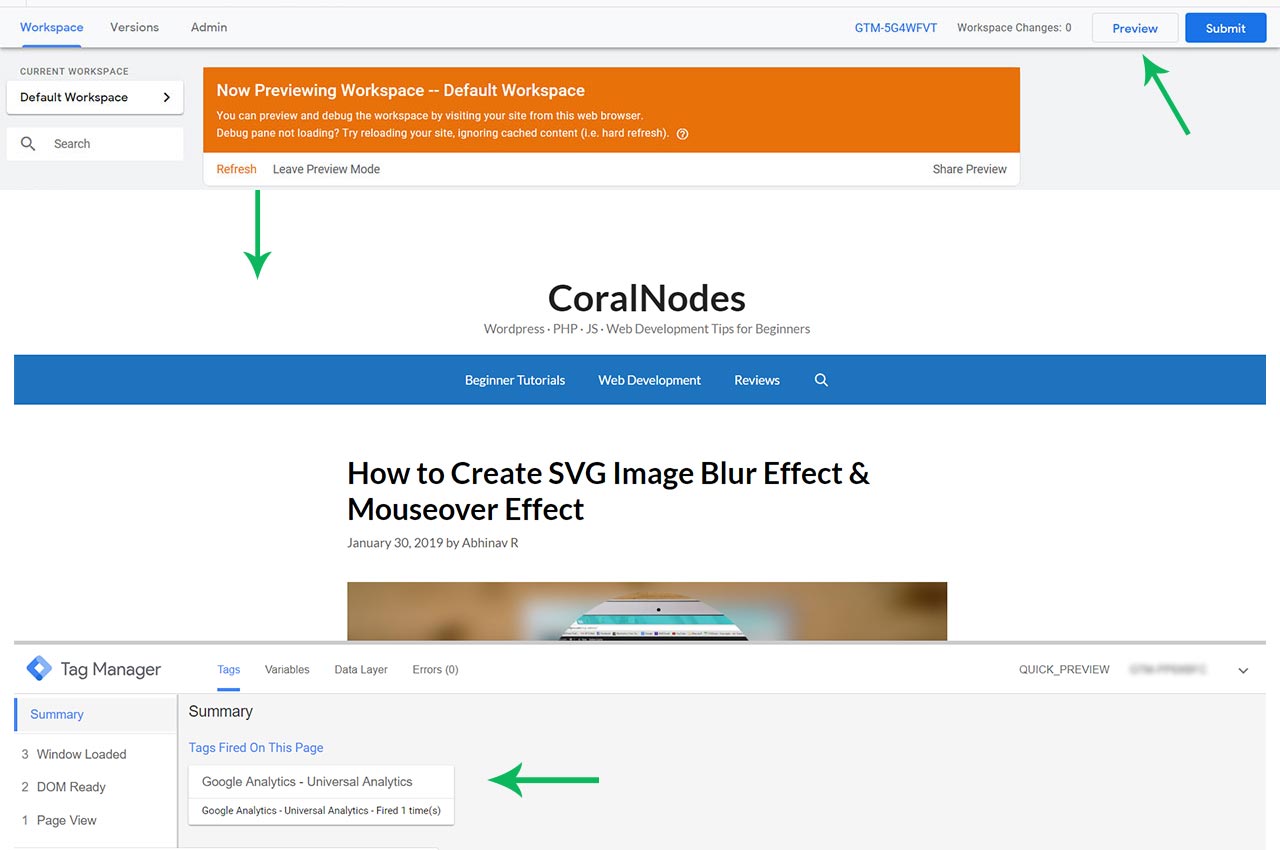
Before finalizing the changes you have made, GTM allows you to live preview the changes and verify them.
Click the Preview button to enable the Live Preview mode. Now if you visit your site on another browser tab, you can see a new console at the bottom.
If everything is done correctly, you should see the name of the Tag listed under Tags Fired On This Page section.
Now come back to the GTM dashboard and click Submit. It prompts you to give a version name. Give an appropriate name and a description of the changes we have made. Finally, hit the Publish button.
Now if you visit the site, you should see it in the Real-Time report section in your Google Analytics dashboard.
Conclusion
That's how you can set up Google Analytics on a website, be it WordPress or not. And we have also seen two methods to integrate it - either directly or using Tag Manager. Unless your marketing needs are quite minimum, choose the second method.